Panasonic DMR-ES40VS DMRES40 User Guide - Page 10
REMOTE CONTROL, Batteries and remote control - vhs dvd recorder
 |
View all Panasonic DMR-ES40VS manuals
Add to My Manuals
Save this manual to your list of manuals |
Page 10 highlights
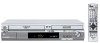
Getting started Remote control (28) (1) (2) (3) (4) (5) DVD/ VHS POWER TV POWER INPUT SELECT TV/ VIDEO CH VOLUME (27) VHS OPERATION SELECT DVD TRACKING/V-LOCK (26) AUDIO CANCEL/RESET VCR Plus+ CM SKIP SKIP/ INDEX SLOW/ REW SEARCH FF (25)(24) (23) (6) PLAY (7) DIRECT NAVIGATOR TOP MENU FUNCTIONS (22) (8) (9) (10) (11) (12) (13) (14) SUB MENU S RETURN TIME SLIP SCHEDULE DISPLAY STATUS JET REW REC REC MODE DVD ERASE ADD/DLT DUBBING VHS DVD A B CREATE CHAPTER VCR/TV (21) (20) (19) (18) (17) (16) (15) ∫ [VHS] and [DVD] button [DVD] ≥Before performing DVD operations, be sure to press the [DVD] button. Also, make sure the DVD indicator lights up on the unit. VHS CH DVD REC [VHS] ≥Before performing VHS operations, be sure to press the [VHS] button. Also, make sure the VHS indicator lights up on the unit. VHS CH DVD REC (1) Turn the unit on l 15 (2) Input select (IN1, IN2 or DV l 57 (3) Select drive (DVD or VHS l above (4) Select channels and title numbers etc./Enter numbers (5) Cancel/Reset the tape counter (6) Basic operations for recording and play (7) Show Top menu/Direct Navigator l 22, 33 (8) Selection/Enter, Frame-by-frame l 15, 21 (9) Show sub menu l 23, 33, 37 (10)Show scheduled recording list l 29, 51 (11)Show on-screen menu l 38 (12)Start recording l 24, 49, 57 (13)Change recording mode l 24, 49 (14)One touch transfer (dub) (" DVD, VHS l 55, 56 (15)Create chapters l 21 (16)Select VCR/TV l 19 (17)Erase items l 21 (18)Add/delete channel l 16 (19)Show status messages l 45, 53 (20)Skip the specified time/ Display the TV image as a picture-in-picture Jet rewind button (JET REW l 21, 26, 47 (21)Return to previous screen (22)Show FUNCTIONS window l 45, 52 (23)Skip a minute forward l 21 (24)Show VCR Plusi screen l 28, 50 (25)Select audio l 21, 25, 53 (26)Channel select/ TRACKING/V-LOCK l 48 (27)TV operations l 18, 25, 49 (28)Transmission window Note ≥Buttons such as the [¥, REC] button do not protrude as much as other buttons to stop them from being pressed accidentally. ≥The word "button" is not used in these operating instructions so "Press the [ENTER] button." is shown as "Press [ENTER]." ≥You can use this remote control to operate your TV if you set the TV manufacturer code (l 18). ∫ Batteries and remote control ∫ About batteries ≥Insert so the poles (i and j) match those in the remote control. ≥Do not use rechargeable type batteries. R6, AA, UM-3 ∫ How to use the remote control Aim at the sensor, avoiding obstacles, at a maximum range of 7 m (23 feet) directly in front of the unit. Remote control signal sensor Do not: ≥mix old and new batteries. ≥use different types at the same time. ≥heat or expose to flame. ≥take apart or short circuit. ≥attempt to recharge alkaline or manganese batteries. ≥use batteries if the covering has been peeled off. 20 20 30 30 7 m (23 feet) directly in front of the unit Mishandling of batteries can cause electrolyte leakage which can damage items the fluid contacts and may cause a fire. Remove if the remote control is not going to be used for a long period of time. Store in a cool, dark place. Note 10 ≥If you cannot operate the unit or TV using the remote control after changing the batteries, please re-enter the codes (l 18). Note ≥Keep the transmission window and the unit's sensor free from dust. ≥Operation can be affected by strong light sources, such as direct sunlight, inverter fluorescent lamps, and the glass doors on cabinets. VQT0R73
-
 1
1 -
2
-
3
-
4
-
 5
5 -
 6
6 -
 7
7 -
 8
8 -
 9
9 -
 10
10 -
 11
11 -
 12
12 -
 13
13 -
 14
14 -
 15
15 -
16
-
17
-
18
-
19
-
20
-
21
-
22
-
23
-
24
-
25
-
26
-
27
-
28
-
29
-
30
-
31
-
32
-
33
-
34
-
35
-
36
-
37
-
38
-
39
-
40
-
41
-
42
-
43
-
44
-
45
-
46
-
47
-
48
-
49
-
50
-
51
-
52
-
53
-
54
-
55
-
56
-
57
-
58
-
59
-
60
-
61
-
62
-
63
-
64
-
65
-
66
-
67
-
68
-
69
-
70
-
71
-
72
-
73
-
74
-
75
-
76
-
77
-
78
-
79
-
80
 |
 |
