Panasonic DMR-ES40VS DMRES40 User Guide - Page 50
Cautions For Using Scheduled Recording On Vhs, Scheduled Recording
 |
View all Panasonic DMR-ES40VS manuals
Add to My Manuals
Save this manual to your list of manuals |
Page 50 highlights
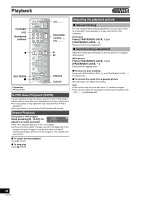
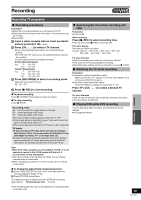
Recording VHS Í DVD/VHS POWER TV POWER INPUT SELECT TV/VIDEO CH VOLUME VHS Numbered buttons ∫ VHS OPERATION SELECT DVD TRACKING/V-LOCK AUDIO CANCEL/RESET VCR Plus+ CM SKIP SKIP/INDEX SLOW/ REW SEARCH FF PLAY DIRECT NAVIGATOR FUNCTIONS VCR Plusi 3, 4, 2, 1 ENTER SCHEDULE REC MODE TOP MENU SUB MENU S RETURN TIME SLIP SCHEDULE DISPLAY STATUS JET REW REC REC MODE DVD ERASE ADD/DLT COPYING CREATE CHAPTER VCR/TV VHS DVD Cautions for using scheduled recording on VHS ∫ Scheduled recording automatically starts at the set time. ≥Scheduled recording can be started only when the unit is turned off. About 1 minute before the scheduled recording starts, the unit switches on. When it finishes, the unit switches back off. If another program is also being played back, the unit does not switch back off. ∫ Scheduled recording cannot be activated on both DVD and VHS at the same time. Make sure the scheduled recording start times do not overlap on both DVD (l 29) and VHS (l 51) Scheduled Recording screens. When the scheduled recording settings overlap: ≥When the start time of both scheduled recordings is the same, the scheduled recording of the last one set has priority. Scheduled Recording You can enter up to 16 programs a month in advance. Preparation ≥Select the unit viewing channel (e.g. AV input) on the TV. ≥Check that the clock is set to the correct time. If it has not been set, set it (l 44). ≥Insert a video cassette with an intact accidental erasure prevention tab. (l 46) ≥Press [VHS]. ∫ Using VCR Plus_ system Entering the PlusCode® numbers is an easy way of scheduled recording. You can find these codes in TV listings in newspapers and magazines. ≥When connecting a cable TV box or satellite receiver, the VCR Plusi system does not work. Program the scheduled recording manually (l 51). [1] Press [VCR Plus_]. VCR Plus+ Remaining Recording Time VHS 1:43 SP DVD 1:43 SP 11/15 Tue 8:34 PM [2] Press the numbered buttons to enter the PlusCode number. ≥Press [2] to move back to correct a digit. [3] Press [ENTER]. SCHEDULED Remaining Recording Time RECORDING VHS 1:43 SP DVD 1:43 SP 11/15 Tue 8:34 PM Channel 39 Date 11/29 Tue On 10:00 PM Off 11:00 PM Drive Mode VHS SP Title Name Press ENTER to store new schedule ≥ Confirm the program and correct it if necessary using [3, 4, 2, 1]. ("Manual programming" l 51, step 2) ≥"Invalid Entry" is displayed when you enter the wrong PlusCode number. Reenter the PlusCode number. [4] If the program is correct Press [ENTER]. ≥Make sure that the scheduled recording has been programmed correctly on the SCHEDULED LIST screen (l 51). ≥Repeat steps 1-4 to program other recordings. [5] Press [SCHEDULE]. ≥The message "Turn recorder off for Scheduled Recording." is shown on the TV. [6] Press [Í, DVD/VHS POWER]. ≥Scheduled recording can be started only when the unit is turned off. ≥The unit turns off and " " lights on the unit's display to indicate scheduled recording standby has been activated. ∫ To release the unit from scheduled recording standby Press [Í, DVD/VHS POWER]. The unit turns on and " " goes out. ≥Be sure to press [Í, DVD/VHS POWER] to return the unit to standby mode before the scheduled recording time. Scheduled recording will work only if " " is displayed. ∫ To stop recording while a program is working [1] Press [VHS] [2] Press [∫, STOP], then [ENTER] within 5 seconds. ≥You can also press and hold [∫] on the main unit for 3 or more seconds to stop recording. Note Refer to Note in Manual programming (l 51). 50 VQT0R73
-
 1
1 -
2
-
3
-
4
-
5
-
6
-
7
-
8
-
9
-
10
-
11
-
12
-
13
-
14
-
15
-
16
-
17
-
18
-
19
-
20
-
21
-
22
-
23
-
24
-
25
-
26
-
27
-
28
-
29
-
30
-
31
-
32
-
33
-
34
-
35
-
36
-
37
-
38
-
39
-
40
-
41
-
42
-
43
-
44
-
 45
45 -
 46
46 -
 47
47 -
 48
48 -
 49
49 -
 50
50 -
 51
51 -
 52
52 -
 53
53 -
 54
54 -
 55
55 -
56
-
57
-
58
-
59
-
60
-
61
-
62
-
63
-
64
-
65
-
66
-
67
-
68
-
69
-
70
-
71
-
72
-
73
-
74
-
75
-
76
-
77
-
78
-
79
-
80
 |
 |
