Panasonic DMR-ES40VS DMRES40 User Guide - Page 11
MAIN UNIT, The unit's display - dvd recorder vcr
 |
View all Panasonic DMR-ES40VS manuals
Add to My Manuals
Save this manual to your list of manuals |
Page 11 highlights
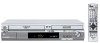
Getting started Getting started Main unit (1) (2) (3) POWER (4) (5) (6) (7) EJECT SKIP - DVD :/6 5/9 REW/FF - VHS VIDEO IN L/MONO- AUDIO IN - R S VIDEO IN IN2 OPEN/CLOSE VHS CH DVD REC /k1.3 OPERATION SELECT VHS DUBBING DVD DV IN DV IN (8) (9) (1) Remote control signal sensor/ DVD/VHS POWER on/off button (Í/I, POWER l 15 ≥To switch the unit from on to standby mode or vice versa. In the standby mode, the unit is still consuming a small amount of power. (2) Cassette eject button (
-
 1
1 -
2
-
3
-
4
-
5
-
 6
6 -
 7
7 -
 8
8 -
 9
9 -
 10
10 -
 11
11 -
 12
12 -
 13
13 -
 14
14 -
 15
15 -
 16
16 -
17
-
18
-
19
-
20
-
21
-
22
-
23
-
24
-
25
-
26
-
27
-
28
-
29
-
30
-
31
-
32
-
33
-
34
-
35
-
36
-
37
-
38
-
39
-
40
-
41
-
42
-
43
-
44
-
45
-
46
-
47
-
48
-
49
-
50
-
51
-
52
-
53
-
54
-
55
-
56
-
57
-
58
-
59
-
60
-
61
-
62
-
63
-
64
-
65
-
66
-
67
-
68
-
69
-
70
-
71
-
72
-
73
-
74
-
75
-
76
-
77
-
78
-
79
-
80
 |
 |

Getting started
11
VQT0R73
(1)
Remote control signal sensor/
DVD/VHS
POWER on/off button (
Í
/I, POWER) . . . . . . .
l
15
≥
To switch the unit from on to standby mode or vice versa.
In the standby mode, the unit is still consuming a small
amount of power.
(2)
Cassette eject button (
<
, EJECT) . . . . . . . . . . . . . . . . .
l
46
(3)
Cassette compartment
(4)
Disc tray open/close button (
<
, OPEN/CLOSE) . . . . . . .
l
8
(5)
Disc tray
(6)
DVD/VHS drive indicator
≥
Lights when the DVD or VHS drive is selected.
(7)
Operation select button
(8)
DVD–SKIP, VHS–REW/FF
buttons
(
:
/
6
,
5
/
9
). . . . . . . . . . . . . . . . . . . . . . . . . .
l
20, 47
(9)
IN2
input terminals (IN2) . . . . . . . . . . . . . . . . . . . . . . . . .
l
57
(10)
The unit’s display
(11)
Channel up/down buttons (CH,
W
,
X
) . . . . . . . . . . . . . . .
l
48
(12)
Stop button (
∫
) . . . . . . . . . . . . . . . . . . . . . . . . . . . . . .
l
20, 47
(13)
Play/
t
1.3
button (
1
/
t
1.3) . . . . . . . . . . . . . . . . . . . . .
l
20, 47
(14)
DV IN . . . . . . . . . . . . . . . . . . . . . . . . . . . . . . . . . . . . . . . . .
l
27
(15)
Recording button (
¥
, REC) . . . . . . . . . . . . . . . . . . . .
l
24, 49
(16)
One Touch Transfer (Dubbing) operation button
≥
From VHS
to DVD
. . . . . . . . . . . . . . . . . . . . . . . . . . . . . .
l
55
≥
From DVD
to
VHS. . . . . . . . . . . . . . . . . . . . . . . . . . . . . .
l
56
(1)
Recording indicator
≥
The recording indicator for the drive selected. When the power
is off, it doesn’t matter which drive is selected.
On:
During recording
Flashes:
During pause recording
(2)
TV indicator
≥
The indicator lights during the TV mode and it goes out during
the VCR mode. You can switch the mode by using [VCR/TV].
(
l
19)
(3)
Tape indicator
(4)
Progressive indicator
≥
The indicator lights during outputting in progressive.
(5)
Scheduled recording indicator (
)
(
l
28, 50)
≥
The scheduled recording indicator lights only when the unit’s
power is off.
On
:
When a scheduled recording program is registered and
recordable disc or tape is inserted.
Flashes:
The scheduled recording indicator flashes when the unit cannot
start (e.g. there is no disc, tape, etc.) the scheduled recording.
(6)
Main display
Digital Clock, Counter, etc.
(7)
Disc indicator
Main unit
EJECT
OPEN/CLOSE
VHS
DVD
VHS
DVD
POWER
CH
REC
OPERATION
SELECT
DUBBING
/
k
1.3
S VIDEO IN
VIDEO IN
SKIP
REW/FF
–
AUDIO IN
–
R
L/MONO
IN2
DVD
VHS
–
–
:
/
6
5
/
9
DV IN
DV IN
(1)
(8)
(9)
(2)
(3)
(4)
(5)
(11)
(10)
(12)
(13)
(14)
(15)
(16)
(6)
(7)
∫
Off Timer
The unit automatically switches to standby when it has not been
used for about 6 hours.
You can turn this feature off or change the time to 2 hours.
(
l
41, “Off Timer”)
∫
The unit’s display
TV
P
REC
Getting started