Panasonic DMR-ES40VS DMRES40 User Guide - Page 49
Recording TV programs, Recording procedures, Specifying the time when recording will
 |
View all Panasonic DMR-ES40VS manuals
Add to My Manuals
Save this manual to your list of manuals |
Page 49 highlights
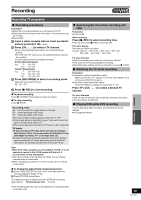
Recording VHS Recording TV programs ∫ Recording procedures Preparation ≥Select the unit viewing channel (e.g. AV input) on the TV. ≥Check that the clock is set to the correct time. If it has not been set, set it (l 44). ≥Press [VHS]. [1] Insert a video cassette with an intact accidental erasure prevention tab. (l 46) [2] Press [CH, W, X] to select a TV channel. ≥If you keep pressing these buttons, the channels change quickly. ≥For VHS, the "DV" channel can be selected however it cannot be recorded. To select channels with the numbered buttons: Antenna Mode (Airwaves) e.g., "5": [0] )[5] "15": [1] )[5] CableTV Mode (Cable) e.g., "5": [0] )[0] )[5] "15": [0] )[1] )[5] "115": [1] )[1] )[5] [3] Press [REC MODE] to select a recording mode. Each time you press the button: SP>EP>VP [4] Press [¥, REC] to start recording. ∫ To pause recording Press [;, PAUSE]. (Press again to restart recording.) ∫ To stop recording Press [∫, STOP]. Recording mode SP: You can record the length shown on the tape. EP: 3 times the length of SP mode. VP: 5 times the length of SP mode. ≥To have a longer recording capacity, select "EP" or "VP". ≥If the image quality is important to you or if you wish to store the tape for a long period, select "SP". ≥The unit can play tapes recorded in LP mode on other equipment. VP mode: ≥A tape recorded in VP mode by the unit cannot be played back by other VCRs. It is recommended to distinguish it from other tapes by writing "VP" on the tape label, etc. ≥It takes more time for automatic tracking to work when playing tapes recorded with VP mode, and it may not work at all with some tapes. Do tracking manually if this is the case (l 48). ∫ Specifying the time when recording will stop Preparation ≥Press [VHS]. While recording Press [¥, REC] to select recording time. ≥You can also press [¥, REC] on the main unit. The unit's display Each time you press the button: Counter (Cancel) # OFF 0:30 # OFF 1:00 # OFF 1:30 ^------ OFF 4:00 ! OFF 3:00 ! OFF 2:00 For your reference ≥When the recording time ends, the unit will turn off itself. ≥This does not work during scheduled recording. ≥Recording stops and the set time is cleared if you press [∫, STOP]. ∫ Watching the TV while recording Preparation ≥Connection (without Audio/Video cable) - Make sure that the "TV" indicator is lit on the unit's display. If it is not lit, press [VCR/TV] to light it. ≥Connection (with Audio/Video cable) - Press [TV/VIDEO] to change the input mode to "TV". Press TV's [CH, W, X] to select a desired TV channel. For your reference ≥You can also do this if the unit is making a scheduled recording. ≥The recording is not affected. ∫ Playing DVD while VHS recording You can play discs while recording. The recording will not be affected. ≥DVD playback (l 20) Playback Recording Note ≥Even if the video cassette you use is labeled "S-VHS", it is not possible to record in the S-VHS system with the unit. It records in the normal VHS system. ≥You cannot change channels while recording. You can change channels while in pause mode. ≥When recording is paused for 5 or more minutes, the unit returns to stop mode. ∫ To display the approximate remaining tape time [1] Select "TAPE SELECT" from the "VHS" menu and select the corresponding tape length. (l 52) [2] Press [STATUS] several times. The display changes as follows each time [STATUS] is pressed. Input channel ) Remaining tape time ) Counter The remaining tape time may not be displayed correctly depending on the tape used. 49 VQT0R73
-
 1
1 -
2
-
3
-
4
-
5
-
6
-
7
-
8
-
9
-
10
-
11
-
12
-
13
-
14
-
15
-
16
-
17
-
18
-
19
-
20
-
21
-
22
-
23
-
24
-
25
-
26
-
27
-
28
-
29
-
30
-
31
-
32
-
33
-
34
-
35
-
36
-
37
-
38
-
39
-
40
-
41
-
42
-
43
-
 44
44 -
 45
45 -
 46
46 -
 47
47 -
 48
48 -
 49
49 -
 50
50 -
 51
51 -
 52
52 -
 53
53 -
 54
54 -
55
-
56
-
57
-
58
-
59
-
60
-
61
-
62
-
63
-
64
-
65
-
66
-
67
-
68
-
69
-
70
-
71
-
72
-
73
-
74
-
75
-
76
-
77
-
78
-
79
-
80
 |
 |
