Panasonic KXWT126 KXWT125 User Guide
Panasonic KXWT126 Manual
 |
View all Panasonic KXWT126 manuals
Add to My Manuals
Save this manual to your list of manuals |
Panasonic KXWT126 manual content summary:
- Panasonic KXWT126 | KXWT125 User Guide - Page 1
Operating Instructions DECT 6.0 Portable Station Model No. KX-WT125/KX-WT126 Thank you for purchasing a Panasonic DECT 6.0 Portable Station. Please read this manual carefully before using this product and save this manual for future use. Please use only the batteries provided and charge the - Panasonic KXWT126 | KXWT125 User Guide - Page 2
Turning the Ringer off while Ringing 16 Changing the Vibrate Setting (KX‑WT126 only 17 Adjusting the Receiver/Speaker/Headset Volume 17 Display 18 Soft Keys 19 Operation Outline 20 Function 35 Making Use of the Voice Mail Service 40 Using the Handset Phonebook 42 Handset Phonebook 42 2 - Panasonic KXWT126 | KXWT125 User Guide - Page 3
Settings 56 Handset Setting Menu Layout 57 Memo Alarm Setting 65 Troubleshooting and Error Messages 68 Troubleshooting 68 Error Messages 72 Important Information 74 Battery Information 74 Important Safety Instructions 75 For Your Safety 75 For Best Performance 77 Security Information - Panasonic KXWT126 | KXWT125 User Guide - Page 4
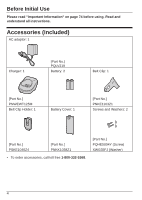
Before Initial Use Before Initial Use Please read "Important Information" on page 74 before using. Read and understand all instructions. Accessories (included) AC adaptor: 1 Charger: 1 [Part No.] PQLV219 Battery: 2 Belt Clip: 1 [Part No.] PNWEWT125M Belt Clip Holder: 1 Battery Cover: 1 [Part - Panasonic KXWT126 | KXWT125 User Guide - Page 5
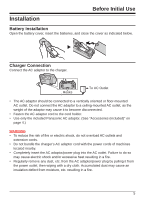
as the weight of the adaptor may cause it to become disconnected. • Fasten the AC adaptor cord to the cord holder. • Use only the included Panasonic AC adaptor. (See "Accessories (included)" on page 4.) WARNING • To reduce the risk of fire or electric shock, do not overload AC outlets and extension - Panasonic KXWT126 | KXWT125 User Guide - Page 6
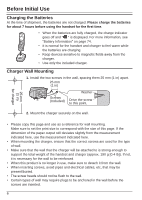
correct screws are used for the type of wall. • Make sure that the wall that the charger will be attached to is strong enough to support the total weight of the handset and charger (approx. 190 g [0.4 lb]). If not, it is necessary for the wall to be reinforced. • When this product - Panasonic KXWT126 | KXWT125 User Guide - Page 7
it clicks. [To remove] 1 Make sure to turn the handset 180° when you take it off. 2 Remove the belt clip. Note When you attach the phone strap to the handset with the belt clip attached, use the strap holes on the belt clip instead of the ones on the handset. 7 - Panasonic KXWT126 | KXWT125 User Guide - Page 8
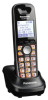
is an optional accessory. A Please use only a Panasonic headset below. KX‑TCA93/KX‑TCA94/ KX‑TCA95/KX‑TCA400/ KX‑TCA430 B C D F G H I [Back View] J K N Open the cover. E O L M A Ringer/Charge Indicator B TALK/SP-PHONE (Speakerphone) Key Used to make or answer calls, or toggle - Panasonic KXWT126 | KXWT125 User Guide - Page 9
page 61. L Microphone M Charge Contacts N Strap Holes Used to attach phone straps and similar items. O Speaker *1 You can talk with the party alternately through the speaker in a quiet room. During a conversation using a headset, Hands-free mode does not work. Note There is no POWER key on this - Panasonic KXWT126 | KXWT125 User Guide - Page 10
Alarm • If you set the handset on the charger during Silent Mode, the handset will not vibrate. *2 *1 The vibrate feature is available only for the KX‑WT126. *2 Please note that if you set the handset on the charger while receiving an incoming call, vibration will stop. Once the vibration stops, the - Panasonic KXWT126 | KXWT125 User Guide - Page 11
language of both the handset and PBX can be selected, and both should be set to the same language. For more information, refer to the user documentation for your PBX. 11 - Panasonic KXWT126 | KXWT125 User Guide - Page 12
Before Operating the Handset Editing the Standby Display Name You can edit the name displayed when the handset is in standby mode. Press the center soft key. Select "0:Setting". Press the center soft key. Select "Setting Handset". Press the center soft key. Select "Display Option". Press the - Panasonic KXWT126 | KXWT125 User Guide - Page 13
Before Operating the Handset Editing the Names of the Flexible CO Keys You can edit a name for each Flexible CO Key of the handset. Press the center soft key. Select "0:Setting". Press the center soft key. Select "Setting Handset". Press the center soft key. Select "Key Option". Press the - Panasonic KXWT126 | KXWT125 User Guide - Page 14
Before Operating the Handset Editing the Names of the Soft Keys for the Flexible CO Keys You can edit the name of the Soft Key for each Flexible CO Key of the handset. Press the center soft key. Select "0:Setting". Press the center soft key. Select "Setting Handset". Press the center soft key. - Panasonic KXWT126 | KXWT125 User Guide - Page 15
Before Operating the Handset Adjusting the Ringer Volume Press the center soft key. Select "0:Setting". Press the center soft key. Select "Setting Handset". Press the center soft key. Select "Incoming Option". Press the center soft key. Select "Ringer Volume". Press the center soft key. - Panasonic KXWT126 | KXWT125 User Guide - Page 16
the ring from the handset does not switch to the headset. If you attach the headset before receiving an incoming call, and headset ringer is set to "On", a tone will be heard from the headset. If Vibrate is set to on (KX‑WT126 only), the handset will vibrate whether a headset is attached or not. 16 - Panasonic KXWT126 | KXWT125 User Guide - Page 17
Before Operating the Handset Changing the Vibrate Setting (KX‑WT126 only) Press the center soft key. Select "0:Setting". on. (See page 10, 15.) Adjusting the Receiver/Speaker/Headset Volume During a conversation Press Up or Down to adjust the volume. (Receiver Volume-Level 1-4, Speaker - Panasonic KXWT126 | KXWT125 User Guide - Page 18
Before Operating the Handset Display A B C D E F A Pictograph Within range of a Cell Station (CS) Silent Mode (See page 10.) Out of range Navigation Key Guidance Intercom Indicator Battery Indicator *1 Off-hook Status Full Message Waiting Vibrate (See page 17.) Low Ringer Volume Off (See - Panasonic KXWT126 | KXWT125 User Guide - Page 19
Before Operating the Handset Soft Keys Icons and information shown on the display will vary depending on the context. To select an item shown on the display, press the corresponding soft key. Opens the Phonebook. Inserts a dialing pause. Stores a new item in the Phonebook. Opens the PBX System - Panasonic KXWT126 | KXWT125 User Guide - Page 20
Before Operating the Handset Operation Outline Handset functions are accessed through the display menu and selected with the Navigator Key and soft keys. [Phonebook]*1 [Intercom] [In standby mode] [Flexible CO Keys] [Function Keys]*2 [Redial List] [Incoming Log] [Outgoing Log] [Group Log] - Panasonic KXWT126 | KXWT125 User Guide - Page 21
Setting Handset mode or PBX Personal Programming mode. : Silent Turns Silent Mode on or off. : Volume Adjusts the ringer volume in standby mode, and adjusts the Receiver/Speaker/Headset volume during a conversation. • For PBX Personal Programming, refer to the user documentation for your PBX. 21 - Panasonic KXWT126 | KXWT125 User Guide - Page 22
Before Operating the Handset Shortcut Combinations Voice Clarity Phonebook Call Log Mute/Auto Answer Conference Message • For operation, see page 25. Fwd/DND Pause Memo Alarm Setting Silent Volume 22 - Panasonic KXWT126 | KXWT125 User Guide - Page 23
Before Operating the Handset Flexible CO Keys A Flexible CO Key can be used either to seize a line in order to make or receive an outside call (F-CO key), or used as a function key. Press the Navigator Key to display the Flexible CO Key list. Here you can access the 12 Flexible CO Keys. The key - Panasonic KXWT126 | KXWT125 User Guide - Page 24
Before Operating the Handset CO Status Display The status of the Flexible CO Keys is displayed on the LCD and on the soft keys. Displays the status of F-CO3 through F-CO8. Pressing the Navigator Key lets you select an F-CO line. The left and right soft keys display the status of F-CO1 and F-CO2. - Panasonic KXWT126 | KXWT125 User Guide - Page 25
Access Numbers OR CO Line Group No. -- Using Flexible CO Keys idle CO Key No. [0-9, , #] OR (idle CO Key) Outside Phone No. Outside Phone No. -- Using Soft Keys Outside Phone No. Using Hot Key Dial *1 Press the dialing key assigned as a Hot Key for more than 1 second. Using the Outgoing Call - Panasonic KXWT126 | KXWT125 User Guide - Page 26
". center soft key. Select the type of phonebook: PBX, EXT, Handset(H/S). Enter name.*4 OR (if required) To store One-touch Dialing Select "0: Setting". Select "PBX Program". (Flexible CO Key) Desired No. To dial (One-touch dialing key) To store Hot Line Desired - Panasonic KXWT126 | KXWT125 User Guide - Page 27
cancel To answer from an idle extension While hearing a callback ring To answer from an idle CO line While hearing a callback ring Outside Phone No. *1 To assign a phone number to a Hot Key, see page 49. *2 When a call is made using the PBX System Phonebook, the called party's name is not stored - Panasonic KXWT126 | KXWT125 User Guide - Page 28
for more than 1 second. • If an outside call is received from a phone number stored in the Handset Phonebook, the number and name of the caller will to the CS and dial again. • For more information, refer to the user documentation for your PBX. Searching for an item stored in the Phonebook You can - Panasonic KXWT126 | KXWT125 User Guide - Page 29
Searching by name or first character(s) of name Operation Press Up. OR Press the center soft key. Select "2: Press the Phonebook". center soft key. Select the type of phonebook: PBX, EXT, Handset(H/S). Press the center soft key. Enter name or the first character(s) of the desired name. OR - Panasonic KXWT126 | KXWT125 User Guide - Page 30
Operation Searching by category - Handset Phonebook only Press Up. OR Press the Select "2: Press the center soft Phonebook". center soft key. key. Select "H/S Phonebook". Press the center soft key. Press #. Select the desired category number. Press the center soft key. Enter name.*1 OR - Panasonic KXWT126 | KXWT125 User Guide - Page 31
Receiving Calls An Intercom Call Receiving An Outside Call/A Group Call An Outside Call on a specific line -- Using Flexible CO Keys rapidly flashing Flexible CO Key [0-9, , #] OR (rapidly flashing Flexible CO Key) -- Using Soft Keys Operation Directed Group Call Pickup Extension No. Group No. - Panasonic KXWT126 | KXWT125 User Guide - Page 32
select the ringer and vibrate pattern for each type of incoming call. (See "Incoming Option" on page 59.) • For more information, refer to the user documentation for your PBX. Caller ID If an outside call that contains Caller ID information (a caller's name and telephone number) is received, this - Panasonic KXWT126 | KXWT125 User Guide - Page 33
During a Conversation Transferring a Call To an extension *1 Extension No. To an outside party Operation *1 OR Outside Phone No. CO Line Group No. To hold (Regular Hold) *2 To hold (Exclusive Call Hold) *2 *2 To retrieve a call -- An Intercom Call Holding -- An Outside Call using - Panasonic KXWT126 | KXWT125 User Guide - Page 34
conversation Select "5: Conference". (Talk to the new party.) (Talk with multiple parties.) Desired Phone No. Select "5: Conference". To leave a conference Press the Select "5: center soft key. ) as necessary beforehand. • For more information, refer to the user documentation for your PBX. 34 - Panasonic KXWT126 | KXWT125 User Guide - Page 35
All Calls Busy No answer Busy/No answer Cancel Follow Me Follow Me Cancel Destination Extension No. OR CO Line Access No. Outside Phone No. Your Extension No. Do Not Disturb Both Calls Outside Calls Intercom Calls Set Cancel Sending a Call Waiting Tone *1 While hearing a busy tone - Panasonic KXWT126 | KXWT125 User Guide - Page 36
Operation Call Waiting To set/cancel for outside calls No Tone Tone To talk to the new party (While hearing the Call Waiting tone) -- To terminate the current status -- To hold and then talk to the new party rapidly flashing Flexible CO Key [0-9, , #] OR (rapidly flashing Flexible CO Key) OR - Panasonic KXWT126 | KXWT125 User Guide - Page 37
To set Absent Message Operation Will Return Soon *2 Gone Home At Ext %%%% + Extension No. Back at %%:%% + Hour:Minute Out until %%/%% + Month/Day In a Meeting To cancel Enter required no. For Log-in For Log-out Log-in/Log-out Specified ICD Group* Extension No. All * ICD Group: Incoming - Panasonic KXWT126 | KXWT125 User Guide - Page 38
Operation To unlock Extension Dial Lock *3 Extension PIN* (max. 10 digits) * PIN: Personal Identification Number Message Waiting Caller -- To leave a message waiting indication When the called extension is busy or does not answer Select "6: Message". OR -- To cancel a message waiting indication - Panasonic KXWT126 | KXWT125 User Guide - Page 39
cannot lock and unlock your extension. For more information, refer to the user documentation for your PBX. *4 You can register a Flexible CO Key to To register Select "0: Setting". (Flexible CO key) Select "PBX Program". Your Extension No. To clear message waiting indications (one-touch operation - Panasonic KXWT126 | KXWT125 User Guide - Page 40
Operation Making Use of the Voice Mail Service Listening to a Message From your own extension VPS* Extension No. Mailbox Password*1 + • If you have no password, you can skip the last step. * VPS: Voice - Panasonic KXWT126 | KXWT125 User Guide - Page 41
the delivery time Follow the guidance Repeat Voice Guidance During Playback Exit Menu *1 For more information on the Mailbox Password, refer to the user documentation for the VPS. • Some feature access numbers may vary depending on the market. Please consult your local dealer for details. 41 - Panasonic KXWT126 | KXWT125 User Guide - Page 42
of 9 Private Ring Categories. It is possible to set a different ringer/vibrate pattern *1 for each category. When the displayed Caller ID *2 matches a phone number or name stored in the Phonebook, the handset rings according to the Private Ring Category settings. *1 For ringer/vibrate patterns, see - Panasonic KXWT126 | KXWT125 User Guide - Page 43
. Select "New Phonebook". Enter name. (max. 16 characters) Press the center soft key. OR Press the Press center soft Up or Down. key. Enter phone number. (max. 32 digits) Press the center soft key. Select the desired category number (1-9) or "Off". Press the center soft key. Press the - Panasonic KXWT126 | KXWT125 User Guide - Page 44
. key. Select "Edit". Press the center soft key. Edit name. (max. 16 characters) OR Press the Press center soft Up or Down. key. Edit phone number. (max. 32 digits) Press the center soft key. Select the desired category number (1-9) or "Off". Press the center soft key. Press the center - Panasonic KXWT126 | KXWT125 User Guide - Page 45
for more than 1 second. • To move the cursor to the left or right, press the Navigator Key respectively. or , Storing an Item Using Predialing Enter phone number. (max. 32 digits) Press the center soft key. Enter name. (max. 16 characters) OR Press the Press center soft Up or Down. key - Panasonic KXWT126 | KXWT125 User Guide - Page 46
. Press the right soft key. Select the desired item. Press the Select "Save center soft Phonebook". key. Press the center soft key. Enter a name, phone number, and select the category number (1-9) or "Off".*1 Press the center soft key for "Save". *1 Press (the center soft key) to confirm each - Panasonic KXWT126 | KXWT125 User Guide - Page 47
Up or Down. Select the desired item. (if required) Press the center soft key. Select "Save Phonebook". Press the center soft key. Enter a name, phone number, and select the category number (1-9) or "Off".*2 Press the center soft key for "Save". *1 This step can be omitted. *2 Press (the center - Panasonic KXWT126 | KXWT125 User Guide - Page 48
Using the Handset Phonebook Editing Category Names You can edit the names of the categories in the Handset Phonebook. Press the center soft key. Select Press the "0:Setting". center soft key. Select "Setting Handset". Press the center soft key. Press the center soft key. Select "Display - Panasonic KXWT126 | KXWT125 User Guide - Page 49
Using the Handset Phonebook Assigning Hot Keys You can assign a phone number stored in the Handset Phonebook to a key to be used as a Hot Key. Press Up. Select Press the "H/S center soft Phonebook". key. Enter name.*1 - Panasonic KXWT126 | KXWT125 User Guide - Page 50
Using the Handset Phonebook Entering Characters You can enter characters and digits using the dialing keys. You can select one of 3 character modes by pressing the Right Soft Key while entering a name. The function icon above the soft key displays the current character mode. For available - Panasonic KXWT126 | KXWT125 User Guide - Page 51
Using the Handset Phonebook Character Mode Table Keys ABC (Alphabetic) 0-9 (Numeric) +ÀÂ (Extended) 1 2 3 4 5 6 7 8 9 0 • Press before or after entering a character to change between uppercase and lowercase. • Pressing a key repeatedly will cycle through the characters associated with that - Panasonic KXWT126 | KXWT125 User Guide - Page 52
Using the Handset Phonebook Locking the Handset Phonebook You can lock/unlock the Phonebook while the handset is in standby mode. If no password has been set, you cannot lock the Phonebook. Locking/Unlocking the Handset Phonebook Press the center soft key. Select Press the "0:Setting". center - Panasonic KXWT126 | KXWT125 User Guide - Page 53
Deleting Stored Items Deleting Stored Items Deleting Stored Items in Handset Phonebook/Hot Key Dial/Outgoing Call Log/Incoming Call Log Handset Phonebook Press Up. OR Press the Select "2: Press the center soft Phonebook". center soft key. key. Select "H/S Press the Phonebook". center soft key. - Panasonic KXWT126 | KXWT125 User Guide - Page 54
Deleting Stored Items Hot Key Dial Press the dialing key for more than 1 second. Select the desired item. Press the center soft key. Select "Delete".*1 Press the center soft key. Select "Yes". Press the center soft key. *1 Select "Delete All" if you want to delete all items. • If you delete - Panasonic KXWT126 | KXWT125 User Guide - Page 55
Incoming Call Log Deleting Stored Items Press Down. Press the right soft key. Select the desired item. Press the center soft key. Select "Delete". Press the center soft key. Select "Yes". Press the center soft key. 55 - Panasonic KXWT126 | KXWT125 User Guide - Page 56
Configuring Handset Settings Configuring Handset Settings Changing the Initial Settings You can customize the handset by editing the settings found under "Setting Handset" in the menu list, as follows: Press the center soft key. Select "0:Setting". Press the center soft key. Select "Setting - Panasonic KXWT126 | KXWT125 User Guide - Page 57
[Main Item] [Sub Item] Setting Handset Incoming Option Ringer Volume Ringer Type Vibrate (KX‑WT126 only) Ring On Charger Memo Alarm Headset Ringer Talk Option Speaker Volume Receiver Volume Headset Volume Headset Mic Vol Talk On Charger Answer Option Any Key Answer Quick Answer Auto - Panasonic KXWT126 | KXWT125 User Guide - Page 58
Configuring Handset Settings Tone Option System Option Other Option Key Tone Range Alarm Register H/S Cancel Base Select Base System Lock Change PIN ChangePassword Line Access CD Reset Handset Phonebook Lock 58 - Panasonic KXWT126 | KXWT125 User Guide - Page 59
Ring (Category 1-9) Ringer Pattern *3 Selects the ringer pattern for each type of call. Vib. Pattern (KX‑WT126 only) Selects the vibrate pattern for each type of call. Vibrate (KX‑WT126 only) Selects whether the handset vibrates while receiving a call. Ring On Charger Selects the ringing mode - Panasonic KXWT126 | KXWT125 User Guide - Page 60
Ringer Pattern Selects the ringer pattern for each Memo Alarm. Vib. Pattern (KX‑WT126 only) Selects the vibrate pattern for each Memo Alarm. Selects whether a tone is heard from the attached headset while receiving a call. Setting • Bell 1-5 • Melody 1-3 • Single • Double • Triple • Short Double - Panasonic KXWT126 | KXWT125 User Guide - Page 61
Mic Vol Talk On Charger Description Adjusts the headset microphone volume. Selects whether or not to continue Auto Ans Delay Description Setting Answers a call by pressing any dialing key. Answers a call while the phone is charging by just lifting up a handset from the charger. • On • Off • On - Panasonic KXWT126 | KXWT125 User Guide - Page 62
Configuring Handset Settings Sub Item HOLD/XFER Key Description Selects the function of the HOLD/TRANSFER Key. Setting • Hold • Transfer Default Hold Display Option Sub Item Language Backlight LCD Contrast Standby Display Category Name Date&Time Form Description Setting Selects the display - Panasonic KXWT126 | KXWT125 User Guide - Page 63
Configuring Handset Settings Sub Item Caller ID Disp CO Status Disp Description Selects which caller information is displayed when a call is received. Either the information stored in the Handset Phonebook or the PBX can be displayed. Selects whether the CO status is shown on the display. Setting - Panasonic KXWT126 | KXWT125 User Guide - Page 64
Configuring Handset Settings Sub Item Description Setting System Lock Change PIN Selects whether to lock the System Option setting or not. Before registering your handset with a PBX, enter the PBX's PIN here. Once you have registered the handset with a PBX, this PIN can be changed so that the - Panasonic KXWT126 | KXWT125 User Guide - Page 65
Configuring Handset Settings Sub Item Description Setting Default Reset Handset Returns the handset settings to its default settings. Enter Password. (4 digits) ↓ Select the desired item(s). Not selected ↓ Press "OK". Phonebook Locks/unlocks the • On Lock Phonebook while the handset - Panasonic KXWT126 | KXWT125 User Guide - Page 66
Option" on page 62.) *2 A " " will be displayed next to the day of the week that has been set. • You can select the ring or vibrate (KX‑WT126 only) pattern for each Memo Alarm. (See "Incoming Option" on page 59.) • If you are on a call at the time that the alarm is set - Panasonic KXWT126 | KXWT125 User Guide - Page 67
Configuring Handset Settings To delete the alarm mode setting Press the center soft key. Select "9:Memo Alarm". Press the center soft key. Select the alarm number. (1-3) Press the right Select "Yes". soft key. Press the center soft key. To stop the alarm OR Press the center soft key. Press - Panasonic KXWT126 | KXWT125 User Guide - Page 68
and Error Messages Troubleshooting and Error Messages Troubleshooting Problem The handset does not work. The handset does not ring. You cannot make/receive a call. You cannot dial. Possible Cause Solution The batteries are drained. - Panasonic KXWT126 | KXWT125 User Guide - Page 69
Troubleshooting and Error Messages Problem Possible Cause Solution The handset stops working during operation. You cannot use the handset during a power failure. The headset does not work. The handset will not function during a power failure because the PBX stops emitting radiowaves. A headset - Panasonic KXWT126 | KXWT125 User Guide - Page 70
Troubleshooting and Error Messages Problem Possible Cause Solution "No Service" is displayed, and beep tones are heard. The handset is out of range. The CS or PBX is out of service • The software version of the PBX/CS/card does not support this feature. • The "CO Status Display in Standby" - Panasonic KXWT126 | KXWT125 User Guide - Page 71
Troubleshooting and Error Messages Problem Possible Cause Solution • The CO Status Display is displayed as "-" in is not displayed on the soft keys. • The software version of the PBX/CS/card does not support this feature. • The "CO Status Display in Standby" setting on the PBX is not enabled. • - Panasonic KXWT126 | KXWT125 User Guide - Page 72
Troubleshooting and Error Messages Problem Possible Cause The handset does not operate according Option" on page 59.) • Consult your dealer. Error Messages Error Message Register Unit No Service PS Not Connected CS Busy Please Wait... Possible Cause The handset has been canceled or the - Panasonic KXWT126 | KXWT125 User Guide - Page 73
Troubleshooting and Error Messages Error Message Charge Battery Use Rechargeable Battery No Entries Memory Full Incorrect Entry Need Repair 1(-2) Possible Cause Solution The handset batteries have - Panasonic KXWT126 | KXWT125 User Guide - Page 74
alarm sounds. Replacing the Batteries If " " flashes after using the phone for a short time, even when the batteries have been fully charged, strength icon will then display the correct reading. • Please use Panasonic batteries with the service part number HHR-65AAAB only. • There is a danger of - Panasonic KXWT126 | KXWT125 User Guide - Page 75
batteries. SAVE THESE INSTRUCTIONS For Your Safety WARNING • Do not install the product in any other way than described in relevant manuals. • For safety reasons shock, do not disassemble this product. Only qualified personnel should service this product. Opening or removing covers may expose you to - Panasonic KXWT126 | KXWT125 User Guide - Page 76
sound volume through earphones, headphones, or headsets may cause hearing loss. • Remove has stopped and contact an authorized service center. • The batteries pose a manual. • Do not dispose of the batteries in a fire. They may explode. Check with local authorities for special disposal instructions - Panasonic KXWT126 | KXWT125 User Guide - Page 77
Important Information • Do not place metal items such as coins or rings on the charger. As they become hot, you might get burnt if you touch them. • When you leave the product unused for a long period of time, unplug the AC adaptor from the outlet. • The AC adaptor is used as the main disconnect - Panasonic KXWT126 | KXWT125 User Guide - Page 78
has been deregistered, erase the call log before your phone is deregistered. For information about deregistering the handset, and operated in accordance with provided instructions. For handset body-worn operation, ) spacing from the user's body. This transmitter must not be co-located - Panasonic KXWT126 | KXWT125 User Guide - Page 79
and used in accordance with the instructions, may cause harmful interference to radio by turning the equipment off and on, the user is encouraged to try to correct the interference by interference that may cause undesired operation. WHEN PROGRAMMING EMERGENCY NUMBERS AND/OR MAKING TEST CALLS - Panasonic KXWT126 | KXWT125 User Guide - Page 80
Important Information If trouble is experienced with this equipment, for repair or warranty information, please contact: Panasonic Service and Technology Company- occurs, use an optional headset accessory or the speakerphone option (if applicable) when using this phone. Consult your audiologist or - Panasonic KXWT126 | KXWT125 User Guide - Page 81
Important Information Product Service Panasonic Factory Service Centers for this product are listed in the service center directory. Consult your certified Panasonic dealer for detailed instructions. Keep a copy of all important data (such as your Phonebook) before sending the machine for repair. 81 - Panasonic KXWT126 | KXWT125 User Guide - Page 82
Important Information 82 - Panasonic KXWT126 | KXWT125 User Guide - Page 83
Important Information 83 - Panasonic KXWT126 | KXWT125 User Guide - Page 84
For your future reference SERIAL NO. (found inside the battery compartment) DATE OF PURCHASE NAME OF DEALER DEALER'S ADDRESS DEALER'S TEL. NO. One Panasonic Way, Secaucus, New Jersey 07094 http://www.panasonic.com/csd © Panasonic System Networks Co., Ltd. 2010 PNQX3097ZA-RF KK1010MH0 (ver 0.006)
-
 1
1 -
 2
2 -
 3
3 -
 4
4 -
 5
5 -
 6
6 -
 7
7 -
8
-
9
-
10
-
11
-
12
-
13
-
14
-
15
-
16
-
17
-
18
-
19
-
20
-
21
-
22
-
23
-
24
-
25
-
26
-
27
-
28
-
29
-
30
-
31
-
32
-
33
-
34
-
35
-
36
-
37
-
38
-
39
-
40
-
41
-
42
-
43
-
44
-
45
-
46
-
47
-
48
-
49
-
50
-
51
-
52
-
53
-
54
-
55
-
56
-
57
-
58
-
59
-
60
-
61
-
62
-
63
-
64
-
65
-
66
-
67
-
68
-
69
-
70
-
71
-
72
-
73
-
74
-
75
-
76
-
77
-
78
-
79
-
80
-
81
-
82
-
83
-
84
 |
 |
Model No.
KX-WT125/KX-WT126
Operating Instructions
DECT 6.0 Portable Station
Thank you for purchasing a Panasonic DECT 6.0 Portable
Station.
Please read this manual carefully before using this
product and save this manual for future use.
Please use only the batteries provided and charge the
batteries for about 7 hours before using the handset for
the first time.
Document Version 2010-10