Panasonic WJRT416V WJRT416V User Guide - Page 12
Internal CD/DVD drive Only for the WJ-RT416V, Play/Pause button PLAY/PAUSE - wj rt416v manual
 |
View all Panasonic WJRT416V manuals
Add to My Manuals
Save this manual to your list of manuals |
Page 12 highlights
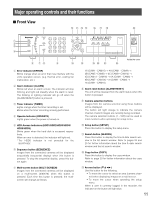
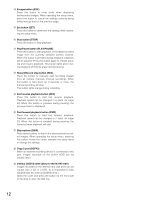
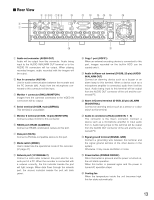
!4 Escape button (ESC) Press this button to mute audio when displaying live/recorded images. When operating the setup menu, press this button to cancel the settings currently being edited and go back to the previous page. !5 Set button (SET) Press this button to determine the settings when operating the setup menu. !6 Stop button (STOP) Press this button to stop playback. !7 Play/Pause button (PLAY/PAUSE) Press this button to start playback of the latest recorded image from the currently selected camera channel. When this button is pressed during playback, playback will be paused. Press this button again to release pausing and resume playback. This button lights green during playback and blinks green during pausing. !8 Record/Record stop button (REC) Press this button to manually start recording images from all camera channels (manual recording). When this button is held down for 2 seconds or more, the manual recording will stop. This button lights orange during recording. !9 Fast reverse playback button (REV) Press this button to start fast reverse playback. Playback speed can be changed in 6 steps. ( page 22) When this button is pressed during pausing, the previous frame is displayed. @0 Fast forward playback button (FWD) Press this button to start fast forward playback. Playback speed can be changed in 7 steps. ( page 22) When this button is pressed during pausing, the frame by frame playback will start. @1 Skip buttons (SKIP) Press these buttons to skip to the previous/next recorded images. When operating the setup menu, pressing this button moves the cursor between the setup items or change the settings. @2 Copy 2 port (COPY2) When an external recording device is connected to this port, images recorded on the built-in HDD can be copied onto it. @3 Internal CD/DVD drive (Only for the WJ-RT416V) Images recorded on the internal hard disk drive can be copied onto a CD or a DVD. (It is impossible to play CD/DVD with this internal CD/DVD drive.) Open the cover and press the button on the front side of the drive to open the disk tray. 12
-
 1
1 -
2
-
3
-
4
-
5
-
6
-
 7
7 -
 8
8 -
 9
9 -
 10
10 -
 11
11 -
 12
12 -
 13
13 -
 14
14 -
 15
15 -
 16
16 -
 17
17 -
18
-
19
-
20
-
21
-
22
-
23
-
24
-
25
-
26
-
27
-
28
-
29
-
30
-
31
-
32
-
33
-
34
-
35
-
36
-
37
-
38
-
39
-
40
-
41
-
42
-
43
-
44
-
45
-
46
-
47
-
48
-
49
-
50
-
51
-
52
-
53
-
54
-
55
-
56
-
57
-
58
-
59
-
60
-
61
-
62
-
63
-
64
-
65
-
66
-
67
-
68
-
69
-
70
-
71
-
72
-
73
-
74
-
75
-
76
-
77
-
78
-
79
-
80
 |
 |
