Panasonic WJRT416V WJRT416V User Guide - Page 60
Alarm Spot Camera No., Alarm Output Port
 |
View all Panasonic WJRT416V manuals
Add to My Manuals
Save this manual to your list of manuals |
Page 60 highlights
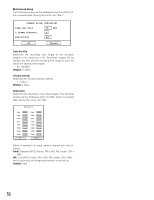
VMD (Area Setup) Set the VMD area. The following window will be displayed when the [SET] button is pressed after moving the cursor onto "Set". Cursor (red) Clear (colorless) areas (not set as the VMD areas) Green areas (set as the VMD areas) Green area: Set as the VMD area. Clear area: Not set as the VMD area. Red area: Cursor Light blue area: Set as the VMD area, and currently motion is being detected. The VMD area can be set using the following buttons. Arrows button: Select an area. [SKIP d]/[SKIP s] buttons: Determine whether or not to set the selected area as the VMD area (green: set as the VMD area, clear: not set as the VMD area). When completing the VMD area setting, press the [ESC] button. The "Alarm Rec. Setup" window will be displayed. Move the cursor onto "OK" and press the [SET] button to apply the settings. Default: All areas are set as the VMD area. Notes: • The colors of the VMD areas may look not exactly as described depending on the brightness or contrast of the images displayed in the areas. • The VMD area cannot be set for "Alarm No." to which no video signal is supplied. Advanced Setup The following window will be displayed when the [SET] button is pressed after moving the cursor onto "Set→". Configure the following settings on the setup window of each "Alarm No." ( page 59). No.01 Alarm Rec. Setup(Advanced) Rec. Duration Alarm Duration Alarm Output Port Alarm Spot Camera No. Preset Camera No. Preset Position 060 Sec 030 Sec 0 01 01 000 OK Cancel 60 Rec. Duration Set the alarm recording duration. 000, 030 - 999 (sec) When "000" is selected, recording will not stop until the alarm is reset. Default: 030 (sec) Alarm Duration Set the active duration of the alarm action (LED blinking, buzzer sounding, alarm output from the terminal on the rear of the recorder). 001 - 999 (Sec) Default: 030 (Sec) Alarm Output Port Select a port from which an alarm signal is output. 0 - 4 When "0" is selected, no alarm signal will be output. Default: 0 Alarm Spot Camera No. Select a camera channel from which images are to be displayed on a single screen at an event occurrence. 1 - 16 Default: (Same value set for "Alarm No.") Preset Camera No. Select a camera channel that the connected camera is to be moved to the preset position at an alarm occurrence. 1 - 16 Default: (Same value set for "Alarm No.") Preset Position Set the preset position to which the camera moves at an event occurrence. 000 - 256 When "000" is selected, the camera will not move at an event occurrence. Default: 000 [All] button When the [SET] button is pressed after moving the cursor onto "All", the same settings will be applied to the following for all of the "Alarm No.". • Rec. Quality • Rec. Frame Rate • Time range of each schedule • Sensitivity • Rec. Duration (Advanced Setup) • Alarm Duration (Advanced Setup) • Alarm Output Port (Advanced Setup)
-
 1
1 -
2
-
3
-
4
-
5
-
6
-
7
-
8
-
9
-
10
-
11
-
12
-
13
-
14
-
15
-
16
-
17
-
18
-
19
-
20
-
21
-
22
-
23
-
24
-
25
-
26
-
27
-
28
-
29
-
30
-
31
-
32
-
33
-
34
-
35
-
36
-
37
-
38
-
39
-
40
-
41
-
42
-
43
-
44
-
45
-
46
-
47
-
48
-
49
-
50
-
51
-
52
-
53
-
54
-
 55
55 -
 56
56 -
 57
57 -
 58
58 -
 59
59 -
 60
60 -
 61
61 -
 62
62 -
 63
63 -
 64
64 -
 65
65 -
66
-
67
-
68
-
69
-
70
-
71
-
72
-
73
-
74
-
75
-
76
-
77
-
78
-
79
-
80
 |
 |
