Panasonic WVCW384 WVCW384 User Guide - Page 11
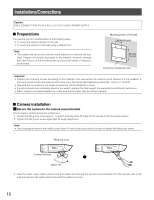
Do not waterproof the drain slit, either., To install this product on a wall
 |
UPC - 791871505830
View all Panasonic WVCW384 manuals
Add to My Manuals
Save this manual to your list of manuals |
Page 11 highlights
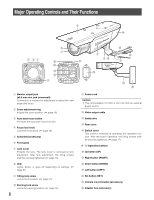
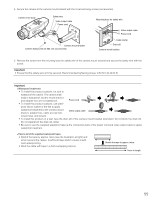
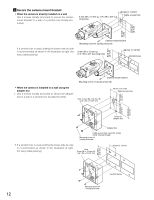
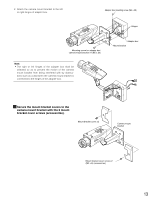
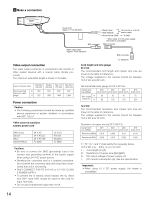
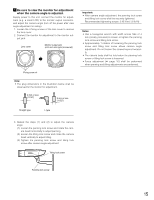
4. Secure the camera to the camera mount bracket with the 3 camera fixing screws (accessories). Camera main body Safety wire Video output cable Power cord Camera mount bracket Camera fixing screw x3 (M4 x 8) (accessories) Mounting boss for safety wire Video output cable Power cord Cable clamp Drain slit Camera mount bracket 5. Remove the screw from the mounting boss for safety wire of the camera mount bracket and secure the safety wire with the screw. Important: • Ensure that the safety wire is firmly secured. Recommended tightening torque: 0.59 N·m {0.44 lbf·ft} Important: • To install this product outdoors, be sure to waterproof the cables. The camera main body is waterproof, but the mount bracket and adapter box are not waterproof. Power cord • To install this product outdoors, use water- proof silicon rubber or the like to apply waterproof treatment to the camera mount bracket, adapter box, cable access hole, Video output cable screw holes, and screws. • To install this product on a wall, face the drain slit of the camera mount bracket downward. Do not block the drain slit. Do not waterproof the drain slit, either. • Be sure to use the supplied waterproof tape at the connection parts of the power cord and video output cable to apply waterproof treatment. • Stretch the tape by approx. twice (see the illustration at right) and wind it around the cables. Insufficient tape stretch causes insufficient waterproofing. • Wind the cable with tape in a half-overlapping manner. Stretch the tape to approx. twice. Twice in length 11
-
 1
1 -
2
-
3
-
4
-
5
-
 6
6 -
 7
7 -
 8
8 -
 9
9 -
 10
10 -
 11
11 -
 12
12 -
 13
13 -
 14
14 -
 15
15 -
 16
16 -
17
-
18
-
19
-
20
-
21
-
22
-
23
-
24
-
25
-
26
-
27
-
28
-
29
-
30
-
31
-
32
-
33
-
34
-
35
-
36
-
37
-
38
-
39
-
40
-
41
-
42
-
43
-
44
-
45
-
46
-
47
-
48
-
49
-
50
-
51
-
52
-
53
-
54
-
55
-
56
-
57
-
58
-
59
-
60
-
61
-
62
-
63
-
64
-
65
-
66
-
67
-
68
-
69
-
70
-
71
-
72
-
73
-
74
 |
 |
