Panasonic WVCW384 WVCW384 User Guide - Page 18
Mount the sunshield, When the mounting surface is changed to the top surface of the camera body, Notes
 |
UPC - 791871505830
View all Panasonic WVCW384 manuals
Add to My Manuals
Save this manual to your list of manuals |
Page 18 highlights
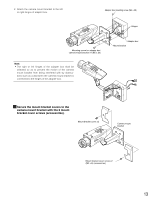
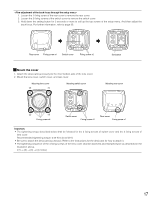
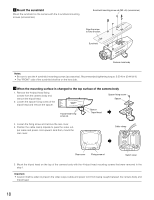
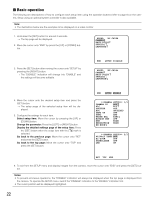
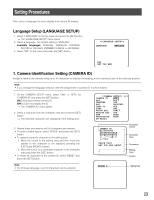
, Mount the sunshield Mount the sunshield on the camera with the 4 sunshield mounting screws (accessories). Sunshield mounting screw x4 (M3 x 6) (accessories) Align the arrow to lens direction. Sunshield SDIII Camera main body Notes: • Be sure to use the 4 sunshield mounting screws (accessories). Recommended tightening torque: 0.59 N·m {0.44 lbf·ft} • The "FRONT" side of the sunshield shall be on the lens side. . When the mounting surface is changed to the top surface of the camera body 1. Remove the 4 tripod head fixing screws from the camera body and remove the tripod head. 2. Loosen the spacer fixing screw of the tripod head and remove the spacer. Spacer fixing screw Spacer Tripod head fixing screw x4 Spacer Tripod head 3. Loosen the fixing screw and remove the rear cover. 4. Position the cable clamp topside to pass the video out- put cable and power cord upward. And then, mount the rear cover. Cable clamp Rear cover Fixing screw x1 Switch cover 5. Mount the tripod head on the top of the camera body with the 4 tripod head mounting screws that were removed in the step 1. Important: • Caution shall be taken to prevent the video output cable and power cord from being caught between the camera body and tripod head. 18
-
 1
1 -
2
-
3
-
4
-
5
-
6
-
7
-
8
-
9
-
10
-
11
-
12
-
 13
13 -
 14
14 -
 15
15 -
 16
16 -
 17
17 -
 18
18 -
 19
19 -
 20
20 -
 21
21 -
 22
22 -
 23
23 -
24
-
25
-
26
-
27
-
28
-
29
-
30
-
31
-
32
-
33
-
34
-
35
-
36
-
37
-
38
-
39
-
40
-
41
-
42
-
43
-
44
-
45
-
46
-
47
-
48
-
49
-
50
-
51
-
52
-
53
-
54
-
55
-
56
-
57
-
58
-
59
-
60
-
61
-
62
-
63
-
64
-
65
-
66
-
67
-
68
-
69
-
70
-
71
-
72
-
73
-
74
 |
 |
