Panasonic WVCW384 WVCW384 User Guide - Page 17
Mount the cover, <Fine adjustment of the back focus through the setup menu>, Important
 |
UPC - 791871505830
View all Panasonic WVCW384 manuals
Add to My Manuals
Save this manual to your list of manuals |
Page 17 highlights
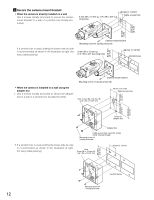
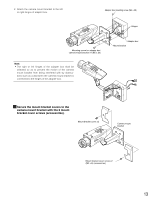
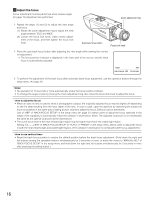
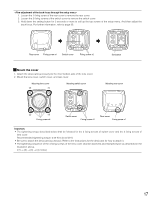
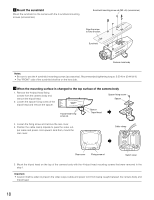
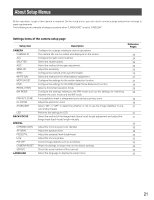
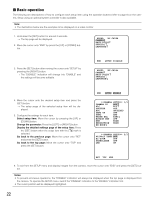
1. Loosen the 1 fixing screw of the rear cover to remove the rear cover. 2. Loosen the 2 fixing screws of the switch cover to remove the switch cover. 3. Hold down the setting button for 2 seconds or more to call up the top screen of the setup menu. And then adjust the back focus. For further information, refer to page 35. Rear cover Fixing screw x1 Switch cover Fixing screw x2 Set button m Mount the cover 1. Attach the desiccant (accessory) to the inner bottom side of the lens cover. 2. Mount the lens cover, switch cover, and rear cover. Mouning lens cover (3) (1) Mouning switch cover Mouning rear cover (2) (4) Fixing screw x4 Switch cover Fixing screw x2 Rear cover Fixing screw x1 Important: • The tightening torque described below shall be followed for the 2 fixing screws of switch cover and the 4 fixing screws of lens cover. Recommended tightening torque: 0.59 N·m {0.44 lbf·ft} • Be sure to attach the desiccant (accessory). Refer to the instructions for the desiccant for how to attach it. • The tightening sequence of the 4 fixing screws of the lens cover shall be observed and repeated twice as described in the illustration above. ((1) → (2) → (3) → (4), twice) 17
-
 1
1 -
2
-
3
-
4
-
5
-
6
-
7
-
8
-
9
-
10
-
11
-
 12
12 -
 13
13 -
 14
14 -
 15
15 -
 16
16 -
 17
17 -
 18
18 -
 19
19 -
 20
20 -
 21
21 -
 22
22 -
23
-
24
-
25
-
26
-
27
-
28
-
29
-
30
-
31
-
32
-
33
-
34
-
35
-
36
-
37
-
38
-
39
-
40
-
41
-
42
-
43
-
44
-
45
-
46
-
47
-
48
-
49
-
50
-
51
-
52
-
53
-
54
-
55
-
56
-
57
-
58
-
59
-
60
-
61
-
62
-
63
-
64
-
65
-
66
-
67
-
68
-
69
-
70
-
71
-
72
-
73
-
74
 |
 |
