Pfaff 561-563 Owner's Manual - Page 7
Einfädeln, Oberfadens, Enhebrado, superior, Threading, needle, Infilatura, superiore, Enfilage,
 |
View all Pfaff 561-563 manuals
Add to My Manuals
Save this manual to your list of manuals |
Page 7 highlights
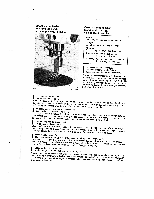
Einfädeln des Oberfadens Threading the needle Enfilage du fib supérieur Oberfaden nach Fig. 3 einfftdeln. Die Positionen 2-11 geben den Ablauf der Faden einfadelung an. Maschine ausschalten. Beim Em fftdeln darauf achten, daI3 der Faden immer von oben durch die drei Bohrungen derFadenfuhrung 2, von rechts zwischen die Spannung 3,von rechts uber die Fadenanzugsfeder 4 und von links durch das NadelOhr gefuhrt wird. Faden cc. 6-7 cm durchziehen. Bei Maschinen mitFadenabschneid einrichtung -900/. . Vorspannung gemal3 neben stehender Skizze einfftdeln! Enhebrado del hilo superior Infilatura del fib superiore Cobocacão do fib superior Thread the needle as illustrated in Fig. 3. Numbers 2-11 indicate the order of needle threa ding. Switch off the machine. Make particularly sure the thread is led from top to bottom through thethree holes ofthread retainer2, from the right between the discs of tension 3, through the thread check spring 4 and from left to right through the needle eye. Pull abt. three inches of thread through the needle eye. On machines with thread trimmer -900/. . lead the thread through the thread retainer as shown in the drawing above. Enfiler le fil d'aiguille selon Ia figure 3. ttLle'oaonuisgsjoiupouiolnlrsesi.3tii,LnodtanroiossdsI2aueairdrlerdloflijettapeflialoesdngs'neaeerlnen6mht alfeetuns7ttdpcsaamonsusssdaoeglesefistrlr.eodsiussoftirrlt.oMcuosendttturreeglIueaiudmred-afcoilhf2iiln, 4edehetoI,ardsdercoiIriacteugiaet.unctArhele'le,onspfiadlraisglqee,ucvehesaildsleedrIeaa Sur los machines avec coupe-fil -900, enfiler Ia pretension comme cur le schema ci-dessus. Enhebre el hilo superior de acuerdo con Ia fig. 3. EddmLNoneaOorsssmtddetpreesaaoelqdIsahuqioicidulnioaoeoaqr4nseueelyicc.s,hohfina2ilnopcaaodlalmrreltbeeainnehnttiderslioe,ecssraleonacsuoeetpnnloldhamrueteiabclcltirooidacrsoonItades-onai9egs0mdiu0oej/plra..er,hedsieeld3ons.ehydsDeetdabeemIrasebaciziroefrqlntinbuteeaicdenteprsedsaadahIraeiDllomoIesasjaedtqpreuuerrenisenvccaaio.aghbuacojopendrafooroserhlmdimleoeludageleulleie6ashqareiu7lgoecsumml2aa., Infilare ii fib superiore come si vede in figura 3. Le posizioni da 2 all indicano il percorso dell'infilatura Disinserire Ia macchina. IdNaaecldlr'euinsntfarilaa,dtuetrlrale'aibdgaoud.eaTrdeiirsaacrfhefiinildcichtaeepniolsfiidob enlevfei3bn; gdapaesdreemcsitrprcaraeatg6t-ur7aidvcaemtros.odIaallm'aoltlolaattetrnadvifeirloso4i0trdeafosriinidsetlragautitdraafvileors2o; Da macchine col rasafili -900/. ., infilare (a pretensione come si mostra nelbo schizzo. Coloque o fio conforme Fig. 3. As posicOes 2 all mostram a sequencia de co!ocaçao do fio. Desligue a maquina. Na colocaçao do fio, cuide para que este seja enfiado porcima pela direita, entre nos pratos tensores 3; pela direita, sobrea mola tensors pebos do fio tres orificios do guia-flos 2; 4e por Ultimo. pelaesquer da enfie na agulha Puxar o fib por mais ou menos 6 - 7 cm. Em maquinas com corta-fios automfttico -900/. . enfie a pre-tensao conforme esquema no circulo. 7
-
 1
1 -
 2
2 -
 3
3 -
 4
4 -
 5
5 -
 6
6 -
 7
7 -
 8
8 -
 9
9 -
 10
10 -
 11
11 -
 12
12 -
13
-
14
-
15
-
16
-
17
-
18
-
19
-
20
-
21
-
22
-
23
-
24
 |
 |
