Pfaff hobby 422 Owner's Manual
Pfaff hobby 422 Manual
 |
View all Pfaff hobby 422 manuals
Add to My Manuals
Save this manual to your list of manuals |
Pfaff hobby 422 manual content summary:
- Pfaff hobby 422 | Owner's Manual - Page 1
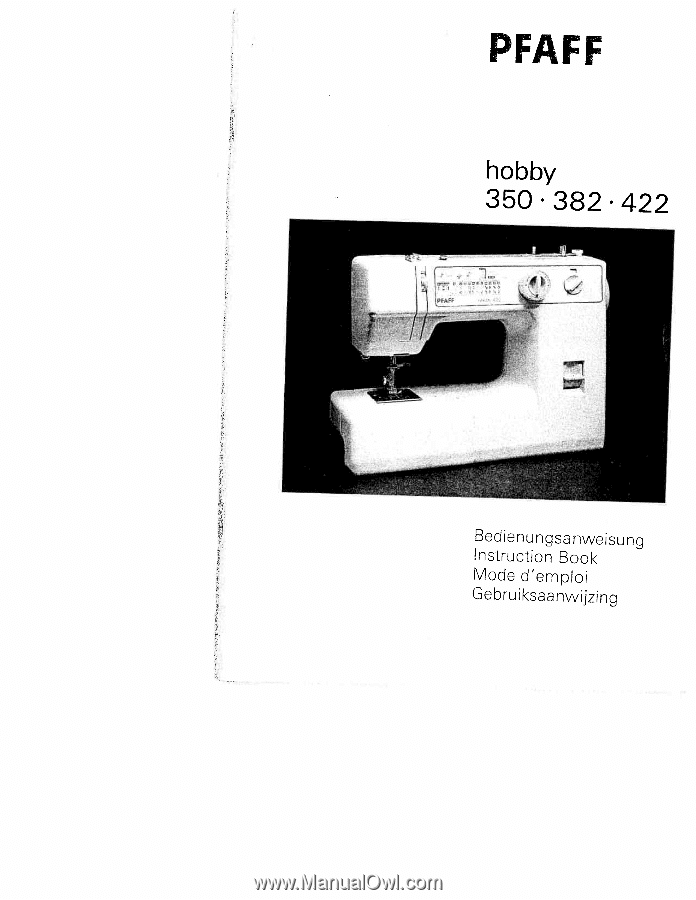
PFAFF hobby 350 382422 Bed len u n gsa n we is u n g Instruction Book Mode d'emploi Gebruiksaanwijzing - Pfaff hobby 422 | Owner's Manual - Page 2
- Pfaff hobby 422 | Owner's Manual - Page 3
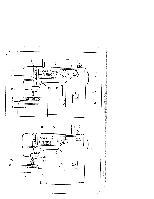
27 Stich(ängen-Einstellknopf 4 Parts of the sewing machine 1 Take-up lever 2 Thread guide 3 Carrying handle 4 Bobbin winder 5 Hand wheel 6 Disengaging knob 7 Reverse-feed control 8 Master switch 9 Detachable work support with accessories box 10 Machine feed 11 Needle plate 1 2 Thread - Pfaff hobby 422 | Owner's Manual - Page 4
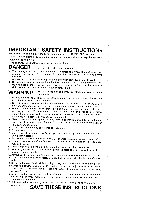
Safety rules valid for United Kingdom only The wires in the mains lead are coloured according to the following code: Blue: Neutral Brown: Live As the colours of the wires in the mains lead of this appliance may not corres pond with the colour coding of the terminals in your plug, proceed as follows: - Pfaff hobby 422 | Owner's Manual - Page 5
away from all moving parts. Special care is required around the sewing machine needle. 12. Always use sewing machine from the electrical outlet when removing covers, lubricating, or when making any other user servicing adjustments mentioned in the instruction manual. winding. SAVE THESE INSTRUCTIONS - Pfaff hobby 422 | Owner's Manual - Page 6
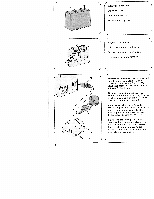
sol. Brancher Ia fiche S dans Ia machine et Ia fiche T dans Ia prise murale. Placer ensuite l'interrupteur general sur MARCHE. Electrische aansluiting: Zet de voet weerstand op een gemakkelijk bereik bare plaats op de vloer. Eerst stekker S in-de machine steken, daarna stekker T in hat stopcontact - Pfaff hobby 422 | Owner's Manual - Page 7
preparations: Reach under work support 9 and pull it out towards the left. Preparer le bobinage: Passer Ia main sous Ia bolte de rangement 9 et retirer celle-ci vers Ia gauche. Spoelen: Met de linkerhand de werkbox verwijderen. 4 VerschluRklappe 21 nach unten öffnen. Fold free-arm cover 21 downwards - Pfaff hobby 422 | Owner's Manual - Page 8
stop S. Pousser Ia canette vers Ia droite, contre Ia butée S. Spoel naar rechts tegen de spoelwinder S drukken. 4 Nähwerk ausschalten: Handrad 5 fest halten und Scheibe 6 nach vorn drehen. Disengaging the sewing mechanism: Hold hand wheel 5 firmly and turn knob 6 towards you. Déhrayer le mécanisme - Pfaff hobby 422 | Owner's Manual - Page 9
apres quelques tours. Pousser Ia canette garnie vers Ia gauche, Ia retirer et couper le fil. 4 N Spoelen: De draad van de garenklos in de voorspanning (16) trekken, naar de spoel leiden, door een gaatje steken en vasthouden. Voetweerstand indrukken en opspoelen na een aantal omwentelin gen - Pfaff hobby 422 | Owner's Manual - Page 10
6 nach hin ten drehen. Engaging the sewing mechanism: Hold balance wheel 5 firmly and turn knob 6 away from you. Embrayage du mécanisme: Retenir le volant 5 et tourner le disque 6 vers l'arrière. Koppelschroef vastzetten: Om na het spoelen de machine weer in werking te stellen: schroef 6 vastzetten - Pfaff hobby 422 | Owner's Manual - Page 11
: Open latch T and push the bobbin case onto pin U until it snaps in place. Bobbin case finger V must fit into cutout W. Mise en place de Ia bolte a canette: Lever le loquet T et engager Ia bolte a canette a fond sur Ia broche U. Le doigt V dolt s'engager dans l'encoche W. Spoelhuls inzetten: KIep - Pfaff hobby 422 | Owner's Manual - Page 12
Ia fente 5, vers le haut dans Ia fente T, dans le releveur de fit 1, revenir dans Ia fente T et dans le guide-fil droit U au pince-aiguille. Bovendraad inrijgen: Naald en draad hevel in de hoogste stand. Naaivoetje omhoog. De draad via geleiding 2, door gleuf S naar beneden, naar boven door gleuf - Pfaff hobby 422 | Owner's Manual - Page 13
legen. Place both threads towards the right under the sewing foot. Coucher les deux fits vers l'arrière a droite sous te pied presseur. Boven- en onderdraad onder de naaivoet door naar links leggen. 4 VerschluBklappe 21 schtieBen. Close free-arm cover 21 Fermer le capot 21. Afsluitkapje 21 sluiten - Pfaff hobby 422 | Owner's Manual - Page 14
a free arm for sewing tubular shaped articles. Les machines possèdent un bras libre pour Ia mise en cuvre d'articles tubu aires. De machines hebben een vrije arm voor rondvormige kledingstukken. / Ndhfläche 9 an die Maschine schieben (Führungsstifte in die Bohrungen). Push detachable work support - Pfaff hobby 422 | Owner's Manual - Page 15
abaissée, pius Ia ((HObby coudra vite. Snelheidspedaal intrappen: De voetdruk op het pedaal regeit de snelheid van de machine. N Oberfadenspannung 14 hegen. 4 N Important! The following is essential for obtaining good sewing results: 1 The needle must be in order. 2. The needle - Pfaff hobby 422 | Owner's Manual - Page 16
the fabric by pulling it towards the back. Relever le levier 1 5. Degager le tissu vers l'arrière. Stofdrukker 15 omhoog duwen. Stof onder de voet wegtrekken. 4 Fadenabschneider 12: Fäden einlegen und nach vorne ziehen. Thread cutter 12: Draw the threads into the slot and pull them toward the - Pfaff hobby 422 | Owner's Manual - Page 17
control 7. The machine sews backwards as long as the control key is held down. Couture en arrière: Abaisser Ia touche 7. La machine coud en arrière aussi longtemps que cette touche est tenue abaissée. Afhechten: Toets 7 indrukken en de machine stikt achteruit. Zolang men de toets ingedrukt houdt - Pfaff hobby 422 | Owner's Manual - Page 18
renden Buch staben (A-B) durch Drehen des Stich muster-Einstellringes 18 im machine setting for sewing the stitch pattern chosen is indicated in the window above this letter, 1] (___/STREfii) = Sewing pattern Stretch stitches of Models 382 and 422 For sewing the coloured stretch stit ches, turn - Pfaff hobby 422 | Owner's Manual - Page 19
de steek behorende machine-installing aangegeven. E-- -/STRETCH} = Naaivoet = Zigzag-instelknop steeklengte instelknop = Steekmotieven Stretchsteken. modellen 382 en 422 Vafogoerbehealtdenasatireentcvhasntedkeengemkloeeutrdsymbool o,,nSdtreertcihn"stevlamnardkeersintegekTlegnegdtreakanidopw2o7r - Pfaff hobby 422 | Owner's Manual - Page 20
Geradstich Stichlage Mitte B Geradstich C Stichlage links D Zickzackbereich Utility stitches Points utilitaires Stitch Buttonhole symbols Point Symboles de boutonniere Straight stitch, middle needle position Point droit, deport median Straight stitch, left needle position Point droit - Pfaff hobby 422 | Owner's Manual - Page 21
below the set ting mark, depending on whether you wish to sew with the needle in its left or middle position, respectively. de point 1 8, amener l'une des lettres B ou C en dessous du repère S. Regler Ia longueur de point par le regle-point 27. Modèle 422: par le bouton a selection ner les motifs de - Pfaff hobby 422 | Owner's Manual - Page 22
breit G Kanten-EinfaEstich schmal H Overlockstich Overedgestitch, wide Overedgestitch, narrow Overlock stitch Point de bordage large Point de bordage étroit Point overiock J Pulloverstich Pullover stitch Point tricot "/ \ K Federstich N Zierelastikstich //%2' 0 Zierelastikstich - Pfaff hobby 422 | Owner's Manual - Page 23
N Stretchsteken-tab& Modelle/ModelS Steek 382 422 Stretch-3voudige rechte steek, midden Stretch-3voudigerechte steek, links Stretch-3voudigezigzagsteek Wafelsteek •a Boordsteek, breed •• Boordsteek, smal Overlocksteek Pulloversteek ) Veerstjeessteek Elastische siersteek Elastische - Pfaff hobby 422 | Owner's Manual - Page 24
the needle in as far as it will go (with its flat side facing towards the back). Tighten the screw. Remplacement de l'aiguille (système 130/705 H): Débrancher a machine du secteur. Desserrer (a vis S et retirer l'aiguille. Engager l'aiguille neuve (le méplat du talon vers l'arriére) jusqu'a Ia but - Pfaff hobby 422 | Owner's Manual - Page 25
as T klikt. 4V und W sind zum Befestigen des Lineals. X ist die NähfuRhalterschraube. Hole W and screw V are used for attaching an edge guide. Screw X is the sewing foot holder screw. V at W servent a fixer l'étrier guide bord. La vis X fixe Ia support de semelle. Linea&klem: Lineaal in W steken en - Pfaff hobby 422 | Owner's Manual - Page 26
E ReiRverschluBfu9, S Stick- und Stopfplatte Sewing feet (standard accessories) A Ordinary sewing foot B Clear-view foot G Blindstitch work support 9. Boito de rangement: Ouvrir le couvercie formant plan de travail. La boite sert au rangement des accessoires de couture. Accessoiresbakje: De deksel - Pfaff hobby 422 | Owner's Manual - Page 27
20 unter die Markierung T gedreht. 5 ist der breiteste Zickzack. Zigzag sewing Models 350 and 382 (III. U>: Turn stitch pattern selector ring 18 large. Modèle 422 (fig. VI: amener a lettre 0 sous le repère S et Ia largeur de point souhaitée par le bouton de reglage 20 des points zigzags sous le - Pfaff hobby 422 | Owner's Manual - Page 28
S kann bei fast allen NähfüBen zum Einsatz kommen. Befestigung des Uneals (Sonderzubehör): Lineal S durch die Bohrung T schieben und mit applica tions. With the edge guide attached, it is easy to sew parallel lines of stitches or to stitch parallel to the edge. The guide either follows an edge (Fig - Pfaff hobby 422 | Owner's Manual - Page 29
droit facilite considérablement es surpi qâres parallèles et le surpiquage des bords. Ce faisant, le bord du tissu (fig. VI ou bien a piqCre précédente suit le guide-droit (fig. WI. La couture sera toujours nette et régulière. 4 Watteren Naaivoetje: Normale-naaivoet A of borduurvoet 8 en Iineaal - Pfaff hobby 422 | Owner's Manual - Page 30
unter den BlindstichfuR legen. Der Stoffbruch des Oberstoffes Iàuft dabei am Anschlag T des Blindstichful,es entlang. Mit der Stellschraube the blindstitch sewing foot. The crease line of the outer fabric runs along edge guide T of the blindstitch sewing foot. Turn screw S to adjust edge guide T - Pfaff hobby 422 | Owner's Manual - Page 31
Steek: rekbare btindsteek Steek(engte: 3-4 Naatd: dikte 70 of 80 Zo wordt de insteek van de naald geregeld De stof onder de voet teggen, met zoom aan de onderkant. De omgestagen rand tangs de geteiding T van de voet taten (open. Met instelschroef S, ptaatje T zover naar links draaien tot - Pfaff hobby 422 | Owner's Manual - Page 32
beim Modell 422 den Zickzackknopf 20 auf 0 stellen. Dann einige Vernäh stiche nãhen. 6. Das Knopfloch mit dem Pfeiltrenner (Sonderzubehör) aufschneiden. Sewing buttonholes Sewing foot: clear-view foot B Tension: needle thread tension a little slack Thread: fine machine embroidery thread - Pfaff hobby 422 | Owner's Manual - Page 33
18 op 2A4 brengen en met 4-6 trenssteken het knoopsgat afsluiten. De naald 5. omhoog brengen. Steekkeuzering 18 bij de modellen 350, 382 B zetten. op C en bi) model 422 op Bovendien bij model 422 de zigzagknop op 0 zetten. Dan enige afhechtsteken naaien. 6. Het knoopsgat mef - Pfaff hobby 422 | Owner's Manual - Page 34
ädeln (UI. Stiel umwickeln (VI und Fäden verknoten. Sewing on buttons Sewing foot: clear-view foot B or without a sewing foot Stitch: C on Models 350 and 382 D on Model 422 Machine feed: cover with darning plate Thread: fine sewing thread Place the button in the location marked previously - Pfaff hobby 422 | Owner's Manual - Page 35
Poser le bouton sur 'emplacement marqué auparavant, en dessous du support de pied presseur. Faire descendre le support de pied sur le bouton. Par Ia bague de reglage 18 du motif de points, regler C sur les modèles 350 et 382 et D sur un modèle 422. Sur ce dernier modèle, regler en plus le bouton - Pfaff hobby 422 | Owner's Manual - Page 36
the foot so that its teeth run along the right guiding edge on the sole of the foot (Fig. TI. Sew about half the length of the zip at the required (Fig. UI. Lower the zipper foot again, continue the seam and then sew across the end. Sew the other side of the zip at the same margin. Shortly before the - Pfaff hobby 422 | Owner's Manual - Page 37
fermoture a glissiere. Faire glisser le pied presseur vers a gauche jusquà a butée; poser Ia fermeturo a glissière ouverte sous le pied presseur de sorto quo es dents Iongent (a barrette droite (fig. TI. Surpi quer a fermeture a glissiere jusqu'au milieu environ a a distance voulue. L'aiguil - Pfaff hobby 422 | Owner's Manual - Page 38
einsticht. Die ReiRverschluRzähne laufen in der linken Fuhrungsrille des FuRes (Abb. UI. Zu Beginn der Naht die Abb. YI. 4 Seam-like zip fastener For machine setting see page 34. How the zipper is prepared the teeth a little to feed them into the guiding groove. Sew the seam to the end and secure it. - Pfaff hobby 422 | Owner's Manual - Page 39
zichtbaarl Machine instelling zie blz 34. De treksluiting en de stof als volgt gereedmaken. Strijk de naden scherp om. De (inkervouw openvouwen (afb. Sl. Leg de Iinkerzijde van de sluiting nu zo op de strijkvouw Iafb. TI dat de tandjes er precies oversteken. De steken worden precies in de vouw - Pfaff hobby 422 | Owner's Manual - Page 40
its teeth are still visible. Pin facing strip V to the underside and stitch it down at the same time as you sew the zip. The zip teeth run along the right guiding edge of the foot (Fig. SI. Shortly before the end of the seam leave the needle down in the fabric - Pfaff hobby 422 | Owner's Manual - Page 41
, coudre un arrét. Treksluiting in damespantalon Machine-insteHing zie blz 34. Verschuif de zoo( van de treks(uit(ng voet gehee( naar (inks. De inslagen van het spht scherp instrijken. De treks (uiting (ges(oten) zôver onder de rechter zijde van het split spe(den, dat de tand jes nog zichtbaar zijn - Pfaff hobby 422 | Owner's Manual - Page 42
ist. Die Stich lange bestimmen Sie bei dieser Arbeit selbst, indem Sie das Ndhgut hin und her bewegen. 6 Darning Preparing the machine: Sewing foot: Darning foot (special accessory) Stitch type: Straight stitch Needle position: Centre Tension: Ease needle thread tension Thread: Fine - Pfaff hobby 422 | Owner's Manual - Page 43
opletten dat beugel T op schroef U komt te liggen. Eerst de onderdraad naar boven halen en de voet laten zakken. De beide draden bij de eerste steken vasthouden. De stof met de hand sturen, daarbij de machine vlug laten (open. Span de draden, van boven naar beneden, over hat beschadigde gedeelte afb - Pfaff hobby 422 | Owner's Manual - Page 44
of oil to the hook raceway occasionally. Caution: do not drop the sewing hook. 4 N Nettoyage et huilage Débrancher Ia machine du secteur. Lever le pied presseur et l'aiguille. Ddvisser les deux vis de fixation de Ia plaque a aiguille et enlever cette plaque Nettoyer a griffe a aide du pinceau - Pfaff hobby 422 | Owner's Manual - Page 45
so that the pins enter slots U, push the bulb upwards and turn it in direction T. Be sure to use only a 1 5-watt light bulb in the sewing lamp. Changement de l'ampoule Débrancher Ia machine du secteur. Pousser l'ampoule vers le haut, Ia tourner vers S et l'enlever. Placer l'ampoule neuve - Pfaff hobby 422 | Owner's Manual - Page 46
Nadel-Tabelle Die WahI der elne bessere richtigen Nadel garantiert Verarbeitung des NahmaterialS Stoffqualität Ieicht Nadel 60 70 75 Stotfqualität mittel Nadel 80 90 Stoffqualität schwer Nadel 100 110 120 Nadelspitzefl Bezeichnung 130/705 H Nadelstärke: 70/ - Pfaff hobby 422 | Owner's Manual - Page 47
Nadel-Tabefle jj I ! Bezeichnung Stichlange 130/705 H-ZWI Stärke: 80 130/705 I-t-ZWI Stärke. 80 Stärke: 90 Stärke: 100 2,5 mm 2,5 mm 2,5 mm 2,5 mm 3,0 mm Stichbreite - - - - - Nadelentfernung 1,6 mm 2,0 mm 2,5 mm 3,0 mm 4,0 mm Geeignet für normale Biesen normale Biesen breite Biesen extra - Pfaff hobby 422 | Owner's Manual - Page 48
Needle chart Use of the correct needle ensures better processing of the material. Fabric weight: light Needle size: 60 7Ô 75 Fabric weight: medium Needle size: 80 90 Fabric weight: heavy Needle size: 100 110 '120 Needle points System & No. Profile Point & eye Suitable for 130/705 H 70, 80 - Pfaff hobby 422 | Owner's Manual - Page 49
Needle chart System & No. Stitch length 130/705 H-ZWI 80 130/705 H-ZWI 80 90 100 2.5mm 2.5 mm 2.5 mm 2.5 mm 3.0 mm Stitch width - - - - - Needle spacing 1.6mm 2.0 mm 2.5 mm 3.0 mm 4.0 mm Suitable for Medium-wide cording Wide cording Extra wide cording Extra wide cording L i 47 - Pfaff hobby 422 | Owner's Manual - Page 50
de pointe 130/705 H Grosseur de l'aiguille: 70,80 - 130/705 H-SUK Grosseur de l'aiguille: 70à 110 130/705 H-PS Grosseur de l'aiguille: 75 a 90 130/705 H-SKF Grosseur de l'aiguille: 70à 110 130/705 H-J Grosseur de Stretch, specialement développée pour machines Pfaff. Convient tout particulière 1 - Pfaff hobby 422 | Owner's Manual - Page 51
130/705 H-ZWI Grosseur: 80 130/705 H-ZWI Grosseur: 80 Grosseur: 90 Grosseur: 100 Longueur de point 2,5 mm 2,5 mm 2,5 mm 2,5 mm 3,0 mm Largeur de point - - - - - Espacement des aiguilles 1,6 mm 2,0 mm Utilisations nervures normales 2,5 mm 3,0 mm 4,0 mm nervures arges nervures extra-larges 49 - Pfaff hobby 422 | Owner's Manual - Page 52
stof Stofkwaliteit dun naald 60 70 75 Stofkwaliteit middel naald 80 90 Vorm van de Naaldpunt Stofkwaliteit dik naald 100 110 120 Benaming 130/705 H naalddikte: 70/80 130/705 H-SUK naalddikte: 70/110 130/705 H-PS naalddikte: 75/90 - Pfaff hobby 422 | Owner's Manual - Page 53
Naaldentabel Benaming Steeklengte fi 130/705 H-ZWI 2,5 mm jj naalddikte: 80 2,5 mm 130/705 H-ZWI naa)ddikte: 80 2,5 mm ) naalddikte: 90 2,5 mm naalddikte: 100 3,0 mm Steekbreecite Naald- 1,6 mm - 2,0 mm - 2,5 mm - 3,0 mm - j 4,0 mm - Geschikt voor: normale biezen normale biezen brede - Pfaff hobby 422 | Owner's Manual - Page 54
ab Die Nadel ist nicht bis zum Anschlag eingesetzt. Die Nadel ist verbogen. Die Nadel ist zu dunn oder zu dick. Durch Ziehen oder Schieben des Stoffes wird die Nadel verbogen und staRt auf die Stichplatte. Die Spulenkapsel 1st nicht richtig eingesetzt. 4. Die Naht 1st nicht gleichmä1ig Die Spannung - Pfaff hobby 422 | Owner's Manual - Page 55
Ursache: Beseitigung: 5. Die Maschine transportiert nicht oder nur unregeImäig Zwischen den Transporteur-Zahnreihen hat sich Nähstaub festgepreRt. Stichplatte abnehmen, Nähstaub mit Pinsel entfernen. 6. Die Masehine geht schwer Fadenreste befinden sich in der Greiferbahn. Fadenreste entfernen - Pfaff hobby 422 | Owner's Manual - Page 56
-quality thread. Insert new needle and push it up as far as it will go. Insert new needle. See Needle Chart. Let machine feed the work alone. Only guide the material lightly. When inserting the bobbin case, push it in as far as it will go. Check upper and lower tensions. Use - Pfaff hobby 422 | Owner's Manual - Page 57
. Remove thread ends and put a drop of oil into hook raceway. 7. Important notes: Never run a threaded machine unless there is a piece of fabric under the sewing foot. If you have to leave the machine, even for a short while, be sure to pull out the mains plug. This is particularly important when - Pfaff hobby 422 | Owner's Manual - Page 58
do fil se forment sur ou sous I'ouvrage. lntroduire a nouvelle aiguille a fond. Remplacer I aiguille Tenir compte du tableau des aiguilles Laisser a machine entramner seule. Guider legèrement l'ouvrage. Appuyer sur Ia boIte a canette a sa mise en place, jusqu'à l'emboItage perceptible. Verifier - Pfaff hobby 422 | Owner's Manual - Page 59
une goutte d'huile dans Is coursière. 7. Remarques importantes Ne jamais rnettre Ne pas oublier de quitte Ia machine en marche a machine enfilèe sans tissu sous Ie pied presseur. toujours débrancher Ia machine du secteur, même si 'on ne que pour quelques instants. Cela est surtout nécessaire s'il - Pfaff hobby 422 | Owner's Manual - Page 60
Opheffen van kleine storingen Oorza a k: Opheffen: 1. De machine slaat steken over De naald is niet goed ingezet. U gebruikt een verkeerd systeem naald. De naald is krom of stomp. De machine is niet goed ingeregen. De naald is te dun voor het garen. Naald zover mogelijk naar boven schui yen, met - Pfaff hobby 422 | Owner's Manual - Page 61
Steekplaat wegnemen, stof met het stofkwastje weghalen. 6. De machine ioopt zwaar Draadresten in de grijperbaan. Draadresten verwijderen en een druppel olie in de grijperbaan doen. 7. Belangrijke aanwijzingen Laat de ingeregen machine niet Schakel eerst de stroom uit als open, zonder stof onder - Pfaff hobby 422 | Owner's Manual - Page 62
-035 943-9 1 zum Biesennähen )Nadelstärke 80, für feine Biesen Nadelstärke 70) zum Nähen von Fransen und zum Durchschlagen 98-802 422-00 98-694 803-00 in Vorbereitung zum Absteppen (Wattieren) Achtung! Nur Geradstich Stichlage Mitte einstellen. Für Absteppnahte und zum Nähen von besonders feinen - Pfaff hobby 422 | Owner's Manual - Page 63
Inhaltsverzeichnis Abstepparbeiten Anlasser Elastischer Blindstich Elektrischer AnschIuI Fadenabschneider Geradstichnähen Giühiampe auswechseln HosenreiBverschlu8, (Damen) Knopfannähen Knopflochnähen Koffer abheben Nade) auswechseln Nadeltabelle NahtreiRverschIu) Nähfü8,e NähfüBe auswechseln Nähstö - Pfaff hobby 422 | Owner's Manual - Page 64
charge. /ssory Appliqué foot Part No. Sewing Operation 93-035 920-91 For appliqué work Binder (remove sewing foot holderl Cording foot, 5 sewing fringes and for basting Edge guide Straight-stitch foot . Needle plate with round needle hole Felling foot, 4,5 mm Felling foot, 6,5 mm 98-802 422 - Pfaff hobby 422 | Owner's Manual - Page 65
Stitch pattern selector ring Straight stitching Stretch stitches Table of stretch-stitch patterns Table of utility-stitch patterns Thread cutter Top stitching Upper threading Zigzag sewing Zippers in ladies' slacks 24 7 5 43 22 23 9 13 42 22 40 6, 8 9 28 4 52 8 9 34 44 13 12 4 15 36 15 30 24 32 16 - Pfaff hobby 422 | Owner's Manual - Page 66
Operations 93-035 920-9 1 applications Bordeur (enlever support du pied) a Pied nervures, 5 rainures (aiguilles jumelées en écartements de 1,8: 2,5 mm) a Pied nervures, 7 rainures (aiguilles jumelées en écartements de 1,4;i,8 mm) Pied pose franges Guide-droit Pied pour point droit Plaque aiguille - Pfaff hobby 422 | Owner's Manual - Page 67
trier guide-bord Insertion de fermeture a glissiere Mise en place de Ia semelle du pied Nettoyage et lubrification Perturbations et remèdes a y apporter Pieds presseurs laccessoires standard) Point invisible élastique Points stretch sur les modèles 382 et 422 Points stretch, tableau des Points - Pfaff hobby 422 | Owner's Manual - Page 68
werzaamheden. Ze zijn verkrijgbaar bij de officiële Pfaff dealer. 1 'ssoires Applikatievoet Biaisbandvoet band Biesjes maken, )naalddikte 80, smalle biesjes naalddikte 70) Doorslaan, stofversieren 98-802 422-00 Wattieren 98-694 803-00 , in bewerking Opgeletl Alleen rechte steken met naaldstand - Pfaff hobby 422 | Owner's Manual - Page 69
storingen 58, 59 Rechte steken naaien 19 Schoonmaken en smeren 42 Spoelen voorbereiden 5, 6 Spoelen 7 Spoel in de spoelhuls 8 Spoethuls in de machine 9 Spoelspanning kontroleren 9 Steek)engte instellen 15 Stofdrukker 12 Stoppen 40, 41 Steekmotief-instelring 16, 17 Stekentabe - Pfaff hobby 422 | Owner's Manual - Page 70
PFAFF G. M. PFAFF Aktiengeselischaft Werk KarIsruheDuriach Gritznerstra5e 11 7500 Kadsruhe 41 Technische Arrderungen vorbehalten. Gedruckt in Deutschlancl. Subject to alterations in design. Printed in Germany. Sous toute reserve
-
 1
1 -
 2
2 -
 3
3 -
 4
4 -
 5
5 -
 6
6 -
 7
7 -
8
-
9
-
10
-
11
-
12
-
13
-
14
-
15
-
16
-
17
-
18
-
19
-
20
-
21
-
22
-
23
-
24
-
25
-
26
-
27
-
28
-
29
-
30
-
31
-
32
-
33
-
34
-
35
-
36
-
37
-
38
-
39
-
40
-
41
-
42
-
43
-
44
-
45
-
46
-
47
-
48
-
49
-
50
-
51
-
52
-
53
-
54
-
55
-
56
-
57
-
58
-
59
-
60
-
61
-
62
-
63
-
64
-
65
-
66
-
67
-
68
-
69
-
70
 |
 |
PFAFF
hobby
350
382422
Bed
len
u
n
gsa
n
we
is
u
n
g
Instruction
Book
Mode
d’emploi
Gebruiksaanwijzing