Pfaff hobby 422 Owner's Manual - Page 34
Knopf, annähen, Stiel, Sewing, buttons
 |
View all Pfaff hobby 422 manuals
Add to My Manuals
Save this manual to your list of manuals |
Page 34 highlights
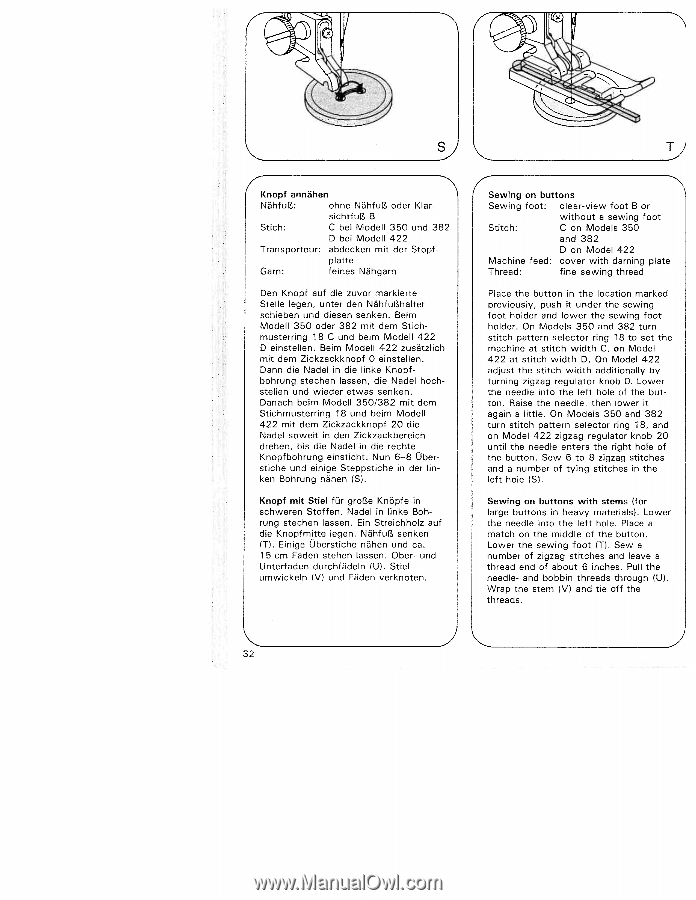
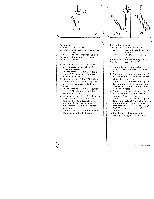
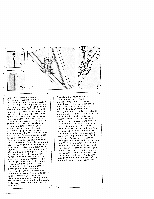
4 Knopf annähen NähfuB: ohne NähfuR oder KIar sichtfuR B Stich: C bei Model! 350 und 382 D bei Model! 422 Trans porteur: abdecken mit der Stopf platte Garn: feines Nãhgarn Den Knopf auf die zuvor markierte Stelle legen, unter den Nähfu6halter schieben und diesen senken. Beim Model! 350 oder 382 mit dem Stich musterring 1 8 C und beim Model! 422 D einstellen. Beim Model! 422 zusätzlich mit dem Zickzackknopf 0 einste!len. Dann die Nadel in die linke Knopf bohrung stechen (assen, die Nadel hoch stellen und wieder etwas senken. Danach beim Model! 350/382 mit dem Stichmusterring 18 und beim Model! 422 mit dem Zickzackknopf 20 die Nadel soweit in den Zickzackbereich drehen, bis die Nadel in die rechte Knopfbohrung einsticht. Nun 6-8 Uber stiche und einige Steppstiche in der in ken Bohrung nähen (SI. Knopf mit Stiel für grofe Knöpfe in schweren Stoffen. Nadel in linke Boh rung stechen lassen. Em Streichholz auf die Knopfmitte legen. NdhfuB senken (TI. Einige Uberstiche nähen und Ca. 15 cm Faden stehen lassen. Ober- und Unterfaden durchfädeln (UI. Stiel umwickeln (VI und Fäden verknoten. Sewing on buttons Sewing foot: clear-view foot B or without a sewing foot Stitch: C on Models 350 and 382 D on Model 422 Machine feed: cover with darning plate Thread: fine sewing thread Place the button in the location marked previously, push it under the sewing foot holder and lower the sewing foot holder. On Models 350 and 382 turn stitch pattern selector ring 18 to set the machine at stitch width C, on Model 422 at stitch width D. On Model 422 adjust the stitch width additionally by turning zigzag regulator knob 0. Lower the needle into the left hole of the but ton. Raise the needle, then lower it again a little. On Models 350 and 382 turn stitch pattern selector ring 18, and on Model 422 zigzag regulator knob 20 until the needle enters the right hole of the button. Sew 6 to 8 zigzag stitches and a number of tying stitches in the left hole (S(. Sewing on buttons with stems (for large buttons in heavy materials!. Lower the needle into the left hole. Place a match on the middle of the button. Lower the sewing foot (TI. Sew a number of zigzag stitches and leave a thread end of about 6 inches. Pull the needle- and bobbin threads through (U!. Wrap the stem (VI and tie off the threads. 32
-
 1
1 -
2
-
3
-
4
-
5
-
6
-
7
-
8
-
9
-
10
-
11
-
12
-
13
-
14
-
15
-
16
-
17
-
18
-
19
-
20
-
21
-
22
-
23
-
24
-
25
-
26
-
27
-
28
-
 29
29 -
 30
30 -
 31
31 -
 32
32 -
 33
33 -
 34
34 -
 35
35 -
 36
36 -
 37
37 -
 38
38 -
 39
39 -
40
-
41
-
42
-
43
-
44
-
45
-
46
-
47
-
48
-
49
-
50
-
51
-
52
-
53
-
54
-
55
-
56
-
57
-
58
-
59
-
60
-
61
-
62
-
63
-
64
-
65
-
66
-
67
-
68
-
69
-
70
 |
 |