Pfaff hobby 422 Owner's Manual - Page 38
Pfaff hobby 422 Manual
 |
View all Pfaff hobby 422 manuals
Add to My Manuals
Save this manual to your list of manuals |
Page 38 highlights
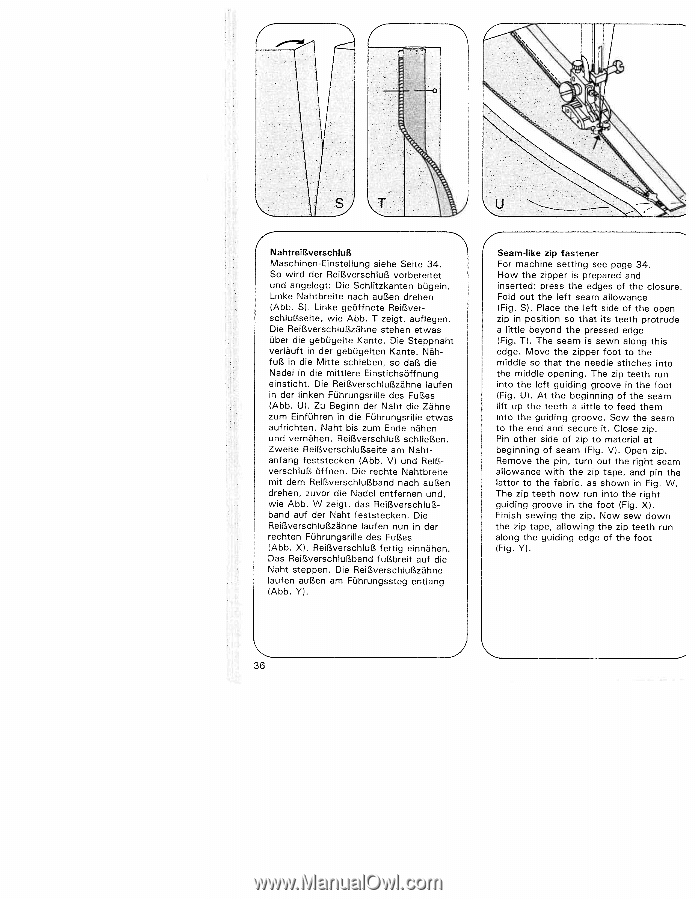
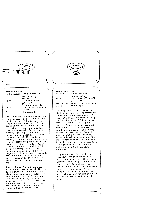
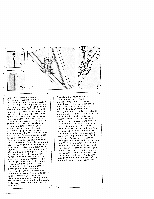
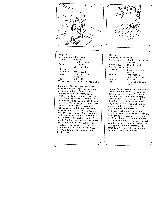
4 Nahtrei1?,verschIu1 Maschinen-Einstellung siehe Seite 34. So wird der ReiRverschluI vorbereitet und angelegt: Die Schlitzkanten bügeln. Linke Nahtbreite nach auLen drehen (Abb. SI. Linke geöffnete ReiBver schluRseite, wie Abb. T zeigt, auflegen. Die ReiRverschluRzähne stehen etwas über die gebügelte Kante. Die Steppnaht verläuft in der gebugelten Kante. Näh fuR in die Mitte schieben, so daB die Nadel in die mittlere Einstichsöffnung einsticht. Die ReiRverschluRzähne laufen in der linken Fuhrungsrille des FuRes (Abb. UI. Zu Beginn der Naht die Zähne zum Einführen in die Führungsrille etwas aufrichten. Naht bis zum Ende nàhen und vernähen. ReiBverschluB schlieRen. Zweite ReiBverschluRseite am Naht anfang feststecken (Abb. VI und ReiR verschluB öffnen. Die rechte Nahtbreite mit dem ReiBverschluRband nach auBen drehen, zuvor die Nadel entfernen und, wie Abb. W zeigt, das ReiRverschluB band auf der Naht feststecken. Die ReiBverschluRzähne laufen nun in der rechten Führungsrille des FuBes (Abb. XI. ReiBverschluB fertig einnähen. Das ReiBverschluBband fuBbreit auf die Naht steppen. Die ReiBverschluBzähne laufen auBen am Führungssteg entlang (Abb. YI. 4 Seam-like zip fastener For machine setting see page 34. How the zipper is prepared and inserted: press the edges of the closure. Fold out the left seam allowance (Fig. SI. Place the left side of the open zip in position so that its teeth protrude a little beyond the pressed edge (Fig. TI. The seam is sewn along this edge. Move the zipper foot to the middle so that the needle stitches into the middle opening. The zip teeth run into the left guiding groove in the foot (Fig. UI. At the beginning of the seam lift up the teeth a little to feed them into the guiding groove. Sew the seam to the end and secure it. Close zip. Pin other side of zip to material at beginning of seam (Fig. VI. Open zip. Remove the pin, turn out the right seam allowance with the zip tape, and pin the latter to the fabric, as shown in Fig. W. The zip teeth now run into the right guiding groove in the foot (Fig. Xl. Finish sewing the zip. Now sew down the zip tape, allowing the zip teeth run along the guiding edge of the foot (Fig. VI. 36
-
 1
1 -
2
-
3
-
4
-
5
-
6
-
7
-
8
-
9
-
10
-
11
-
12
-
13
-
14
-
15
-
16
-
17
-
18
-
19
-
20
-
21
-
22
-
23
-
24
-
25
-
26
-
27
-
28
-
29
-
30
-
31
-
32
-
 33
33 -
 34
34 -
 35
35 -
 36
36 -
 37
37 -
 38
38 -
 39
39 -
 40
40 -
 41
41 -
 42
42 -
 43
43 -
44
-
45
-
46
-
47
-
48
-
49
-
50
-
51
-
52
-
53
-
54
-
55
-
56
-
57
-
58
-
59
-
60
-
61
-
62
-
63
-
64
-
65
-
66
-
67
-
68
-
69
-
70
 |
 |