Pfaff hobby 422 Owner's Manual - Page 40
ReiI.,verschluBzähne
 |
View all Pfaff hobby 422 manuals
Add to My Manuals
Save this manual to your list of manuals |
Page 40 highlights
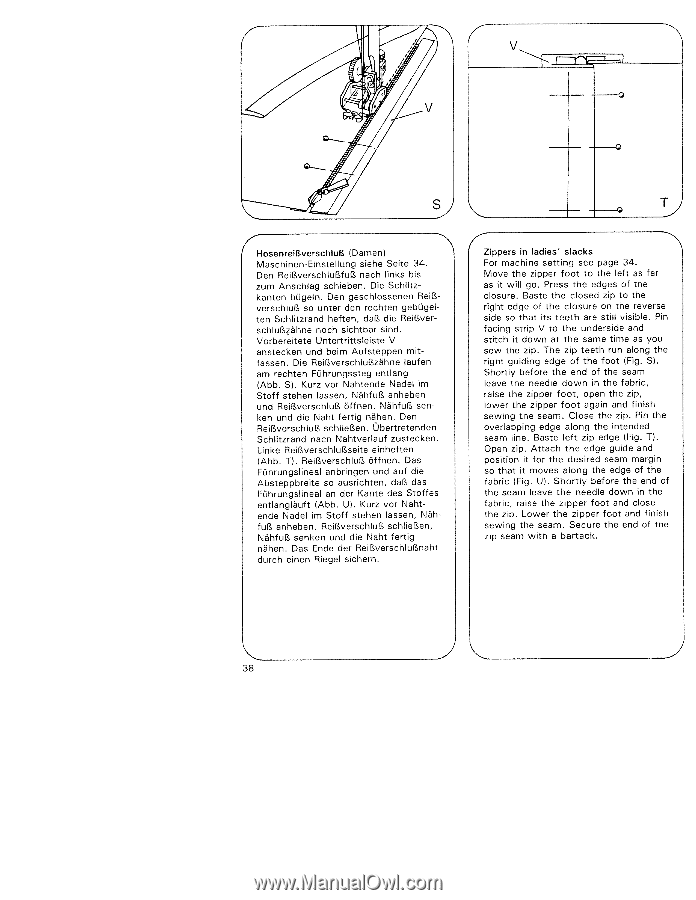
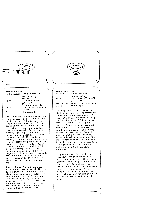
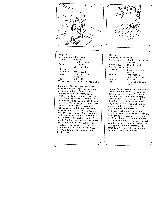
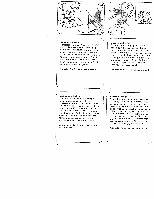
V - 4HosenreiRverschluB (Damen) Maschinen-Einsteflung siehe Seite 34. Den ReiltverschluRfuB nach inks bis zum Anschlag schieben. Die Schlitz kanten bugeln. Den geschlossenen ReiB verschlul?, so unter den rechten gebugel ten Schlitzrand heften, daB die ReiBver schluBähne noch sichtbar sind. Vorbereitete Untertrittsleiste V anstecken und beim Aufsteppen mit fassen. Die ReiI.,verschluBzähne lauten am rechten Fuhrungssteg entlang (Abb. S). Kurz vor Nahtende Nadel rn Stoff stehen lassen, NähfuB anheben und ReiBverschluB öftnen. NähfuR sen ken und die Naht fertig nähen. Den ReiBverschluB schiieBen. Ubertretenden Schlitzrand nach Nahtverlauf zustecken. Linke ReiBverschluBseite einheften (Abb. T). ReiBverschluB öffnen. Des Fuhrungslineal anbringen und auf die Absteppbreite so ausrichten, daB des Führungslineal an der Kante des Stoffes entlangläuft (Abb. U). Kurz vor Naht ende Nadel im Stoff stehen lassen, Näh fuB anheben, ReiBverschluR schlieBen, NähfuB senken und die Naht fertig nähen. Das Ende der ReiBverschluBnahi durch einen Riegel sichern. 4 T 4 Zippers in ladies' slacks For machine setting see page 34. Move the zipper foot to the left as far as it will go. Press the edges of the closure. Baste the closed zip to the right edge of the closure on the reverse side so that its teeth are still visible. Pin facing strip V to the underside and stitch it down at the same time as you sew the zip. The zip teeth run along the right guiding edge of the foot (Fig. SI. Shortly before the end of the seam leave the needle down in the fabric, raise the zipper foot, open the zip, lower the zipper foot again and finish sewing the seam. Close the zip. Pin the overlapping edge along the intended seam line. Baste left zip edge (Fig. T(. Open zip. Attach the edge guide and position it for the desired seam margin so that it moves along the edge of the fabric (Fig. U). Shortly before the end of the seam leave the needle down in the fabric, raise the zipper foot and close the zip. Lower the zipper foot and finish sewing the seam. Secure the end of the zip seam with a bartack. 38
-
 1
1 -
2
-
3
-
4
-
5
-
6
-
7
-
8
-
9
-
10
-
11
-
12
-
13
-
14
-
15
-
16
-
17
-
18
-
19
-
20
-
21
-
22
-
23
-
24
-
25
-
26
-
27
-
28
-
29
-
30
-
31
-
32
-
33
-
34
-
 35
35 -
 36
36 -
 37
37 -
 38
38 -
 39
39 -
 40
40 -
 41
41 -
 42
42 -
 43
43 -
 44
44 -
 45
45 -
46
-
47
-
48
-
49
-
50
-
51
-
52
-
53
-
54
-
55
-
56
-
57
-
58
-
59
-
60
-
61
-
62
-
63
-
64
-
65
-
66
-
67
-
68
-
69
-
70
 |
 |