Pfaff hobbymatic 905 Owner's Manual
Pfaff hobbymatic 905 Manual
 |
View all Pfaff hobbymatic 905 manuals
Add to My Manuals
Save this manual to your list of manuals |
Pfaff hobbymatic 905 manual content summary:
- Pfaff hobbymatic 905 | Owner's Manual - Page 1
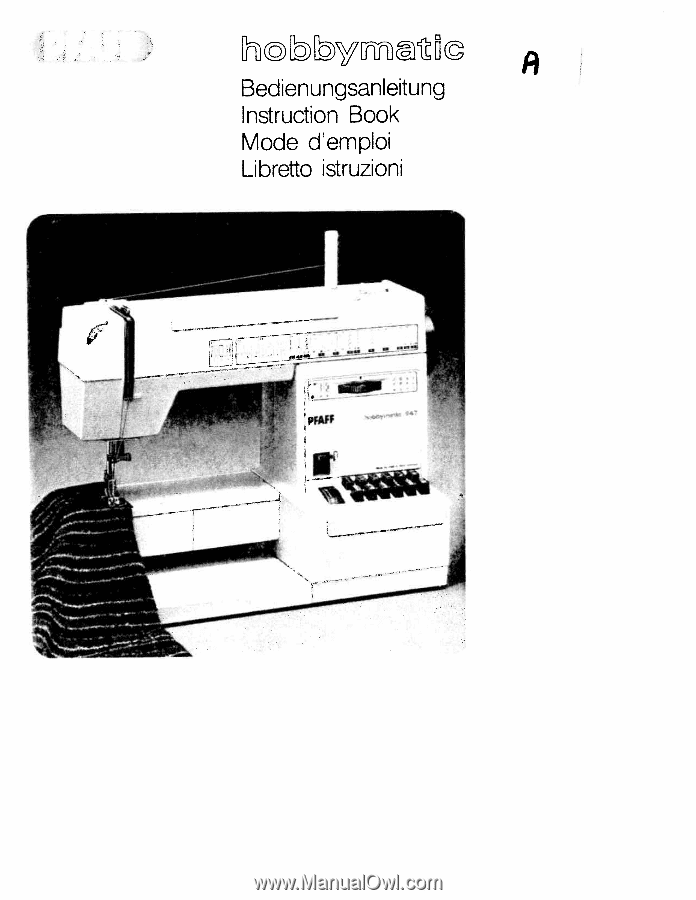
©bEbymrtc A Bedienungsanleitung Instruction Book Mode d'emploi Libretto istruzioni - Pfaff hobbymatic 905 | Owner's Manual - Page 2
- Pfaff hobbymatic 905 | Owner's Manual - Page 3
sewing machine 101 lake-up lever 102 Bobbin winder tension 103 Carrying handle 104 Bobbin winder 105 Hand wheel 106 Stop motion knob 107 Stitch length key 108 Detachable work support with accessory compartment 109 Needle plate 110 Sewing foot holder with sewing sewing hook> 120 Thread guide 121 - Pfaff hobbymatic 905 | Owner's Manual - Page 4
Pièces de Ia machine 101 Levier releveur de fit 102 Pretension du dôvidoir 103 Poignee 104 Dévidoir 105 Volant 106 Disque de debrayage du volant a 107 Regle-point 108 Plaque de rangement avec bote accessoires a 109 Plaque aiguille 110 Support avec pied presseur 111 Fentes d'enfilage 112 Tension du - Pfaff hobbymatic 905 | Owner's Manual - Page 5
/ Den Anlasser und die Bedienungsanlei lung aus dem Fach N nehmen, So wie de Abbildung oben zeigt beides wieder e,nräumen. Take foot control and lnstrucbon Book in the illustration above. Retrer le rheostat a pédale ella notice demploi de Ia case N of les remettre dans Ia case comme on volt sur Ia - Pfaff hobbymatic 905 | Owner's Manual - Page 6
the foot con trol on the floor. Insert plug N in the machine and plug 0 in the wall socket. Branchement éiectrlque: Placer le rheostat a padale Pfaff. Electronic-Anlasser (Schaltor 0) Stellung = halbe Endgeschwindigkeit I Stellung 44 = voIle Endgeschwindigkeit Push master switch P; the sewing - Pfaff hobbymatic 905 | Owner's Manual - Page 7
Verwandlungsnähflãche etwas anheben und herausnehmen. Preparation for bobbin winding: Lift detachable work support and remove it. Preparation des canettes: Lever quelque peu Ia boite de rangement et a sortir, Preparazione per avvoigere a spoilna: Sollevare leggermente ii piano variabile e toglierlo - Pfaff hobbymatic 905 | Owner's Manual - Page 8
P. (7 Nähwerk ausschalten: Handrad 105 fest halten und Scheibe 106 nach vorn drehen. Disengaging the sewing mechanism: Hold the hand wheel steady and turn knob 106 toward you. Débrayer le mécanisme de couture: Retenir le volant 105 et tourner Ia disque 106 vers lavant. Disinnestare meccanismo del - Pfaff hobbymatic 905 | Owner's Manual - Page 9
the l€ft, remove it and cut off the thread. Bobinage Tourner l'interrupteur general. a Tirer le fib de Ia bobine dans Ia préten sion 102 du dévidoir, le coucher droite at l'enrouier de quelques tours, dans be sens de Ia flèche, sur Ia canette. Agir sur Ia pedale du rheostat et bobiner - Pfaff hobbymatic 905 | Owner's Manual - Page 10
if. l 4 Náhwerk einschalten: Handrad festhal ten und Scheibe 106 nach hinten drehen. Dann Handrad nach vorne drehen, bis es einrastet. Engaging the sewing mechanism: Hold the hand wheel firmly and turn disk 108 toward the back, then turn the hand wheel forward again until it snaps in. Embrayage - Pfaff hobbymatic 905 | Owner's Manual - Page 11
125. Raise latch 0 and push the bobbin case onto stud P as far as it will go, making sure cutout 0 points upwards. I Mise en place de Ia bolte a canette: • Tourner Iinterrupter general 125 sur a ArrêP.. Relever le loquet 0 et glisser Ia boite canette, I'ouverture Q en haut, a fond sur le tourillon - Pfaff hobbymatic 905 | Owner's Manual - Page 12
up" position. Raise sew ing foot. Pull thread from spool and draw it into the bobbin tension stud, through opening N, slot 0, behind guiding piece P, upwards through the needle from front to back. Enfiler le fil d'aiguille de l'avant en arriè re par le chas d'aiguille. lrifilare it fib superiore dat - Pfaff hobbymatic 905 | Owner's Manual - Page 13
thread: Hold the needle thread taut. Turn the hand wheel towards you and sew a stitch until both needle and take-up lever are up. Pull out the jusquà ce que laiguille et le reteveur de fit se a trouvent a nouveau en position tlaute. Remonter le fit de canette aide du fit daiguille. Far salire ii - Pfaff hobbymatic 905 | Owner's Manual - Page 14
4 N Nahfläche, wie der Pfeil zeigt, an die Maschine schieben. Push work support against the machine, as shown by the arrow. Placer Ia boite de rangement contre Ia machine, comme le montre Ia flèche. Applicare il piano variabile alta macchina, come indicato dalla freccia. • Hauptschalter - Pfaff hobbymatic 905 | Owner's Manual - Page 15
you press down the pedal, the faster the machine runs. Abaisser Ia pedale du rheostat. Plus Ia pedale sera abaissée, plus Ia Pfaff coudra vito. Premere ii reostato: Piü a To check the tension, set the machine at a wide zigzag stitch. Sew a short seam. The threads should interlock in the middle of the - Pfaff hobbymatic 905 | Owner's Manual - Page 16
.oeg'diaCeveur.eosetnraCgitnitlolratlsôusgepldeelrrnuenosouqrfeIumo'reraatlieddqleaeuqneeudssnautlprn'leeoèippn3caohtsiiains.ftftr5e. seur des tissus. CLdIzcaaiaauowgctn-te3eizet-tnnraunosig5rsril.aioelo.poPnniaieLüüedl.'elacanIalInellortanngcortooomrtdn - Pfaff hobbymatic 905 | Owner's Manual - Page 17
the number indicating the stitch length at mark N. Fig. 0 (bottom) shows how to set the stitch length control for sewing stretch stitches (red stitch symbols on push but tons). Réglage de Ia Iongueur du point Les chiffres sur le disque 107 indiquent a longueur du point en mm. Celle-ci est reglable - Pfaff hobbymatic 905 | Owner's Manual - Page 18
ücken. Solange die Taste gedrückt wird, näht die Maschine rückwärts. Reverse sewing Press button 123. As long as you hold this button the machine sews back wards. Couture en marche arrière Abaisser a touche 123. La machine coud en arriêre aussi longtemps quo a touche est maintenue en bas. La - Pfaff hobbymatic 905 | Owner's Manual - Page 19
a 15-watt light bulb in the sewing lamp. Safety rules for United Kingdom see page 36. 4 Mesures de sécurité a) Toujours faire preuve do prudence et continuellement surveiller le travail. b) Toujours dóbrancher Ia machine du secteur avant do quitter Ia machine, avant los travaux d'entretien et en - Pfaff hobbymatic 905 | Owner's Manual - Page 20
4 T(DuMinipetoepdvrtesealcrlshestceieohndhielnidceehnSeetrnAentMczhaoshdtliecvlhloeen)hTabipepntaesitneen und Programmen. ADsTc,iaehsBatT,eltnaCtastsuKetnendBozplu1ifnsmltkoegcLlheSötiastcisehctnzheenldaitegicge die Aus getippten (siehe Seite 25>. D Zickzackstlch 2 mm E Zickzackstich 3,5 mm F - Pfaff hobbymatic 905 | Owner's Manual - Page 21
_ _ B C D E F 4 T(Lmmeoeousndcoevhmlaeenbsseredssaedonlecsosonpmtootoimunctmashnoeéddsleéaelsettiqddueeesms)parcohgirnaem. TLtaeaomdutépcophsuoecrashteeabrnobnlu'ouatuoilgetnournniillnlèoeirseearsteo:guBAacu,hsceBehsr,etCae(cpntiavmgéeéems25ee)t. o Point zigzag 2 mm E Point zigzag 3,5 mm F - Pfaff hobbymatic 905 | Owner's Manual - Page 22
_ HRHHR Tipptasten (DuMnietoedvreselclrhesciomhdiieltidcSehtnereetAncnhMzsatoihcdlheevllnoe)nhTabipepntaesitneen und Programmen. A, B, C Knopflochtasten Die Taste B 1st gleichzeitig die Aus schaittaste zum LOsen der getippten Tasten und linke Stichiage (siehe Seite 25). D Stretch-3fach- - Pfaff hobbymatic 905 | Owner's Manual - Page 23
stitch Elastic decorative stitch M Honeycomb stitch Elastic stitch Alpilsaltgesedtisticn8h0et-hse8a1sn. tdiTtchshitsitpccrhhoagcrrotammalbsiconhacatoriotnntoasninasre possible applications. The letters of the buttons on your machine determine the programs and combinations that can be sewn. - Pfaff hobbymatic 905 | Owner's Manual - Page 24
T(Lmmeoeousndcoévhmlaeenbsseredasveodeleccosonpmtooleimuncmtashnoeeddslséaelsettiqddueeessm)parcohgirnaem. TtLaeoamdutecpophsuoecarshteeabrnobnlu'ouatuoilgetnournnililnlèeeirseearsteo:guABacu,hsce8ohs,retCae(cnptiavmgéeeêms25ee)t. 0 Triple point zigzag élastique 2 mm E Point zigzag 2 mm Triple - Pfaff hobbymatic 905 | Owner's Manual - Page 25
button required and set the stitch length between I and 6. All zigzag and utility stitches are halved in width when button G is pressed. / Reglage des points uttiltaires (symboles blancs) Appuyer sur a touche et regler Ia Ion gueur do point désirée entre 1 et 6. En appuyant égalemont sur Ia touche - Pfaff hobbymatic 905 | Owner's Manual - Page 26
the it wilt go (red symbol). By also stitches pressing button G, all stretch can be halved in width. Reglage des points etastiques (ApssyoypmipmnubtbyodoololeressIrauorruologuIneagg,etusojuo)uuscqrhued'oàetpaoreibngutlsteérosul.er regle le Tous los do moitié points élastiques en appuyant sur - Pfaff hobbymatic 905 | Owner's Manual - Page 27
-mmwessbttmbiiripntiunencgrcaeahtttsittiaoiiospocbnensonldse,msB,,csaobsaitsoeimonnkvgw.auebeterlteiatlholalennar5es Combinaisons de points elastiques ePacfmctipeoogepsunuusurstr,tieyeolcniyeiuolttrscamcdhiosdrbaeireominnssn.psucerolrLiltseuao - Pfaff hobbymatic 905 | Owner's Manual - Page 28
4 4 L1 T>+1uj H I 4.Stichlage Stichlage Stichlage Stichlage einstellen bei Geradstich: links: Taste B tippen Mitte: Taste G tippen rechts: Taste H und I tippen 4-Selecting the needle position tor sLCRteerifganthitgrntahenletednesledteieltdecplhoepisoniptsgioio:tsiniot:ino:pnu: - Pfaff hobbymatic 905 | Owner's Manual - Page 29
corresponding letter at mark "0" by turning thumb wheel N. For sewing utility stitches, thumb wheel N for fancy stitches must be disengaged. To do so, set the white dot at mark0". N Disque de reglage des points d'ornementation Chaque point d'ornementation est designé par une lettre-code - Pfaff hobbymatic 905 | Owner's Manual - Page 30
13 instruction Book Mode d'ernpioj Libretto istruzion H I L - PMF$ L_- ---a I - Pfaff hobbymatic 905 | Owner's Manual - Page 31
". Points décoratits at points combines Les motifs combines sont obtenus par pression des touches correspondantes. Le tableau presente les points avec, en dessous, los lettres-codes des touches a manceuvrer. En cas de mention stretch-, tourner le régle-point en ion gueur sur -stretch'.. N Punti - Pfaff hobbymatic 905 | Owner's Manual - Page 32
P schieben = zum Nähen. Dropping the teed dog Open tree arm cover 119. Push the dropfeed control toward 0 (feed dog dropped) or toward P (sewing position). Abaissement de Ia grifte Ouvrir le cache 119 et déplacer le cursour abaisse-griffe dans le sons 0 = grille escamotée; le déplacer vers P pour Ia - Pfaff hobbymatic 905 | Owner's Manual - Page 33
befestigen. S ist die NähfuBhalterschraube. Screws 0 and R are for securing acces sories. S is the Sewing foot retaining screw. a 0 et R servent fixer les accessoires. S est Ia vis de fixation du support de semelle. o a R servono per fissare gli accessori. S é Ia vite di fissaggio del supporto per - Pfaff hobbymatic 905 | Owner's Manual - Page 34
die Nâhflâche, wie der Pfeil zeigt, an die Maschine schieben (0). Detachable work support Lift and remove the work support (N). To fit the work support to the machine push is close to the machine as indi cated by the arrow (0). Plan de travail variable Soulever quelque peu et enle ver le plan - Pfaff hobbymatic 905 | Owner's Manual - Page 35
Filzscheibe Sewing feet (standard 1 Ordinary sewing 4 foot 5 accessories> Zipper foot Buttonhole foot 2 Clear-view foot 6 Edge guide 3 a point invisible 5 glissiére Semelle a boutonnières 6 Guide-bord 7 Rondelle de feutre Pledini (corredo 1 piedino normale) 4 piedino per normale - Pfaff hobbymatic 905 | Owner's Manual - Page 36
kann bei fast allen NàhfUl3en zum Einsatz kommen, Befestigung des Lineals Lineal N durch die Bohrung 0 schieben und Sewing foot: Ordinary sewing foot or clear-view foot and edge guide Stitch: Button G Edge guide N can be used with nearly all sewing feet. Fitting the edge guide Push edge guide - Pfaff hobbymatic 905 | Owner's Manual - Page 37
, 0 at serrer rogler Ia gLleuasidgseuuirdspueir-qdâIr'roéeictsafrpataceirmlaitleelnètlceodsnéassitidrééa.rasbulrepmiqeunatge des (fig. bords. Q) ou Ce taisant, Ia bien Ia piqüre bord du tissu précadente suit Ia guide-droit (fig. R). La couture sara toujours nette at réguliére. 1' Lavori dl - Pfaff hobbymatic 905 | Owner's Manual - Page 38
unter den Bhnd stichiuB legen. Der Stoffbruch des Ober stoftes läuft dabei am Anschlag 0 des Blindstichfu8es entlang. Mit der Stellschraube N the blindstitch sewing foot. The crease line of the outer fabric runs along edge guide 0 of the blindstitch sewing foot. Turn screw N to adjust edge guide 0 - Pfaff hobbymatic 905 | Owner's Manual - Page 39
N -J N -j - Point invisible Pied presseur: Tension: Fib: Pied a points invisibbes Fib d'aiguilbe moms tendu Fib a coudre Point: Touche H Longueur do point: Aiguilbe: 3a4 Grossour 70 ou 80 RPpexooetisgénelrtrasieglui'enorvudibrseboiebnt(bgaoepsjr.IeéatpLébaaeruéctdéaesesosIu0u' - Pfaff hobbymatic 905 | Owner's Manual - Page 40
/ Some safety rules valid for United Kingdom only Tcohleouwreirdesacincotrhdisinmg ationsthleeafdollaorweing code: Blue: Neutral Brown: Live As the colours of the wires in the mains lead of this correspond appliance may with the colour not coding of the tfmiesorlumlmostwianrsbak: - Pfaff hobbymatic 905 | Owner's Manual - Page 41
_ KTdKKfFsPPkdaeatnnanafrdensoeoeadronet,ipifpeelpn.nnKftfnflkQlZColnzdwoolcoiueüicceiehapmtmbehhhifnfpeubKemltrpoleKeond3neecirldenngonehnuaritiosp.be.nnctpfeShedOblrBhfronkUretiebiociNaninnieNcehclmtagnherlheãdaternihaenReNnnbãdtrg.usehäeNeeti6vheeSnnooenl3bsttlercrlcpeeiaidktshnnsaeneteltdl.neiä - Pfaff hobbymatic 905 | Owner's Manual - Page 42
the needle. 2 Push button B in until 4 to 6 bar- tacking stitches are sewn, holding the workpiece firmly, then release the but ton. 3 Push button A. Sew the second but tonhole seam the same length as the first. 4 Push button B in until 4 to 6 bartacking stitches are sewn, holding the material firmly - Pfaff hobbymatic 905 | Owner's Manual - Page 43
Ia matiére. Tenir passe Iégèrement tendu Ie et fil Ie de couper. 6 Ouvrir Ia boutonniere. a a Nbmooeuuntstonarnevciaeonrmte dmoatnictdoreomndmseesdns'caeexiré . Zeichnungen sind ohne Nähf uS. Drawings do not include sewing foot. Los illustrations ne moritrent pas a semelle du peed - Pfaff hobbymatic 905 | Owner's Manual - Page 44
toot: Clear-view toot or without sewing foot Stitch type: Button E Thread: Fine sewing thread Drop the machine teed. Move the neec to its left position, and turn the balance wheel towards you until the needle des cends. Position the button on the previously marked material: Carefully place - Pfaff hobbymatic 905 | Owner's Manual - Page 45
Pied-prosseur: sans pied-de-biche ou avec pied en plexiglas Point: Bouton-poussoir E Griffe: Fit: sur 10 tissu et sous 10 pied-presseur. Glisser précautionneusement le tissu et le bouton S0US 10 support du pied presseur. Abaisser celui-ci et faire piquer l'aiguille dans 10 trou gauche du bouton. - Pfaff hobbymatic 905 | Owner's Manual - Page 46
the toot so tha its teeth run along the right guiding edge on the sole of the foot (Fig. 0). Sew about half the length of the zip at the required (Fig. P). Lower the zipper foot again, continue the seam and then sew across the end. Sew the other side of the zip at the same margin. Shortly before the - Pfaff hobbymatic 905 | Owner's Manual - Page 47
aa IPniesdertpiorenssdeeurf:ermetuPglriieesdssièrefgelrimsseleturree a Longueur de Point: Fit: point: 2 a 3 mm Bouton-poussoir Fit a coudre G Mise en place du pied a fermeture a a a a gAdtapgelavcrarireascuiInsssrcaoslthéecIsaerSuheeermr(sraf'pieiganlel.eciuuecrNtpre)jioéeucatodsrhruqereauiê - Pfaff hobbymatic 905 | Owner's Manual - Page 48
au3en am Füh rungssteg entlang (Abb. T). ( Seam-like zipper closure For machine setting see page 42. How the zipper is prepared and inserted: Press the of the seam lift up the teeth a little to teed them into the guiding groove. Sew the seam to the end and secure it. Close zip. Pin other side - Pfaff hobbymatic 905 | Owner's Manual - Page 49
\\' j\\ a \\\ \ \\ / \\ \\ \\\ \\\ / 4, / 4FelViRl(mlsRpIneldrftonddapaaiuoim eseageueqaenirrcépgm.tigpOrenuettigrleeairuIla.esNoreaueasqctaiegrnd)rlgisuToue.IcllgteaageIslaemrreoepaOeroeurldelumrirmqbpcuefsalgetmtoeuamihusvairaseaqnrsinIoerreesnnuémauiuedfugederrtbcei, - Pfaff hobbymatic 905 | Owner's Manual - Page 50
, daB das Fuhrungs lineal an der Kante des Stoffes entlang läuft (Abb, P). Kurz vor Riegel sichern. ,0 4 Zippers in ladles' slacks For machine setting see page 42. Move the zipper foot to the at the same time as you sew the zip. The zip teeth run along the right guiding edge of the foot (Fig. - Pfaff hobbymatic 905 | Owner's Manual - Page 51
. 0). Ouvrir Ta fermeture a glissière. Mettre en place et aligner To guide-droit sur Ta tar geur do Ta piqUre de sorte que le guide droit Tonge le bord du tissu (fig. P). Peu avant Ta fin de Ta couture, Taisser laiguille detanfesrmTeetrisTsau,ferremmeotunrteera Te pied presseur glissière - Pfaff hobbymatic 905 | Owner's Manual - Page 52
go of bar P, which then rests on retaining screw Q. Tighten screw 0. Draw up the bobbin thread. Hold both threads until the machine has made a few stitches. First sew a few stitches over the damaged spot from one side to the other in serpentine fashion, placing the lines of stitching close together - Pfaff hobbymatic 905 | Owner's Manual - Page 53
1 F ' \. \'\ ' \"' ' - Pfaff hobbymatic 905 | Owner's Manual - Page 54
senken Führen Sie den Wollfaden durch den Stchlochausschnitt des Stopffu8es und legen Sie hn i die Fadenfuhrung P. guide P. Place the wool thread under the darninç foot. Start at the top left and place the wool thread back and forth across the damaged area (Fig. N). Then Cut the wool thread and sew - Pfaff hobbymatic 905 | Owner's Manual - Page 55
\S Reprise A Ia lame Pied presseur: Pied a (contra repriser supplement) Point: Bouton-poussoir G Tension du fit d'aiguitte: Fit: Zfitonaebbrooduetrononuièarersep(3r)iser fit de tame Aiguilte: Griffe: Butée 121: Grosseur 70 abaissée La glisser vers l'arrière Abaisser te levier presse-tissu - Pfaff hobbymatic 905 | Owner's Manual - Page 56
loosened. Remove needle plate Clean both machine feed and the vicinii of the sewing hook with a soft brush. D not oil the machine. All you have to do is griffe et le compartiment du crochet. Ne pas hul ler a machine. De temps a autre, 1 suffit de mettre une goutte d'huile dans a coursiére. 4 Pulizia - Pfaff hobbymatic 905 | Owner's Manual - Page 57
Instruction Book Mode d1 'eniplo Libretto istruzjo LL_ S :F I - Pfaff hobbymatic 905 | Owner's Manual - Page 58
the bulb upwards and turn it in direction P. Changement de l'ampoule • Débrancher Ia machine du Placer le guide-bord de facon secteur, oblique dans l'ouverture N sur Ia tête de Ia machine. boftier de Descendre et maintenir le a lampe. Pousser lampoule vvqteeeusrre.sQPsl.eelasPhcoaeteurunts - Pfaff hobbymatic 905 | Owner's Manual - Page 59
Wahl cler ene bessere nchtigen Nadel garantiert Verarbeitung des Nahmaterials Stoffqualitat teicht Nadel 60 70 75 Stoffqual Simplex - mtttlere Kugelspitze - - grol3e Kugelspitze Spezell fur Besonders Pfaff entwickelte Stretchnadel. gut geeignet für empfindliche Stretch- und Wirkstoffe - Pfaff hobbymatic 905 | Owner's Manual - Page 60
Nadel-Tabelle _ __ _________ Bezeichnung Stichlange Stichbreite Nadelentfernung Geeignet für 1301705H-ZWI 2,5mm - Stärke: 80 2,5mm - - ------- --. 1,6mm 2,0mm 1301705H-ZWI Stärke: 80 Stärke 90 Stârke. 100 2,5mm 2,5mm 3,0mm - -- -- - 2,5mm - 3,0mm - 4,0mm - - -- - - Pfaff hobbymatic 905 | Owner's Manual - Page 61
Needle chart Using the adequate needle guarantees a better working up of the material. Fabric weight: light Needle size: 60, 70,75 Fabric weight: medium Needle size: 80,90 Fabric we:ght: heavy Needle size: 100, 110,120 Needle points System & No. 130/705 H 70, 80 Profile - - Point & eye - Pfaff hobbymatic 905 | Owner's Manual - Page 62
"leedle chart System&No. Stitch length 130/705H-ZW1 80 130/705K-ZWI 80 90 100 25mm 25mm 2.5mm 2,5mm 3.0mm Wd1h Ie spadng - - 1.6mm - 2.0mm - - 25mm 3.0 mm 4.0 mm Suitable for Mecumde cording Wide cording Extra wide cording Extra-wide cording DBfaeebfcroiocrreaptyrioovpueedsrlteyas. - Pfaff hobbymatic 905 | Owner's Manual - Page 63
, chevreau 130/705 H-PCL a Grosseur do 'aiguilte: 80 110 -- pointe coupante (a avec rainure obli- quo gauche) --±-- petite pointe a Grosseur de l'aigullte: 70 110 '- bille, chas long Similicuir, plastique, feuilles plastiques, toile cirée a Piqüres avec sole boutonniere ou fit synthetique 30 - Pfaff hobbymatic 905 | Owner's Manual - Page 64
aiguilles Designation Longueur de 'point 130/705 H-ZWI Grosseur: 80 25mm 25mm Largeur de point Espacement des aiguilles 1,6 mm 2,0mm Utlilsations nervures normales 130/705 H-ZWI Grosseur 80 Grosseur: 90 Grosseur: 100 25mm 2,5mm 3,0mm 2,5mm 30mm 4,0 mm nervures larges nervures extra- - Pfaff hobbymatic 905 | Owner's Manual - Page 65
Tabella degli aghi La scelta delrago giusto garantisce una migliore lavorazione del matenale da cucire Qualitá della stoffa leggera ago 60/70/75 Qualitä della stoff a media ago 80/90 Qualit della stotla pesante ago 100/110/120 Le punte degli aghi Denominazione Profilo Punta e Cruna Indicata - Pfaff hobbymatic 905 | Owner's Manual - Page 66
ibella degli aghi Denominazione Iunghezza punto - 130/705H-ZW 25mm Grossezza, 80 2,5 mm 1301750 H-ZWI Grossezza 80 Grossezza. 90 Grossezza. 100 2,5 mm 2,5 mm 3.0mm Iarghezza punto - - - - - distanza aghi 1,6 mm 2,0 mm Indicato per nervature normati nervature normali 2,5 mm 3.0 mm 4,0 mm - Pfaff hobbymatic 905 | Owner's Manual - Page 67
. Die Nadel st zu dunn odor zu dick. Durch Ziehen oder Schieben des Stoffes wird die Nadel verbogen und sto8t auf die Stichplatte. Die Spulenkapsel 1st Unterfadon st ungleich aufgespult. Fadenschlingon unterhaib oder oberhalb des Stoffes. Ober- und Unterfadenspannung kontrotlieren. Nur einwandtreies - Pfaff hobbymatic 905 | Owner's Manual - Page 68
N Ursache: Beseitigung: 5. Die Maschine transportiert nicht oder unregeImalig Zwischen den Transporteur-Zahnreihen hat sich Nähstaub festgepre6t. Stichplatte abnehmen, Nähstaub mit Pinsel entfernen. T-ansporteur st versenkt. Versenkschieber steht rechts. Verserikschieber nach inks stellen, - Pfaff hobbymatic 905 | Owner's Manual - Page 69
thread. Insert new needle and push it up as far as it will go. Insert new needle. Refer to needle table. Let machine feed the work alone. Only guide the material lightly. When inserting the bobbin case, push it in as far as it will go. Check upper and lower tensions. Use - Pfaff hobbymatic 905 | Owner's Manual - Page 70
ends and put a drop of oil into hook raceway. 7. Fundamental rules Before exchanging either sewing foot or needle, Never run a threaded machine unless there is a foot. If you have to leave the machine, even for the master switch. This is particularly important switch off master switch 125. piece - Pfaff hobbymatic 905 | Owner's Manual - Page 71
La bolte a canette nest pas introduite correctement. lntroduire Ia nouvelle aiguille a fond. Remplacer t'aiguilte. Tenir compte du tableau des aiguilles. Laisser a machine entrainer soule. Guider fegerement l'ouvrage. Appuyer sur Ia boite a canette a sa miso en place. jusqu'à lemboltage perceptible - Pfaff hobbymatic 905 | Owner's Manual - Page 72
Oter los bourres au pinceau. a Griffe abaissée (levier do marche arrière Placer le bouton abaissegrif1e gauche. en position droite). 6. Marche dure de Ia machine Des bribes de fil so sont prises dans Ia coursière du crochet. Enlever es bribes do fil of mettre uno goutte dhuile dans Ia coursière - Pfaff hobbymatic 905 | Owner's Manual - Page 73
Possibili inconvenienti e come ovviarli I nconveniente Come ovviare 1, La macchina salta punti Lago non è inserito bene. E stato nserito un ago sbagliato. L'ago è storto o spuntato, La macchina non è infilata bene. Lago e troppo fine per ii fIIo Inserire ago fino albarresto. La parte piatta del - Pfaff hobbymatic 905 | Owner's Manual - Page 74
nconveniente Come ovviare 5. La macchina non trasporta a trasporta solo irregolarmente Tra dentini del trasporto si e pressata delta polvere di cucito. Togliere Ia placa dell'ago e pulire dentini con un pennello. II trasporto è abbassato. II dispositivo per abbassare it trasporto Spostare it - Pfaff hobbymatic 905 | Owner's Manual - Page 75
Nãharbeiten. Es st be) ihrern Handler gegen Berechnung erbáltüch. Für Nähfüf3e mit Schaft Zum Lösen der Betestigungsschraube des Nätifu)3schalters eine Mürtze verwenden. /uhenOr Besteit Nr Ndharheit App knttorsfu8 Bande,nasser Nähf'jithaiter entlernont Sesenfoi3 5 Riten (Zwiiingsriadein - Pfaff hobbymatic 905 | Owner's Manual - Page 76
Inhaltsverzeichnes Abstepparbeiten Anlasser Blindstich Einstellrad für Zierstiche Elektrischer Arischlu8 Fadenabschneider Gluhiampe auswechseln Hosenrei8verschlu8 (Darner,) Knopfannähen Knopflochnähen Nadel auswechsen Nadeltabetle Nahtrei8verschlu8 Nãhfü6e Nähfüfte auswechseln - Pfaff hobbymatic 905 | Owner's Manual - Page 77
fringes and for basting Straight-stitch foot Needle plate with round needle hole 98-694 803-00 93-032 087-91 For topstitching and sewing very delicate and soft fabrics (silk lersey, etc.) Felling foot, 45 mm Felling foot, 6.5 mm Shirring foot Single-needle cording foot -- Overlock foot -_______ - Pfaff hobbymatic 905 | Owner's Manual - Page 78
buttonholes Sewing feet Sewing in zippers Sewing on buttons Thread Thumb cutter wheel for fancy stitches Topstitching Upper threading Utility- and stretch-stitch Work support/accessory combinations box Zippers for ladies' slacks 34, 35 6 4, 5 53 28 29 8 12 52 48, 49 50, 51 5. 7 10 - Pfaff hobbymatic 905 | Owner's Manual - Page 79
Pied fronceur 93-035998-91 froncement de volants, etc. Pied guide-cordonnet Pied overlock Ourleur (bord route) 2 mm 93-035915-91 pose de cordons 98-620404-00 surfilage de bords de coupe: assemblage et surfilage simultané de bords de coupe 98-694804-00 ourlage de bords au point zigzag Ourleur - Pfaff hobbymatic 905 | Owner's Manual - Page 80
variable Points dornementation, points combines Points ir,visibtes Pose des boutons Preparation des canettes Reglage de a tongueur de point Regtage des points utititaires Regtage des points élastiques Remontée dii fit de canette Reprisage au lii de lame a Reprisage au point droit Rheostat pédale - Pfaff hobbymatic 905 | Owner's Manual - Page 81
Accessori fuorl corredo Gil accessori fuori corredo servono per avon di cucito speciali. Si possono acquistare nel negozi Pfafl. Per piedln con gambo Per alientare Ia vile del porta-piedino usare una moneta. cessorio No dordine avoro di Cucito Piedino per applicazion( L 93-035920-91 per avon di - Pfaff hobbymatic 905 | Owner's Manual - Page 82
Indice Attaccatura bottoni Avvolgere Ia spoilna Cerruera lampo americana Cerniere lampo Cerniere lampo per pantaloni da signora Coflegamento Combinazioni elettrico di punti utiti a di punti flexi (stretch> Come abbassare II trasporto Controllo della tensions interiore Controllo della - Pfaff hobbymatic 905 | Owner's Manual - Page 83
der Stichlangen-Einsteiler bis zum Anschlag auf ,,stretch' zu drehen. Bei allen übri r. Bezeichnung 01 K flopfl oc h er Anwendung Ohne Drehen des Stoffes, nur tippen und das Knopf loch ist fertig. Die Stichdichte läl3t sich regulieren. 02 Geradstich 03 Zickzackstich 04 Stretch-3fachGeradstich - Pfaff hobbymatic 905 | Owner's Manual - Page 84
;en st de Stichlänge nach Wunsch zu wählen. In der Texttabelle snd Bez&chnung md Anwendung der einzelnen Programme angegeben. 07 0809 10 11 f\/ '-il \/\ Il /\f .-11 \/\ \//\/'I ..- - Pfaff hobbymatic 905 | Owner's Manual - Page 85
Stitch program chart L,ted in this chart are the he lcwer half, the buttons stitch to be program number, me corresponding stitch and, pressed to sew this seam pattern. For all stitch in pro grams marked stretcn'. turn the stitch control toward "stretch" as far as it will go. ABC 02 I c . I I - Pfaff hobbymatic 905 | Owner's Manual - Page 86
fabrics. t - Ornamental seam on light clothing. 13 Elastic ornamental stitch Inserting patches and darning rips on elastic materials or sewing ornamental seams on elastic fabrics. 14 Feather stitch Decorative cover seams, e. g. on aprons. 15 Lampshade stitch, wide Classical ornamental - Pfaff hobbymatic 905 | Owner's Manual - Page 87
Pour renforcer les coutures élastiques (gaines, combines, soutiens-gorge. .). 06 Point zigzag pique Pose de pièces ou raccommodage dans es tissus élastiques. 07 Po:nt nid d abeille Pose de fils élastiques (smocks) et couture dassemblage sur tissu éponge. 08 Point invisible .....4 09 Point - Pfaff hobbymatic 905 | Owner's Manual - Page 88
élastiques - - 14 Point dépine Couture décoratve sur tabliers. 15 Point grec large Point overlock 16 ferme large 1 7 Point grec ètroit t 18 Point de tissage 19 Point diagonal 20 Point triangle Couture decorative classique sur tous es tissus tins. Pour poser et raccommoder es bords et executer - Pfaff hobbymatic 905 | Owner's Manual - Page 89
La La In tttuaatbbtieeUlI laparoidngedriacmparmoiiigprcraoomngrmainmidmicaa.zioii nreela"tfilveoxi"puonctcoorer,e sotto, q'jali regolare il tasti occorre premere. regolatore del punto fino all'arresto su 'stretch" !-e 02 03 04 Ii I II c II C) CE) /\ / ------- - ---' ---- Ill \ / - Pfaff hobbymatic 905 | Owner's Manual - Page 90
g!i altri punti Si PUÔ regolare a lunghezza tie! plJnt( .1 v,It,i'i J.Ii ill tb denominazione e apphcazione dei sinqolt prugf 111111 7 08 09 10 / - -I! lI - \/ tI \/ H HK L CD. 11 12 13 14 15 16 17 -4/ M ii \/\ > . 1 I ' _-/I _' j - Ii \/\ " ' _ - __-fl Ii \/\ (' %. -I lJ
-
 1
1 -
 2
2 -
 3
3 -
 4
4 -
 5
5 -
 6
6 -
 7
7 -
8
-
9
-
10
-
11
-
12
-
13
-
14
-
15
-
16
-
17
-
18
-
19
-
20
-
21
-
22
-
23
-
24
-
25
-
26
-
27
-
28
-
29
-
30
-
31
-
32
-
33
-
34
-
35
-
36
-
37
-
38
-
39
-
40
-
41
-
42
-
43
-
44
-
45
-
46
-
47
-
48
-
49
-
50
-
51
-
52
-
53
-
54
-
55
-
56
-
57
-
58
-
59
-
60
-
61
-
62
-
63
-
64
-
65
-
66
-
67
-
68
-
69
-
70
-
71
-
72
-
73
-
74
-
75
-
76
-
77
-
78
-
79
-
80
-
81
-
82
-
83
-
84
-
85
-
86
-
87
-
88
-
89
-
90
 |
 |
©bEbymrtc
A
Bedienungsanleitung
Instruction
Book
Mode
d’emploi
Libretto
istruzioni