Pfaff hobbymatic 905 Owner's Manual - Page 11
aufwärtsbewegen.
 |
View all Pfaff hobbymatic 905 manuals
Add to My Manuals
Save this manual to your list of manuals |
Page 11 highlights
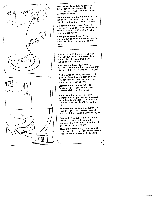
Unterfadenspannung prUfen: Kapsel leicht ruckartig aufwärtsbewegen. Sie mu8 stufenweise niedersinken. (Einstell schraube N nach links drehen = loser, nach rechts drehen = fester). Checking the bobbin thread tension: With a brief, sharp upward movement of your hand, the bobbin must gradually slip downwards. (Turn screw N counter-clock wise for a weaker tension, or clockwise for a tighter tension.) Tension du fit de canette: Laisser pendre Ia canette garnie au fil de Ia canette. Elle doit descendre graduelle ment quand on imprime a Ia main de Iégeres saccades ascendantes. Rotation de Ia vis N vers Ia gauche: reduction do Ia tension; rotation vers Ia droite: renforcement. Controllo delta tensione interlore: Tirare Ia capsula con leggeri colpetti verso - lalto. Deve abbassarsi gradatamente (girando Ia vitO di regolaggio N a sinistra si allenta, verso destra si rinforza). tçpulenkapsel einsetzen: • Hauptschalter 125 ausschalteri. Klappe 0 anheben und die Kapsel bis zum Anschlag auf Stift P schieben, Aus schnitt Q mul3 dabei nach oben zeigen. Inserting the bobbin case: • Switch off master switch 125. Raise latch 0 and push the bobbin case onto stud P as far as it will go, making sure cutout 0 points upwards. I Mise en place de Ia bolte a canette: • Tourner Iinterrupter general 125 sur a ArrêP.. Relever le loquet 0 et glisser Ia boite canette, I'ouverture Q en haut, a fond sur le tourillon P. Come inserire Ia capsula delta spolina: • Disinserire l'interruttore principale 125. Sollevare ii chiusino 0 e inserire Ia cap sula fino all'arresto sul porno P. L'aper tura 0 deve essere rivolta verso I'alto.
-
 1
1 -
2
-
3
-
4
-
5
-
 6
6 -
 7
7 -
 8
8 -
 9
9 -
 10
10 -
 11
11 -
 12
12 -
 13
13 -
 14
14 -
 15
15 -
 16
16 -
17
-
18
-
19
-
20
-
21
-
22
-
23
-
24
-
25
-
26
-
27
-
28
-
29
-
30
-
31
-
32
-
33
-
34
-
35
-
36
-
37
-
38
-
39
-
40
-
41
-
42
-
43
-
44
-
45
-
46
-
47
-
48
-
49
-
50
-
51
-
52
-
53
-
54
-
55
-
56
-
57
-
58
-
59
-
60
-
61
-
62
-
63
-
64
-
65
-
66
-
67
-
68
-
69
-
70
-
71
-
72
-
73
-
74
-
75
-
76
-
77
-
78
-
79
-
80
-
81
-
82
-
83
-
84
-
85
-
86
-
87
-
88
-
89
-
90
 |
 |
