Philips 7FF2CWO User manual - Page 18
right, Play Slideshow, WARNING, PC Folder, Camera Folde
 |
UPC - 609585141773
View all Philips 7FF2CWO manuals
Add to My Manuals
Save this manual to your list of manuals |
Page 18 highlights
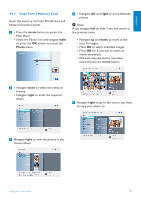
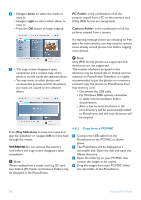
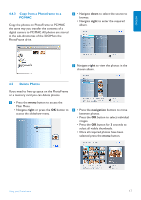
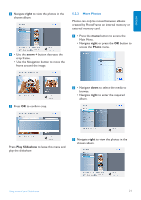
6 • Navigate down to select the media to copy to. • Navigate right to select which album to copy to. • Press the OK button to begin copying. PC Folder: is the combination of all the pictures copied from a PC to the memory card. (Only JPEG format are recognized) Camera Folder: is the combination of all the pictures created from a camera. If a warning message shows up indicating no free space for more photos, you may need to remove some already stored photos first before copying more photos. 7 • The copy screen disappears upon completion and a resized copy of the photo is stored inside the selected album. • You may move to other photos and continue this process until all the photos you want are copied to the selected album. Note: Only JPEG format photos are supported. Subdirectories are not supported. The number of photos accepted in this directory may be limited due to limited internal memory on PhotoFrame.Therefore, it is highly recommended to put the photos on a memory card and copy the photos to PhotoFrame from that memory card. • Disconnect the USB cable. • For Windows 2000 systems, remember to safely remove hardware before disconnection. • After a few seconds, all photos in the root directory will be automatically added to PhotoFrame and the root directory will be emptied. Press Play Slideshow to leave this menu and play the slideshow or navigate left to move back through the menus. WARNING:Do not remove the memory card before the copy screen disappears upon completion. Note: When reading from a media card e.g. SD card, two folders (PC Folder and Camera Folder) may be displayed in the PhotoFrame. 4.4.2 Copy from a PC/MAC 1 Connect the USB cable from the Photoframe to the PC/MAC as shown above. 2 The Photoframe will be displayed as a removable disk. Open the disk and open the Album directory. 3 Open the folder(s) on your PC/MAC that contain the images to be copied. 4 Drag the images from your PC/MAC folder into the folder of the Photoframe. 16 Using yout PhotoFrame
-
 1
1 -
2
-
3
-
4
-
5
-
6
-
7
-
8
-
9
-
10
-
11
-
12
-
 13
13 -
 14
14 -
 15
15 -
 16
16 -
 17
17 -
 18
18 -
 19
19 -
 20
20 -
 21
21 -
 22
22 -
 23
23 -
24
-
25
-
26
-
27
-
28
-
29
-
30
-
31
-
32
-
33
-
34
-
35
-
36
-
37
-
38
-
39
-
40
-
41
-
42
-
43
-
44
-
45
-
46
-
47
-
48
-
49
-
50
-
51
-
52
-
53
-
54
-
55
-
56
-
57
-
58
-
59
-
60
 |
 |