Philips HTS3051BV User manual - Page 50
IP Address Setting / DNS Setting, EnableEasy, EnableCustom, Press [BACK
 |
View all Philips HTS3051BV manuals
Add to My Manuals
Save this manual to your list of manuals |
Page 50 highlights
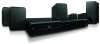
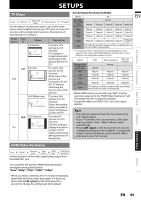
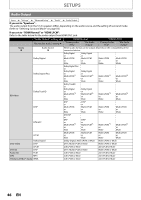
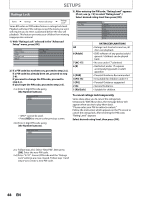
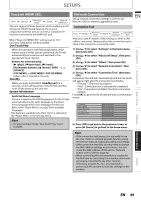
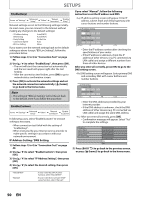
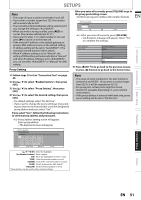
SETUPS Enable(Easy) home A"Settings" A "Advanced Setup" A"Others" A "Network Connection" A "Enable (Easy)" Network settings are set to the following settings initially. (In most cases, you can connect to the Internet without making any changes to the default settings.) - IP Address Setting - DNS Setting - Proxy Setting - Connection Speed - BD-Live Setting Auto(DHCP) Auto(DHCP) Do Not Use Auto Allow If you want to set the network settings back to the default settings as above (except "BD-Live Setting"), follow the procedure below. 1) Follow steps 1) to 4) in "Connection Test" on page 49. 2) Use [K / L] to select "Enable(Easy)", then press [OK]. • The unit will start the connection test automatically and the test result will appear right after the test finishes. • After the connection test finishes, press [OK] to go to network status confirmation screen. 3) Press [OK] to activate the network settings and set the network connection automatically. [ (home)] to go back to the home menu. If you select "Manual", follow the following instruction to set the IP address and DNS. 4-a) IP address setting screen will appear. Enter IP address, subnet mask and default gateway with cursor buttons and number buttons. IP Address Setting IP Address Subnet Mask Default Gateway Clear OK • Enter the IP address number after checking the specifications of your router. • If the IP address is unknown, check the IP address of other devices. (e.g. PC connected via LAN cable) and assign a different number from those of other devices. After you enter all correctly, press [OK] to go to the DNS setting screen. 4-b) DNS setting screen will appear. Enter primary DNS and secondary DNS with cursor buttons and number buttons. DNS Setting Primary DNS Note • The setting of "BD-Live Setting" will not be set back to the default, even if you follow the procedure. Enable(Custom) home A"Settings" A "Advanced Setup" A "Others" A "Network Connection" A "Enable (Custom)" In following cases, select "Enable(Custom)" to set each setting as necessary. - When connection test failed with the setting of "Enable(Easy)". - When instructed by your Internet service provider to make specific settings in accordance with your network environment. IP Address Setting / DNS Setting 1) Follow steps 1) to 4) in "Connection Test" on page 49. 2) Use [K / L] to select "Enable(Custom)", then press [OK]. 3) Use [K / L] to select "IP Address Setting", then press [OK]. 4) Use [K / L] to select the desired setting, then press [OK]. Secondary DNS Clear OK • Enter the DNS addresses provided by your Internet provider. • If the DNS address is unknown, check the DNS address of other devices (e.g. PC connected via LAN cable) and assign the same DNS address. 4-c) After you enter all correctly, press [OK]. • Confirmation message will appear. Select "Yes" to complete the settings. IP Address Subnet Mask Default Gateway Primary DNS Secondary DNS xxx.xxx.xxx.xxx xxx.xxx.xxx.xxx xxx.xxx.xxx.xxx xxx.xxx.xxx.xxx xxx.xxx.xxx.xxx Is Setting OK? Yes No 5) Press [BACK U] to go back to the previous screen, or press [ (home)] to go back to the home menu. "Auto(DHCP)" "Manual" : If your router has DHCP server function, select "Auto(DHCP)". : If your router does not have DHCP server function, select "Manual". 50 EN
-
 1
1 -
2
-
3
-
4
-
5
-
6
-
7
-
8
-
9
-
10
-
11
-
12
-
13
-
14
-
15
-
16
-
17
-
18
-
19
-
20
-
21
-
22
-
23
-
24
-
25
-
26
-
27
-
28
-
29
-
30
-
31
-
32
-
33
-
34
-
35
-
36
-
37
-
38
-
39
-
40
-
41
-
42
-
43
-
44
-
 45
45 -
 46
46 -
 47
47 -
 48
48 -
 49
49 -
 50
50 -
 51
51 -
 52
52 -
 53
53 -
 54
54 -
 55
55 -
56
-
57
-
58
-
59
-
60
-
61
-
62
-
63
-
64
 |
 |