Philips HTS3051BV User manual - Page 53
Software Upgrade, Reset to Factory Default
 |
View all Philips HTS3051BV manuals
Add to My Manuals
Save this manual to your list of manuals |
Page 53 highlights
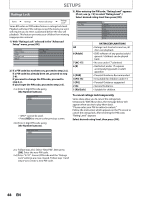
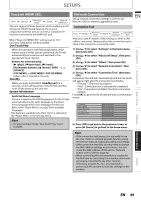
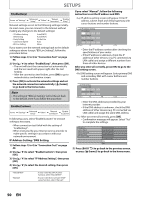
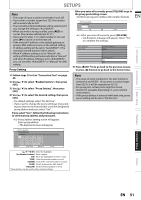
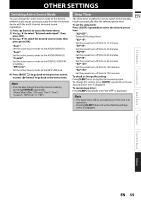
SETUPS Software Upgrade Philips continuously tries to improve its products and we strongly recommend that you upgrade the software when upgrades are available. New software can be downloaded from our website at www.philips.com using the type number of your Home Theater System (e.g. HTS3051BV) to find information. Disc Upgrade home A"Settings" A "Advanced Setup" A "Others" A "Software Upgrade" A "Disc Upgrade" You can upgrade the software by using disc. 1) Follow steps 1) to 3) in "Connection Test" on page 49. 2) Use [K / L] to select "Software Upgrade", then press [OK]. 3) Use [K / L] to select "Disc Upgrade", then press [OK]. 4) Use [K / L] to select "Yes", then press [OK]. 5) Disc tray will open automatically. • Insert the disc for software upgrade and then press [A (open/close)]. 6) After completing loading disc, confirmation message will appear. Use [s / B] to select "Yes" and press [OK] to start upgrading. • It may take a while to complete the upgrading. 7) After the disc upgrade finishes, this unit will restart and open the disc tray automatically. Remove the disc. Note • Please visit www.philips.com to download the latest software version. Please read the software upgrade Read-me file carefully before performing an upgrade using a disc. • Please do not unplug the AC power cord while executing the "Disc Upgrade". • All settings will remain the same even if you upgrade the software version. Network Upgrade home A "Settings" A "Advanced Setup" A "Others" A "Software Upgrade" A "Network Upgrade" You can upgrade the software by connecting the unit to the Internet. 1) Follow steps 1) to 3) in "Connection Test" on page 49. 2) Use [K / L] to select "Software Upgrade", then press [OK]. 3) Use [K / L] to select "Network Upgrade", then press [OK]. 4) Use [K / L] to select "Yes", then press [OK]. • This unit will then start checking for the latest software version. 5) Confirmation message will appear. Use [s / B] to select "Yes", then press [OK]. • The unit will start downloading the latest software version. 6) When the download completes, confirmation message will appear. Press [OK]. • The unit will start upgrading the software version. • It may take a while to complete the upgrading. 7) After upgrading finishes, this unit will restart and open the disc tray automatically. Note • In order to upgrade the software via the Internet, you must connect the unit to the Internet and set up necessary settings. • For the network connection, refer to "Network Connection with LAN" on page 22. • For the network setup, refer to "Network Connection" on page 49. • Please do not unplug the AC power cord or LAN cable while executing the "Network Upgrade". • All settings will remain the same even if you upgrade the software version. • The disc tray will open automatically after upgrading finishes. This is not a malfunction. Reset to Factory Default Menus to reset player settings, format SD card, local storage, clear network settings and deactivate VUDU. 1) Use [K / L] to select "Settings" in the home menu, then press [OK]. 2) Use [K / L] to select "Factory Default", then press [OK]. 3) Use [K / L] to select the desired setting, then press [OK]. "Settings": All the settings except for the "Ratings Lock" and "Network Connection" setting will be reset to default. "Format SD Card" (Available only when an SD Memory Card is inserted): Initialize the SD Memory Card. "Local Storage": Local storage for Player or SD card (Available only when an SD Memory Card is inserted) used for BD-Java will be initialized. "Network Settings": Reset the network setting to the default. "Vudu Deactivate": Deactivates the connection to VUDU. 4) Use [K / L] to select "Yes", then press [OK]. • Confirmation message will appear. Press [OK] to complete the setting. 5) Press [BACK U] to go back to the previous screen, or press [ (home)] to go back to the home menu. Note • Do not remove the SD Memory Card while executing the "Format SD Card" or "Local Storage" (SD card). It will damage the card. • "Format SD Card" and "Local Storage" (SD card) are not available when a Blu-ray Disc is in the unit. Others Function Setup Playback Basic Setup Connections Introduction EN EN 53
-
 1
1 -
2
-
3
-
4
-
5
-
6
-
7
-
8
-
9
-
10
-
11
-
12
-
13
-
14
-
15
-
16
-
17
-
18
-
19
-
20
-
21
-
22
-
23
-
24
-
25
-
26
-
27
-
28
-
29
-
30
-
31
-
32
-
33
-
34
-
35
-
36
-
37
-
38
-
39
-
40
-
41
-
42
-
43
-
44
-
45
-
46
-
47
-
 48
48 -
 49
49 -
 50
50 -
 51
51 -
 52
52 -
 53
53 -
 54
54 -
 55
55 -
 56
56 -
 57
57 -
 58
58 -
59
-
60
-
61
-
62
-
63
-
64
 |
 |