Pioneer AVIC N4 Owner's Manual
Pioneer AVIC N4 - Navigation System With DVD player Manual
 |
UPC - 012562863078
View all Pioneer AVIC N4 manuals
Add to My Manuals
Save this manual to your list of manuals |
Pioneer AVIC N4 manual content summary:
- Pioneer AVIC N4 | Owner's Manual - Page 1
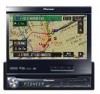
Operation Manual DVD MULTIMEDIA AV NAVIGATION SERVER AVIC-N4 Notice to all users: This software requires that the navigation system be properly connected to your vehicle's parking brake. If not properly connected and depending on your vehicle, additional installation may be required. For more - Pioneer AVIC N4 | Owner's Manual - Page 2
The screens shown in the examples may differ from the actual screens. The actual screens may be changed without notice for performance and function improvements. - Pioneer AVIC N4 | Owner's Manual - Page 3
Agreement PIONEER AVIC-N4 - for U.S.A. THIS IS A LEGAL AGREEMENT BETWEEN YOU, AS THE END USER, AND PIONEER ELECTRONICS (USA) INC. ("PIONEER"). PLEASE READ THE TERMS AND CONDITIONS OF THIS AGREEMENT CAREFULLY BEFORE USING THE SOFTWARE INSTALLED ON THE PIONEER PRODUCTS. BY USING THE SOFTWARE INSTALLED - Pioneer AVIC N4 | Owner's Manual - Page 4
PIONEER AVIC-N4 - for Canada THIS IS A LEGAL AGREEMENT BETWEEN YOU, AS THE END USER, AND PIONEER ELECTRONICS OF CANADA, INC. ("PIONEER"). PLEASE READ THE TERMS AND CONDITIONS OF THIS AGREEMENT CAREFULLY BEFORE USING THE SOFTWARE INSTALLED ON THE PIONEER PRODUCTS. BY USING THE SOFTWARE INSTALLED ON - Pioneer AVIC N4 | Owner's Manual - Page 5
bureau or for any other use involving the processing of data of other persons or entities. You may make one (1) copy of the Data for archival or backup purposes only but you may not otherwise copy, reproduce, modify, make derivative works, derive the structure of or reverse engineer the Data. The - Pioneer AVIC N4 | Owner's Manual - Page 6
to streets/highways made after that time may not be reflected in this database. • It is strictly prohibited to reproduce and use any part or the whole of this map in any form without permission from the copyright owner. • If the local traffic regulations or conditions deviate from this data, follow - Pioneer AVIC N4 | Owner's Manual - Page 7
- ry) setting 20 DVD Map Discs for Your Navigation System 21 Configuration of data recorded on discs 21 Initial Use 21 Chapter 1 Basic Operation Navigation unit 23 Flow from Startup to Termination 24 Inserting/Ejecting a Disc 24 Inserting a disc 24 Ejecting a disc 24 Opening and Closing the LCD - Pioneer AVIC N4 | Owner's Manual - Page 8
Items Users can Change 73 Volume 73 System Options 74 Short-Cut Selection 74 Map Display Options 75 Defined Locations 76 Demo Mode 76 Time 76 Modify Current Location 77 Hardware Info 77 Restore Factory Settings 77 Chapter 6 Using the AV Source (Built-in DVD Drive and Radio) How to Display each Menu - Pioneer AVIC N4 | Owner's Manual - Page 9
Chapter 7 Using the AV Source (Pioneer AV Equipment) Multi-DVD Player 93 Playing a disc 93 Operations and Functions 93 USB 94 Operating the USB portable audio player/USB memory 94 Displaying text information 94 Switching between the detail information dis- play and the list display 94 Viewing - Pioneer AVIC N4 | Owner's Manual - Page 10
146 Troubleshooting 148 Problems in the navigation screen 148 Problems in the AV screen (during DVD-Video playback) 150 Problems in the AV screen (during iPod playback) 152 Messages and how to react to them 152 Error Messages 157 Handling and Care of the Disc 158 DVD Map Discs 158 DVD drive - Pioneer AVIC N4 | Owner's Manual - Page 11
the relevant section of this chapter. 6 Using the AV Source (Built-in DVD Drive and Radio) Describes how to use DVD-Video, CD, ROM, DivX and the radio. 7 Using the AV Source (Pioneer AV Equipment) When Pioneer audio equipment is connected to the navigation system, that equipment can be operated - Pioneer AVIC N4 | Owner's Manual - Page 12
optional screen that is purchased for use in conjunction with this navigation unit will be referred to as the "Rear Display". "Video image" "Video image" in this manual indicates the moving image of DVD-Video, DivX, iPod videos, and the equipment that is connected to this system with a RCA cable - Pioneer AVIC N4 | Owner's Manual - Page 13
❒ Using the most current map DVDs will allow for most accurate destination mapping. Upgrade DVDs are available for purchase through your local Pioneer dealer. ❒ Never use headphones while driving. ❒ Do not attempt to install or service your navigation system by yourself. Installation or servicing of - Pioneer AVIC N4 | Owner's Manual - Page 14
as loss or theft. 2. Receive updates on the latest products and technologies. 3. Download owner's manuals, order product catalogues, research new products, and much more. 4. Receive notices of software upgrades and software updates. Precaution CAUTION: USE OF CONTROL OR ADJUSTMENT OR PERFORMANCE OF - Pioneer AVIC N4 | Owner's Manual - Page 15
Parking brake interlock Certain functions (such as viewing of DVD-Video and certain touch key operations) offered by this navigation system could be dangerous and/or unlawful if used while driving. To prevent such functions from being used while the vehicle is in motion, there is an interlock - Pioneer AVIC N4 | Owner's Manual - Page 16
the brake pedal pushed down before releasing the parking brake. Color difference of the map display between day and night • SCREEN IMAGE MAY APPEAR REVERSED. • USE INPUT ONLY FOR REVERSE OR MIRROR IMAGE REAR VIEW CAMERA. OTHER USE MAY RESULT IN INJURY OR DAMAGE. Night display The examples in this - Pioneer AVIC N4 | Owner's Manual - Page 17
-R/-RW/-ROM and DVD-R/-RW/-ROM. ❒ Supply of this navigation system only conveys a license for private, non-commercial use and does not convey a licence nor imply any right to use this product in any commercial (i.e. revenuegenerating) real time broadcasting (terrestrial, satellite, cable and/or any - Pioneer AVIC N4 | Owner's Manual - Page 18
from the list. iPod® compatibility When you use this navigation system with a Pioneer iPod cable (CD-I200) (sold separately), you can control an iPod with Dock connector. ❒ To obtain maximum performance, we recom- mend that you use the latest version of the iPod software. ❒ iPod is a trademark of - Pioneer AVIC N4 | Owner's Manual - Page 19
discs The unit cannot play back DVD-R/-RW discs that are written in Layer Jump Recording mode. For more information about the writing method, see the operation manual for the writing device. About DVD Map Disc You can use discs intended for this navigation system. Use only discs approved by Pioneer - Pioneer AVIC N4 | Owner's Manual - Page 20
DivX About WMA DivX is a compressed digital video format created by the DivX® video codec from DivX, Inc. This unit can play DivX video files recorded on CD-R/RW/ ROM and DVD-R/RW/ROM discs. Keeping the same terminology as DVD video, individual DivX video files are called "Titles". When naming - Pioneer AVIC N4 | Owner's Manual - Page 21
or nearest authorized Pioneer service station regarding the satellite radio tuner that can be connected to this navigation system. For satellite radio tuner operation, please refer to the Operation Manuals of the navigation system and satellite radio tuner. Note: The system will use direct satellite - Pioneer AVIC N4 | Owner's Manual - Page 22
Prior to using this product for the first time after installation. • If the product fails to operate properly. • If there appear to be problems with equipment (for example, Bluetooth adapter) to this navigation system, be sure to reset that equipment too. Reset the navigation system to the initial - Pioneer AVIC N4 | Owner's Manual - Page 23
DVD Map Discs for Your Navigation System Configuration of data recorded on discs The map for this navigation system is supplied on two discs: one for the west and the other for the east. Please set the disc to use according to your destination or current location. The areas recorded on each disc are - Pioneer AVIC N4 | Owner's Manual - Page 24
22 - Pioneer AVIC N4 | Owner's Manual - Page 25
NAVI/AV Basic Operation Chapter 1 Navigation unit This section gives information about the names of the parts and the main features using the buttons. 1 Chapter 1 Basic Operation 2 3 4 5 6 7 8 g f ae d c b a 9 1 Disc indicator When a disc is set in navigation system, this indicator lights. 2 - Pioneer AVIC N4 | Owner's Manual - Page 26
, see page 136 and install the program. 1 Start the engine. The navigation system is also turned on. After some time, the navigation opening screen comes on for a few seconds. Then, a message screen is displayed. ❒ Insert the Pioneer DVD Map Disc to the disc loading slot. 2 Check the details - Pioneer AVIC N4 | Owner's Manual - Page 27
after the setting is turned "On". 1 Press and hold the OPEN/CLOSE button. The Flap Setup screen appears. 2 Touch "Flap Set Back". Touching "Flap Set Back" switches between "On" and "Off". 3 Touch "ESC". When Flap Setup is displayed during the navigation screen, the map screen is displayed. 25 - Pioneer AVIC N4 | Owner's Manual - Page 28
CLOSE button. The Flap Setup screen appears. 2 Touch "Auto Flap". Each touch of the "Auto Flap" changes the settings as follows: • Manual - You have to press the OPEN/ CLOSE button to open/close the display • Auto - The display automatically opens/ closes when power to navigation system is turned on - Pioneer AVIC N4 | Owner's Manual - Page 29
displaying the NAVI MENU, used for navigation operations, and the AV MENU, used for AV operations, are different depending on which screen is currently displayed. Map screen Press the MAP button NAVI MENU Press the MENU button Press the AV button or the VOLUME knob Press the MAP button Press - Pioneer AVIC N4 | Owner's Manual - Page 30
flow of operation 1 Park your vehicle in a safe place, and apply the parking brake. 2 Insert the Pioneer DVD Map Disc to the disc loading slot. • For safety reasons, you cannot use some of these basic navigation functions while your vehicle is in motion. To enable these functions, you must stop in - Pioneer AVIC N4 | Owner's Manual - Page 31
/AV Chapter 1 Basic Operation How to set your destination by address 1 Press the MAP button to display the map screen. 2 Press the MENU button to display the NAVI MENU. 3 Touch "Destination" to display Destination menu. 4 Touch "Address Search". 5 Touch "Zone code key". If the destination is in - Pioneer AVIC N4 | Owner's Manual - Page 32
screen. ❒ For example, for "Early California Ct", you can just enter part of the name, such as "California". ❒ When entering the characters, the unit as your destination. This is useful when you don't know the ❒ You can also see the destination on the map by touching the to the right of the list - Pioneer AVIC N4 | Owner's Manual - Page 33
memory navi mode when the DVD Map Disc is removed from the navigation system. Some functions are restricted and different from the navigation using the DVD Map Disc (DVD navi mode). If you want to use these functions, please insert the DVD Map Disc again. During the memory navi mode, navigation is - Pioneer AVIC N4 | Owner's Manual - Page 34
Source screen. ❒ Also, press the VOLUME knob repeatedly when the AV operation screen is displayed to switch between sources: "DISC" [CD, ROM, DVD-V, DivX] (built-in DVD drive) - "RADIO" (tuner) - "iPod" (iPod) - "XM" (XM tuner) - "SIRIUS" (SIRIUS tuner) - "USB" (USB) - "BT-TEL" (Bluetooth Telephone - Pioneer AVIC N4 | Owner's Manual - Page 35
to a CD You can listen to an audio CD by removing the DVD Map Disc from the navigation system. ➲ About Memory Navigation ➞ "Memory navi mode" on page 31. (For details, see page 138.) 1 Press the EJECT button to remove the DVD Map Disc. 3 Press the VOLUME knob (or AV button) to switch the Audio - Pioneer AVIC N4 | Owner's Manual - Page 36
key: The button is operable. Gray touch key with white letters: The function is not available during memory navi mode. Or, the function is not available for areas not stored on the disc. Touching this button activates a message indicating that the function is not available. Gray touch key with gray - Pioneer AVIC N4 | Owner's Manual - Page 37
in gray with black letters. If you want to use such functions, insert the DVD Map Disc. NAVI MENU Use this menu for basic operation of your navigation system. 1 With the map displayed, press the MENU button. 2 To change to the menu you want to use, touch the name of the menu displayed at the - Pioneer AVIC N4 | Owner's Manual - Page 38
NAVI Route Options menu 1 When the map is displayed, briefly touch any part of the map. If you continue to touch the map, it will start scrolling. Navigation Menu and Map Display Chapter 2 Used to specify the conditions for setting the route to the destination. ➲ Setting the Route Options ➞ Page - Pioneer AVIC N4 | Owner's Manual - Page 39
NAVI Chapter 2 Navigation Menu and Map Display : Volume Setting The sound volume for the navigation can be set. ➲ Setting the guidance volume ➞ Page 73 ❒ If the mode is selected by pressing the MAP button, the screen automatically switches to the selected map display mode after 4 seconds. : Menu - Pioneer AVIC N4 | Owner's Manual - Page 40
NAVI Navigation Menu and Map Display Chapter 2 Guide View Overlays two arrows onto the standard map ("Map View"). (1) (10) (8) Rear View Rear view image is displayed on of the screen. (15) (2) (7) (15) (16) (4) (11) (5) (12) (3) (9) (17)(6) Route View Displays the name of the street you - Pioneer AVIC N4 | Owner's Manual - Page 41
of the street to be used (or next guidance point Map of your surroundings (Side map) Touching the map briefly shows the shortcut menu, while touching longer changes the map to Scroll mode. ➲ "Moving the map to the location you want to see" ➞ Page 40 39 Chapter 2 Navigation Menu and Map Display NAVI - Pioneer AVIC N4 | Owner's Manual - Page 42
2000 kilometers). When the view mode is set to Map View or Guide View, "Direct scale key" is displayed. Touching "Direct scale key" changes the map to the selected scale directly. ❒ In memory navi mode and/or when traversing an area not stored on the disc, selection of the scales is limited. Direct - Pioneer AVIC N4 | Owner's Manual - Page 43
to use shortcut map. 1 Press the MAP button to access the map screen. 2 Touch the map for at least 2 seconds. The map display changes to Scroll mode. 3 Scroll the map and move the scroll cursor to the place you want to make your destination. ➲ Moving the map to view the part Navigation Menu and Map - Pioneer AVIC N4 | Owner's Manual - Page 44
42 Navigation Menu and Map Display Chapter 2 NAVI - Pioneer AVIC N4 | Owner's Manual - Page 45
display appears. ❒ Inserting the DVD Map Disc will cause a forced reroute. (This rerouting cannot be canceled.) Finding Your Destination by Selecting the Type of Facility Searching for Points of Interest (POI) 1 Touch "Destination" in the NAVI MENU, and then touch "POI Search". 2 Touch the zone - Pioneer AVIC N4 | Owner's Manual - Page 46
Interest in your surroundings on the map. Use it to find a POI to visit during a journey. 1 Touch "Destination" in the NAVI MENU, and then touch " mark. OK: Starts searching. Back: Returns to the previous screen. Set: Display the screen for registering POI shortcuts. ➲ Register POI shortcut ➞ Page 51 - Pioneer AVIC N4 | Owner's Manual - Page 47
" in the NAVI MENU searches your surroundings. On the other hand, when using in the Shortcut changes the destination. ➲ Searching the destination by map ➞ Page 41 Route Calculation to Your Home the "Destination History". Places that you have registered manually, such as your home, are stored in - Pioneer AVIC N4 | Owner's Manual - Page 48
the route by scrolling the map along the route, and checking the entire distance of the route in a single screen. Route calculation starts. ❒ You 2 Touch "Yes (all)". Checking the set route with the map 1 Touch "Route Options" in the NAVI MENU, then touch "View Current Route". ❒ "View Current - Pioneer AVIC N4 | Owner's Manual - Page 49
, your navigation system may navi mode, the information using the shortcut menu if "Whole Route Overview" is selected on the "Short-Cut Selection". Checking the set route from the shortcut menu You can also check the information about the set route from the shortcut menu. 1 Touch the map screen - Pioneer AVIC N4 | Owner's Manual - Page 50
the route to the destination using the Route Options menu 1 Touch "Route Options" in the NAVI MENU, and then touch " NAVI MENU, and then touch "Edit Current Route". 2 Select editing method. Recalculating a specified distance in the route ahead of your current position 1 Touch the map screen. - Pioneer AVIC N4 | Owner's Manual - Page 51
: Returns to the original order. Select from manual order, "Automatic" or "Original" and touch point along the route can be skipped. 1 Touch the map screen. The Shortcut menu appears. 2 Touch . 3 Touch " to Avoid. 1 Touch "Route Options" in the NAVI MENU, then touch "Designate Areas to Avoid". 2 - Pioneer AVIC N4 | Owner's Manual - Page 52
Map If you want to stop registration, touch "Back". ❒ Depending on the setting of route search conditions, you may not be able to avoid the specified areas. A confirmation message is displayed on the screen map, and you can check the location on the display. 1 Touch "Info/Traffic" in the NAVI use - Pioneer AVIC N4 | Owner's Manual - Page 53
another icon, repeat steps 3 through 5. ❒ You can register a POI shortcut by touching "Overlay POI" under "Info/Traffic" in the NAVI MENU, or by touching the icons such as and on the map. The steps for registration are the same as described above. Deleting a POI shortcut 1 Touch "Destination" in the - Pioneer AVIC N4 | Owner's Manual - Page 54
using the Route Options menu. The following description features an example of changing the number of routes to be searched. 1 Touch "Route Options" in the NAVI Route This displays a screen for adding or deleting ➲ "Checking the set route with the map" ➞ Page 46 ➲ "Checking the your navigation system - Pioneer AVIC N4 | Owner's Manual - Page 55
NAVI 5 Touch "OK". The route you selected is accepted, and the map of your surroundings appears. When you start driving, the route guidance begins screen: (1) Route calculation condition Displays the conditions set by the Route Options menu by icon. • Use/avoid freeway • Use/avoid toll road • Use - Pioneer AVIC N4 | Owner's Manual - Page 56
54 Setting a Route to Your Destination Chapter 3 NAVI - Pioneer AVIC N4 | Owner's Manual - Page 57
Utilities • For safety reasons, you cannot use some of these navigation functions while your vehicle is in motion. To enable these functions, you must stop in a safe place and apply the parking brake (see page 13 for details). 1 Touch "Settings" in the NAVI MENU, then touch "Defined Locations - Pioneer AVIC N4 | Owner's Manual - Page 58
them in the Address Book. 1 Touch "Destination" in the NAVI MENU, then touch "Destination History". 2 Touch on the right-hand side edit. : The map of that place can be displayed. ➲ "When appears to the right of the list" ➞ Page 41 Add: The screen for selecting the Navigation Utilities Chapter 4 56 - Pioneer AVIC N4 | Owner's Manual - Page 59
NAVI (1) (2) (3) (4) (5) (6) (1) Name You can enter the desired name. (2) Name (2nd line) The name of the city appears in this column (not editable). (3) Phone number You can search by registered telephone number. (4) Pictograph The symbol displayed on the map 4 Editing the Navigation Utilities 57 - Pioneer AVIC N4 | Owner's Manual - Page 60
Address Book, display a map of its surroundings and Disc Address Book data stored on a CD-R/-RW and DVD-R/-RW can be loaded to the navigation system. This function is used when moving Address Book data from a Pioneer navigation system with a PC card slot (e.g., AVIC-88DVD) to a Pioneer navigation - Pioneer AVIC N4 | Owner's Manual - Page 61
an active subscription to XM NavTraffic service, you can view current traffic conditions and information on your navigation display. When the unit receives updated traffic information, the navigation system will overlay the traffic information on your map, and also display detailed text information - Pioneer AVIC N4 | Owner's Manual - Page 62
from the DVD Map Disc is required. Please insert the DVD Map Disc. ❒ When is displayed, the data is being loaded from the DVD Map Disc. (2) A of Use traffic flow information, the navigation system will recommend an alternate route automatically. On the freeway, the navigation system will - Pioneer AVIC N4 | Owner's Manual - Page 63
may appear on the map. The number in the icon indicates the actual average speed of that specific area. ❒ The flow icon appears only when the scale on the map is 10 mi (20 km) or lower. ❒ You can turn off the use of Traffic flow information. 61 Chapter 4 Editing the Navigation Utilities NAVI - Pioneer AVIC N4 | Owner's Manual - Page 64
"Info/Traffic" in the NAVI MENU, and then touch "Traffic Settings". 2 Touch "On". The button changes to "Off". 3 Touch "Back". ❒ If you wish to use the traffic flow information again, touch "Off" to turn the button "On" in the Traffic Settings screen. Editing the Navigation Utilities Chapter 4 62 - Pioneer AVIC N4 | Owner's Manual - Page 65
system. Displaying stock prices This navigation system can display the prices of up to 12 stocks. 1 Touch "Info/Traffic" in the NAVI MENU, and then touch "Stock Info". The screen displays a list of stock prices. ❒ Although the stock price information dis- played onscreen is updated every 30 seconds - Pioneer AVIC N4 | Owner's Manual - Page 66
update is needed. The following are the instructions on how to do so: 1 Store the desired item (topic). ➲ "Storing browsable information" ➞ Page 64 2 Touch "Info/Traffic" in the NAVI Editing the Navigation Utilities Chapter 4 If the storing step is successful, the confirmation screen will appear. - Pioneer AVIC N4 | Owner's Manual - Page 67
while your navigation system is turned on. If you subscribe to both services, the appropriate status will be shown in the "Status". • The Emergency Info screen is only intended to provide information to a driver that may be useful during an emergency situation, and does not replace the need to - Pioneer AVIC N4 | Owner's Manual - Page 68
NAVI tance service is paid for by Pioneer only if your navigation system is registered with Pioneer and you sign up on-line with Signature's Nationwide Auto Club, Inc. at the time you register your navigation system with Pioneer. If you have not signed up for this service with Signature's - Pioneer AVIC N4 | Owner's Manual - Page 69
subcatego- ries. Touch the subcategories you wish to use from among those displayed and touch "OK" to select the Auto Service from the subcategories. 5 Touch the name of the facility to set the route you want. Chapter 4 Editing the Navigation Utilities Displays the route to the selected facility - Pioneer AVIC N4 | Owner's Manual - Page 70
during audio operations or during playback. • Navigation Background: Background of nav- igation menu screen. Several background pictures are stored in the Pioneer DVD Map Disc. If you want to use these pictures, insert the Pioneer DVD Map Disc. Here, a method for changing the background picture - Pioneer AVIC N4 | Owner's Manual - Page 71
image appears. ❒ When you select images stored on the Pio- neer DVD Map Disc, you cannot select the layout method. ❒ When the picture starts to change the Splash Screen, Audio Operating screen backgrounds or the navigation backgrounds. Return to step 3. ❒ When the navigation system is reset - Pioneer AVIC N4 | Owner's Manual - Page 72
Pulse" or "Learning Status", touch the relevant result, then touch "Clear". ❒ The navigation system can automatically use its sensor memory based on the outer dimensions of the tires. Checking the connections of leads and installation positions Check that leads are properly connected between the - Pioneer AVIC N4 | Owner's Manual - Page 73
" in the NAVI MENU, then touch "Hardware Info". 2 Touch "Connection Status". The Connection Status screen appears. (1) (2) (3) (4) (5) (6) (7) (1) Speed Pulse The Speed Pulse value detected by the navigation system is shown. "0" is shown while the vehicle is stationary. (2) GPS Antenna Indicates the - Pioneer AVIC N4 | Owner's Manual - Page 74
72 Editing the Navigation Utilities Chapter 4 NAVI - Pioneer AVIC N4 | Owner's Manual - Page 75
with an asterisk (*) show that they are default or factory settings. Volume The sound volume for the navigation can be set. You can set the volume of the route guidance and the beep sound separately. To display the Volume setting screen, touch "Volume" in the Settings menu. ❒ When you move to the - Pioneer AVIC N4 | Owner's Manual - Page 76
stop the engine of your vehicle and do not switch off the navigation system until the installation is completed and the map of your surroundings appears. KM/Mile Setting This setting controls the unit of distance displayed on your navigation system. Mile *: Show distances in miles. Mile & Yard: Show - Pioneer AVIC N4 | Owner's Manual - Page 77
dots. AV Guide Mode Set whether to automatically switch to the navigation screen from the AV operation screen when your vehicle approaches a guidance point such as an intersection while displaying a screen other than navigation. On*: Switches from AV operation screen to navigation screen. Off: Does - Pioneer AVIC N4 | Owner's Manual - Page 78
demo drive. Off*: Demo Mode is set off. ❒ If you eject the DVD Map Disc during the demo drive, the demo mode will be stopped. Time Adjusts the systems clock. The time difference (+, -) between the time originally set in your navigation system is set here. You can also select summer time On/Off - Pioneer AVIC N4 | Owner's Manual - Page 79
displayed on the map. Hardware Info Touch "Hardware Info" in the Settings menu to display. Connection Status ➲ "Checking the connections of leads and installation positions" ➞ Page 70 3D Calibration ➲ "Checking the Navigation Status" ➞ Page 70 Service Info Screen Displays the disc production number - Pioneer AVIC N4 | Owner's Manual - Page 80
78 Customizing Your Navigation System Chapter 5 NAVI - Pioneer AVIC N4 | Owner's Manual - Page 81
Drive and Radio) Chapter 6 Using the AV Source (Built-in DVD Drive and Radio) This chapter describes how to display the AV MENU for AV operations and perform operations with the DVD drive and radio. How to Display each Menu 1 Press the VOLUME knob (or AV button) to switch to the AV operation screen - Pioneer AVIC N4 | Owner's Manual - Page 82
the screen changes to the AV Source screen. Function menu (2) (3) (1) Sound menu System menu ❒ When the source is "OFF", the "Function" key changes to "Initial" key. (1) Function key Touch to enter the Function menu for each source. ➲ Using the Function menu ➞ "Operation using - Pioneer AVIC N4 | Owner's Manual - Page 83
Chapter 6 Using the AV Source (Built-in DVD Drive and Radio) Operating the Built-in DVD drive This section explains the operation of DVD-Video, CD, MP3/WMA/AAC or DivX. ❒ The built-in DVD drive of this unit can recognize the several types of media as following sources. - DVD-Video: "DVD-V" - Audio - Pioneer AVIC N4 | Owner's Manual - Page 84
files) - DivX (DivX video files) ❒ There is sometimes used. ❒ If more than 255 tracks are stored in the folder, some time may be required to display the track list. Touch key operation (DVD-V) 1 Touch "DISC" in the AV Source screen to select the built-in DVD drive. If no disc is loaded in navigation - Pioneer AVIC N4 | Owner's Manual - Page 85
is available for DVD-Video. ❒ You can display the menu by touching Menu or TOP M. while a disc is playing. Touching either of these keys again lets you start playback from the location selected from the menu. For details, refer to the instructions provided with the disc. Using DVD menu direct touch - Pioneer AVIC N4 | Owner's Manual - Page 86
: 1/16 - 1/8 - 1/4 - 1/2 ❒ There is no sound during slow motion play- back. ❒ With some discs, images may be unclear during slow motion playback. ❒ Reverse slow motion playback is not possi- ble. Searching for a playback location When playing back a DVD-Video, you can search for a specific title - Pioneer AVIC N4 | Owner's Manual - Page 87
switches between angle. ❒ Touching "Angle" during fast forward/fast rewind, pause or slow motion playback returns you to normal playback. Resume playback (Bookmark) When playing DVD-Video discs, you can use this function. The Bookmark function lets you resume playback from a selected scene the next - Pioneer AVIC N4 | Owner's Manual - Page 88
AV Using the AV Source (Built-in DVD Drive and Radio) Chapter 6 Built-in DVD drive source 2 Touch the screen to display the touch panel keys. Touch keys (CD) (2) (1) (2) (3) Touch keys (ROM) (2) (1) (4) (2) (3) (4) Move the folder up or down When a ROM is played, touch or to - Pioneer AVIC N4 | Owner's Manual - Page 89
AV Built-in DVD drive source Chapter 6 Using the AV Source (Built-in DVD Drive and Radio) ❒ If the upper folder has no MP3/WMA/AAC files, the track or file currently playing will not change. Randomly play tracks with one touch All of the songs in a disc can be played at random by only touching - Pioneer AVIC N4 | Owner's Manual - Page 90
AV Using the AV Source (Built-in DVD Drive and Radio) Chapter 6 Built-in DVD drive source 2 Touch the screen to display the touch panel keys. Touch keys (Page 1) ❒ The following screen appears when the vehicle is stopped. When the vehicle is moving, the shape of the touch keys changes. (2) (1) (5) - Pioneer AVIC N4 | Owner's Manual - Page 91
AV Built-in DVD drive source Chapter 6 Using the AV Source (Built-in DVD Drive and Radio) Other functions (DivX) Fast rewind or There is no sound during slow motion play- back. ❒ With some discs, images may be unclear during slow motion playback. ❒ Reverse slow motion playback is not possi- - Pioneer AVIC N4 | Owner's Manual - Page 92
AV Using the AV Source (Built-in DVD Drive and Radio) Chapter 6 RADIO ❒ When using DivX, you can switch between showing or hiding the subtitles while a subtitle file is displayed. This switches the subtitles while displaying subtitles in a DivX file. Playing DivX® VOD content Some DivX VOD (video - Pioneer AVIC N4 | Owner's Manual - Page 93
AV RADIO Chapter 6 Using the AV Source (Built-in DVD Drive and Radio) 4 To perform seek tuning, keep touching detail information display and the preset list display You can switch the left side of the basic screen according to your preference. 1 Touch "Preset" (or "Detail"). Each touch of "Preset - Pioneer AVIC N4 | Owner's Manual - Page 94
Using the AV Source (Built-in DVD Drive and Radio) Chapter 6 RADIO replace broadcast frequencies you have saved using P1 - P6. Tuning in strong signals Local seek tuning lets you tune in only those radio set the sensitivity. There are four levels of sensitivity for FM and two levels for AM: FM: 1 - 2 - Pioneer AVIC N4 | Owner's Manual - Page 95
chapter, please also refer to the operation manual of the AV equipment connected to the navigation system. Multi-DVD Player Playing a disc DVD-Video (1) (2) (3)(6) (4) (5) (8) (7) You can use the navigation system to control a DVD player or multi-DVD player (e.g. XDV-P6), which is sold separately - Pioneer AVIC N4 | Owner's Manual - Page 96
(7) (8) You can control a USB portable audio player/USB memory by combining the USB adapter (e.g. CDUB100) (sold separately) to the navigation system. For details concerning operation, refer to the USB adapter's operation manual. ❒ Optimum performance of this unit may not be obtained depending on - Pioneer AVIC N4 | Owner's Manual - Page 97
to All. ❒ If you perform track search or fast forward/ rewind during Track, the repeat play range changes to Folder. USB Chapter 7 Using the AV Source (Pioneer AV Equipment) List display Viewing contents of upper folder Touching upper folder. to display contents of the ❒ If the current folder - Pioneer AVIC N4 | Owner's Manual - Page 98
which differs from that described in the XM tuner's operation manual. Only the logo data that is contained in the navigation DVD Map Disc can be displayed for each channel. The icon of a newly established channel that is not contained in the disc cannot be displayed. When no icon can be displayed - Pioneer AVIC N4 | Owner's Manual - Page 99
AV XM Chapter 7 Using the AV Source (Pioneer AV Equipment) ❒ You can also perform tuning within selected channel category. information display and the preset list display You can switch the left side of the basic screen according to your preference. 1 Touch "Detail" (or "Preset"). Each touch of " - Pioneer AVIC N4 | Owner's Manual - Page 100
AV Using the AV Source (Pioneer AV Equipment) Chapter 7 XM ❒ You can also touch or to recall stations , and you can switch the station to listen to that song. ❒ A track itself is NOT downloaded BUT only the song title and the artist name are memorized. Memorizing the song title and the artist - Pioneer AVIC N4 | Owner's Manual - Page 101
Using the AV Source (Pioneer depending on the situation of the Navigation System. ➲ "Setting the notification of touching "TRAFFIC" in the AV source screen. ❒ You can call up a traffic channel Radio ID to select "RADIO ID" from channel category in the CATEGORY mode. Advanced XM tuner operation Using - Pioneer AVIC N4 | Owner's Manual - Page 102
mode (7) You can use the navigation system to control a Pioneer Sirius satellite digital tuner, which is sold separately. For details concerning operation, refer to the SIRIUS tuner's operation manuals. This section provides information on SIRIUS operations with navigation system which differs from - Pioneer AVIC N4 | Owner's Manual - Page 103
SIRIUS Chapter 7 Using the AV Source (Pioneer AV Equipment) (5) SIRIUS You can also perform manual tuning by press- ing the or button. Switching the SIRIUS channel select mode You list display You can switch the left side of the basic screen according to your preference. 1 Touch "Detail" (or - Pioneer AVIC N4 | Owner's Manual - Page 104
AV Using the AV Source (Pioneer AV Equipment) Chapter 7 SIRIUS ❒ Up to the station to listen to that song. ❒ A track itself is NOT downloaded BUT only the song title and the artist name are memorized. Memorizing the Navigation System. ➲ "Setting the notification of memorized tracks" ➞ Page 103 - Pioneer AVIC N4 | Owner's Manual - Page 105
this operation by touching "TRAFFIC" in the AV source screen. ❒ You can call up a traffic channel from sources other than SIRIUS. ❒ To cancel traffic announcement, touch "TRFC Off". Display the Radio ID If you select CH: 000, the Radio ID is displayed. 1 Touch "Direct". 2 Input "000" and then - Pioneer AVIC N4 | Owner's Manual - Page 106
Pioneer AV Equipment) Chapter 7 SIRIUS 1 Touch "Memo" in the Function menu. 2 Touch "Alert On" or "Alert Off". ❒ Touch to toggle the selection. Selecting teams for Game Alert This navigation system can alert you when games involving your favorite sports teams are about to start. To use updated - Pioneer AVIC N4 | Owner's Manual - Page 107
the Bluetooth adapter's operation manual. ❒ Since this unit is always on standby to connect with your cellular phones via Bluetooth wireless technology, using this unit without running the engine can result in battery drainage. (1) Source icon (2) Device name indicator (3) Signal level indicator - Pioneer AVIC N4 | Owner's Manual - Page 108
Bluetooth wireless technology. ➲ "Registering your cellular phone" ➞ Page 111 3 Adjust the volume level Adjust the volume on your cellular phone and the navigation system for comfort. ❒ The caller's voice volume and ring volume ": Change to the preset dial list screen. You can assign the input number - Pioneer AVIC N4 | Owner's Manual - Page 109
AV BT-TEL Chapter 7 Using the AV Source (Pioneer AV Equipment) 2 Touch "Log" to change the list. ❒ using this function, you need to trans- fer the phone book in your cellular phone to this navigation system. ➲ "Transferring the phone book" ➞ Page 111 1 Touch "PH.Book". The phone book list screen - Pioneer AVIC N4 | Owner's Manual - Page 110
Using the AV Source (Pioneer useful to display them in the alphabetical order for easier searching. 1 Touch "PH.Book". The phone book list screen appears. 2 Touch "Search". The phone book search screen phone's instruction manual. 3 navigation system to auto- matically answering incoming calls. ➲ "Setting - Pioneer AVIC N4 | Owner's Manual - Page 111
AV BT-TEL Chapter 7 Using the AV Source (Pioneer AV Equipment) 2 To end the call, touch . ❒ You may . Connecting a cellular phone To use a phone wirelessly with the navigation system, it is necessary first to establish a connection using Bluetooth wireless technology. There are several ways - Pioneer AVIC N4 | Owner's Manual - Page 112
you to establish a Bluetooth wireless connection from your cellular phone. 1 Touch "Phone Connect" in the Function menu. The phone connection menu screen appears. 2 Touch "Connection Open". "Pairing" is flash in the display. 3 Use a cellular phone to connect to the navigation system. Connection to - Pioneer AVIC N4 | Owner's Manual - Page 113
➞ Page 109 Disconnecting a cellular phone When you are done using your phone with the navigation system, you can close the Bluetooth wireless connection. 1 Touch "Phone Connect" in the Function menu. The phone connection menu screen appears. 2 Touch "Disconnect". After the disconnection is completed - Pioneer AVIC N4 | Owner's Manual - Page 114
navigation system via Bluetooth technology, this navigation screen appears. ❒ Hands-free phoning connection is discon- nected to establish the connection for phone book transfer. The navigation system now ready to be transferred the phone book from the phone. 2 Use . Using the AV Source (Pioneer AV - Pioneer AVIC N4 | Owner's Manual - Page 115
and the phone book edit screen reappears. Clearing memory You The clear memory screen appears. 2 Touch "Clear" for. Name edit screen You can input letters screen reappears. ❒ Each name can be input 16 characters long. On this screen cleared from this navigation system's memory. ❒ If you - Pioneer AVIC N4 | Owner's Manual - Page 116
ring tone you select for this navigation system has no effect on the ring tone used by your phone. If you do not want your phone and this navigation system to ring at the same ". Touching "Echo Cancel" switches between "On" and "Off". Using the AV Source (Pioneer AV Equipment) Chapter 7 BT-TEL 114 - Pioneer AVIC N4 | Owner's Manual - Page 117
AV iPod Chapter 7 Using the AV Source (Pioneer AV Equipment) iPod You can control an iPod by combining the iPod cable (e.g. CD-I200) (sold separately) to the navigation system. For details concerning operation, refer to the iPod's owner's manual. Operating iPod (1) (2)(6) (5) (3), (7) (4) ➲ " - Pioneer AVIC N4 | Owner's Manual - Page 118
(VIDEO) This navigation system can play video if an iPod with video capabilities is connected. ❒ Change the video setting on the iPod so that the iPod can output the video to an external device, before you display the video screen. ❒ For details about the settings, refer to the iPod's owner's manual - Pioneer AVIC N4 | Owner's Manual - Page 119
off. If the video from an iPod with video capabilities seems fuzzy, turning off the charging setting may improve the video quality. 1 Touch "iPod Charge" in the Function menu. Touching "iPod Charge" switches between "On" or "Off". BT-AUDIO Chapter 7 Using the AV Source (Pioneer AV Equipment) 117 - Pioneer AVIC N4 | Owner's Manual - Page 120
there are a number of Bluetooth audio players available on the market, operations with your Bluetooth audio player using this navigation system vary greatly in range. Please refer to the instruction manual that came with your Bluetooth audio player as well as this manual while operating your player - Pioneer AVIC N4 | Owner's Manual - Page 121
open on. Pairing is displayed. This navigation system is now on standby for connection from Bluetooth audio player. If your Bluetooth audio player is set ready for Bluetooth wireless connection, the connection to this navigation system will be automatically established. ❒ Before you can use - Pioneer AVIC N4 | Owner's Manual - Page 122
navigation system that differ from those described in the external unit's operation manual. ❒ Operation varies depending on the external unit connected. (In some cases, the external unit may not respond.) (1) Source icon (2) External unit indicator 1 Touch "EXT-1" or "EXT-2" in the AV Source screen - Pioneer AVIC N4 | Owner's Manual - Page 123
AV Chapter 7 Using the AV Source (Pioneer AV Equipment) AV Input (AV) • For safety reasons, visual images cannot be ). Selecting AV as the source 1 Touch "AV-1" or "AV-2" in the AV Source screen to select AV as the source. ➲ "Selecting an AV source" ➞ Page 32 ❒ If you want to switch AV source - Pioneer AVIC N4 | Owner's Manual - Page 124
122 Using the AV Source (Pioneer AV Equipment) Chapter 7 AV - Pioneer AVIC N4 | Owner's Manual - Page 125
is Preout Full, Non Fading will be displayed instead of Sub Woofer. ➲ "Setting the rear output and subwoofer controller" ➞ Page 129 ❒ When selecting the FM tuner as the source, you cannot switch to "SLA". Using the equalizer The equalizer lets you adjust the equalization to match vehicle interior - Pioneer AVIC N4 | Owner's Manual - Page 126
as desired. Adjusted equalizer curve settings are memorized in Custom1. ❒ If you make Custom2 adjustments, Custom2 curve is updated. ❒ You can adjust the center frequency, level and the Q factor (curve characteristics) of each currently selected curve band (Low/Mid/ High). • Band: You can select - Pioneer AVIC N4 | Owner's Manual - Page 127
ranges at low volume. 1 Touch "Loudness" in the Sound menu. 2 Touch "On" to turn loudness on. To turn loudness off, touch "Off". 3 Touch or to select a desired level. Each time you touch or selects level in the following order: Low - Mid - High Using subwoofer output The navigation system is - Pioneer AVIC N4 | Owner's Manual - Page 128
source level adjustment volume automatically. • CD, ROM, DivX, S-DVD and M-DVD • EXT-1and EXT-2 • AV-1 and AV-2 • XM and SIRIUS Setting Up the DVD/DivX Player Configure the DVD/DivX player. DVD/DivX Setup adjustments (1) (1) DVD/DivX Setup menu display 1 Play the disc that contains DVD-Video or - Pioneer AVIC N4 | Owner's Manual - Page 129
of the TV aspect. For details, refer to the disc's instructions. Setting the parental lock Some DVD-Video discs let you use parental lock to restrict the viewing of violent and adult oriented scenes by children. You can set the parental lock level in steps as desired. ❒ When you set a parental lock - Pioneer AVIC N4 | Owner's Manual - Page 130
literature or on the disc itself. With discs that do not feature a recorded parental lock level, you cannot use parental lock. ❒ With some discs, parental lock operates to skip certain scenes only, after which normal playback resumes. For details, refer to the disc's instructions. ❒ If you forget - Pioneer AVIC N4 | Owner's Manual - Page 131
system. • When the voice guidance is output. ❒ The sound muting/attenuation function does not work when you use a cellular phone connected to the navigation system via the Bluetooth adapter, which is sold separately. ❒ When 5.1ch setting is "On", the sound muting/attenuation setting is not - Pioneer AVIC N4 | Owner's Manual - Page 132
to turn "Off". 130 Each touch of "REAR SCREEN" changes the settings as follows: • Mirror - The video on the front screen of the navigation unit is output to the "Rear display" • DVD - The video and sound of the DVDs are output to the "Rear display" • AV1 - The video and sound of the AV-1 are output - Pioneer AVIC N4 | Owner's Manual - Page 133
and that a portion of what is seen by the camera is not viewable. • Pioneer recommends the use of a camera which outputs mirror reversed images, otherwise screen image may appear reversed. • Immediately confirm whether the display changes to a rear view camera image when the shift lever is moved to - Pioneer AVIC N4 | Owner's Manual - Page 134
navigation system is connected to the auto antenna of the vehicle, select either of the following settings. • Radio - Extends the antenna only for the Radio Radio" and "Power". ❒ Regardless of whether "Radio Screen Mode • For safety reasons, you cannot use some of these navigation screen screen screen - Pioneer AVIC N4 | Owner's Manual - Page 135
without video and sources with video are saved separately in the memory. ❒ The picture adjustment may not be able to be used with some rear view cameras. ❒ The same setting is selected for the normal background picture and the navigation map display. ❒ Because of the LCD screen characteristics - Pioneer AVIC N4 | Owner's Manual - Page 136
AV Customizing the AV Source Setting Chapter 8 Language Code Chart for DVD Language Code Chart for DVD Language (code), input code Japanese (ja), 1001 English (en), 0514 French (fr), 0618 Spanish (es), 0519 German (de), 0405 Italian (it), 0920 Chinese (zh), 2608 - Pioneer AVIC N4 | Owner's Manual - Page 137
incorrect password three times, the navigation system is locked. 1 Enter the password. 2 Touch "OK". The password mode is canceled. Delete the password The current password can be deleted. 1 With the map displayed, press the MENU button. 2 Touch "Settings" in the NAVI MENU. 3 Touch "System Options - Pioneer AVIC N4 | Owner's Manual - Page 138
you want to use. 3 Set the time difference. 1 Park your vehicle in a safe place. Leave the engine on, and make sure that the parking brake is applied. 2 Insert the Pioneer DVD Map Disc into the disc loading slot of the navigation system. When the upgraded program has been found, installation of the - Pioneer AVIC N4 | Owner's Manual - Page 139
the touch panel may be damaged. Do not use a sharp pointed tool such as a ballpoint pen or a mechanical pen. Otherwise the screen is damaged. Stylus (supplied with navigation system) 1 Press the VOLUME knob (or AV button) to switch to the AV operation screen. 2 Press the MENU button to change to the - Pioneer AVIC N4 | Owner's Manual - Page 140
the DVD Map Disc and store new data in the memory during navigation operation, such as when the destination is far away. The memory navi mode uses the following map data to perform navigation. The following are collectively known as Memory Data: • Manually downloaded memory area data in "Map in - Pioneer AVIC N4 | Owner's Manual - Page 141
✓ : My Favorites ✓ *: Product Number in the Service Info Screen is not displayed. About the icon for the memory navi mode When new route guidance starts, the route data from the DVD Map Disc is read into the memory of the navigation system. The status of the memory navi mode is indicated by the - Pioneer AVIC N4 | Owner's Manual - Page 142
may not be able to use map display mode during DVD navi mode. If the map display mode is not changed during memory navi mode, the display will return to the map display mode used during the DVD 140 navi mode when the DVD Map Disc is set again. • In memory navi mode, map scale data that cannot be - Pioneer AVIC N4 | Owner's Manual - Page 143
these limitations, insert the DVD Map Disc to the navigation system. Positioning Technology The navigation system accurately measures your current location by combining the positioning by GPS and by Dead Reckoning. Positioning by GPS The Global Positioning System (GPS) uses a network of satellites - Pioneer AVIC N4 | Owner's Manual - Page 144
NAVI used. How do GPS and dead reckoning work together? For maximum accuracy, your navigation system continually compares GPS position as shown on the map to show fewer errors. ❒ If you use chains on your wheels for automatically replaces the value for calculating distance. ❒ If the ND-PG1 is used or - Pioneer AVIC N4 | Owner's Manual - Page 145
NAVI/AV Appendix Handling Large Errors Positioning errors are kept to a minimum by combining GPS, Dead Reckoning and map matching. However, in some situations, these functions may not work properly, and the error may become bigger. When the positioning by GPS separately) be used. Conditions Likely - Pioneer AVIC N4 | Owner's Manual - Page 146
NAVI/AV Appendix • If there is a parallel road. • If there is a loop If you are driving on a long, straight road or a gently curving road. • If you take a recently opened road that is not on the map. • If you are on a steep mountain road with many height changes. • If you drive in zig-zags. - Pioneer AVIC N4 | Owner's Manual - Page 147
NAVI different size. • If trees or other obstacles block the GPS signals for a considerable period. • If you drive very slowly the engine. • If you insert the disc and turn your navigation system on while driving. Some types of status • Memory area memorized manually • Area to avoid • Registered - Pioneer AVIC N4 | Owner's Manual - Page 148
the disc, the Auto Reroute function will not work. • Even if "Close-up of Junction" is "On", the display will not switch to an enlarged map of the disc, preparation for memory navi mode will have to be redone after the vehicle returns to an area stored in the disc. (Preparation for the memory navi - Pioneer AVIC N4 | Owner's Manual - Page 149
NAVI/AV Appendix ❒ A set Areas to Avoid may be deleted when the software is updated. If this happens, the system will automatically try to recover the deleted information, but data can be recovered only for areas stored on the disc. For items that could not be recovered, a recovery process will - Pioneer AVIC N4 | Owner's Manual - Page 150
Pioneer service facility. Problems in the navigation screen Symptom Power doesn't turn on. The unit doesn't operate. The power turns on, but the unit then replace the fuse. Be very sure to install a correct fuse with the same rate. Press the RESET button. (➞ Refer to page 20 in this manual.) Press - Pioneer AVIC N4 | Owner's Manual - Page 151
, refer to "Installation Manual".) Check whether or not the reverse gear signal input lead (Violet) is connected properly. (The navigation system works properly without the lead connected, but positioning accuracy will be adversely affected.) Touch on the screen and change the map display. Check the - Pioneer AVIC N4 | Owner's Manual - Page 152
brake. Secure the navigation system firmly. Before ejecting the disc, switch the source. This problem may occur when certain connection methods are used. Check the rear display and its connection. Switch the source with a video. Problems in the AV screen (during DVD-Video playback) Symptom CD - Pioneer AVIC N4 | Owner's Manual - Page 153
map. No sounds are heard. The volume level will not rise. The icon is displayed, and operation is not possible. The picture stops (pauses) and the unit cannot be operated. The picture is stretched, the aspect is incorrect. Cause "DVD/DivX Setup" is carried out The setting for the rear view camera - Pioneer AVIC N4 | Owner's Manual - Page 154
the navigation system is malfunctioning. Problems in the AV screen (during iPod playback) Symptom Cannot be operated. Cause The iPod is frozen. The authorization error has occurred. Action (See) • Reconnect the iPod with the interface cable for iPod® (sold separately). •Update the iPod version - Pioneer AVIC N4 | Owner's Manual - Page 155
"Installation Manual" and set the direction of the navigation unit correctly. Note down the error code shown on the screen. Turn off the power, and then contact your nearest Pioneer service facility. If the sensor learning status reaches the Sensor Initializing status, the system is ready to be used - Pioneer AVIC N4 | Owner's Manual - Page 156
NAVI map data, software, hardware or disc. be established by bypassing toll roads used in the POI Search cannot be found in the Address Search.) If no freeway was found in the selected Zone. What to do • Change the destination. • Clean the disc. • Consult the Pioneer instructions shown on the screen - Pioneer AVIC N4 | Owner's Manual - Page 157
kit for DVD, then try to reading again. The PICTURES folder exists on the disc but no data in JPEG format exists. Use the appropriate data after reading "Changing Background Picture" on page 68. In the memory navi mode, if the Auto-reroute does not function for some reason. Insert the DVD Map - Pioneer AVIC N4 | Owner's Manual - Page 158
Manual for more information regarding safe operation. Viewing of front seat video source while driving is strictly prohibited. When In the memory navi mode, if the DVD Map Disc on the DVD Map Disc. Or, replace the DVD Map Disc and try to zoom in again. • Retry. • Consult the Pioneer Local dealer if - Pioneer AVIC N4 | Owner's Manual - Page 159
manual.) Replace the DVD-Video with one bearing the correct region number. This type of disc cannot be played by the navigation system The temperature of the navigation system is outside of the normal operating range Replace the disc with one the navigation system can play. Wait until the unit - Pioneer AVIC N4 | Owner's Manual - Page 160
Appendix NAVI/AV Handling and Care of the Disc Some basic precautions are necessary when handling your discs. DVD Map Discs • Do not use discs other than those intended for this product. Use only discs approved by Pioneer. ❒ If you wish to use other DVD Map Discs, first check that they are - Pioneer AVIC N4 | Owner's Manual - Page 161
data or other filler information. Otherwise, the disc may not be recognized by the built-in DVD drive. - CD-R/-RW: 1.8 MB - DVD-R/-RW: 170 MB MP3, WMA and AAC files • WMA data can be encoded by using Windows Media Player version 7 or later. • This unit may not operate correctly depending on the - Pioneer AVIC N4 | Owner's Manual - Page 162
on one disc. 160 DivX video files • This unit corresponds to DivX video format implemented discs. • Some special operation may be prohibited because of the composition of DivX files. • DivX files downloaded .08 Mbps for DVDs. • DivX VOD file playback requires ID code of this unit to DivX VOD provider - Pioneer AVIC N4 | Owner's Manual - Page 163
authorized PIONEER Service Station for internal inspection, adjustments or repairs. Handling the LCD screen • When the LCD screen is subjected to direct sunlight for a long period of time, it will become very hot resulting in possible damage to the LCD screen. When not using this navigation system - Pioneer AVIC N4 | Owner's Manual - Page 164
your dealer or the nearest authorized Pioneer service station. Route Setting Information Route search specifications Your navigation system sets a route to your destination by applying certain built-in rules to the map data. This section provides some useful information about how a route is set - Pioneer AVIC N4 | Owner's Manual - Page 165
on a traffic circle - when your vehicle is out of Memory area - when the vehicle goes out of the area stored in the disc during DVD navigation mode - when the vehicle goes out of the memorized area during memory navi mode - when driving on routes described in "Roads not used in calculations" 163 - Pioneer AVIC N4 | Owner's Manual - Page 166
There are three types of roads marked on the map of this disc. Roads included in the route guidance and roads not included Turn by Turn Routable Roads contain full attribute data and can be used for full Route Guidance. Pioneer navigation will display full route guidance, including turn-by-turn - Pioneer AVIC N4 | Owner's Manual - Page 167
as the Dolby Digital surround sound system used in theaters. DRM This technology preserves the copyrights for digital data by limiting the number of copies that can be made for audio and video files. DVD Map Discs The DVD-ROM disc contain Pioneer navigation software. Map data is also recorded on the - Pioneer AVIC N4 | Owner's Manual - Page 168
done with files on floppy or hard discs. Parental lock Some DVD-Video discs with violent or adult-oriented scenes feature parental lock which prevents children from viewing such scenes. With this kind of disc, if you set the unit's parental lock level, playback of scenes inappropriate for children - Pioneer AVIC N4 | Owner's Manual - Page 169
✕ 46 ✕ 28 mm (6-3/4 ✕ 1-3/4 ✕ 1-1/4 in.) Weight 2.3 kg (5.1 lbs) Hideaway unit: Dimensions (W ✕ H ✕ D 180 ✕ 30 ✕ 140 mm Weight 0.7 kg (1.5 lbs) Navigation GPS Receiver: System L1, C/Acode GPS SPS (Standard Positioning Service) Reception system ........ 8-channel multi-channel reception system - Pioneer AVIC N4 | Owner's Manual - Page 170
+11 dB (10 kHz) (volume: -30 dB) HPF: Frequency 50/80/125 Hz Slope 12 dB/oct Subwoofer: Frequency 50/80/125 Hz Slope 18 dB/oct Gain 12dB Phase Normal/Reverse DVD Drive System DVD-Video, Compact disc audio, MP3, WMA, AAC, DivX system Usable discs DVD-Video, Compact disc, MP3, WMA, AAC, DivX - Pioneer AVIC N4 | Owner's Manual - Page 171
to the default or factory settings. *2: If you touch "Restore Factory Settings", the setting value return to the default or factory settings. NAVI MENU Destination Address Search Return Home Go to POI Search Vicinity Search*1 Address Book Destination History Freeway Search Telephone Search Cancel - Pioneer AVIC N4 | Owner's Manual - Page 172
NAVI/AV Route Options Edit Current Route View Current Route Recalculate Number of Routes*2 Route Condition*2 Avoid Freeway*2 Avoid Ferry*2 Avoid Toll Road*2 Designate Areas to Avoid P. 48, 52 P. 47, 52 P. 52 P. 52 P. 52 P. 52 P. 52 P. 53 P. 49 Appendix 170 - Pioneer AVIC N4 | Owner's Manual - Page 173
NAVI/AV Appendix Settings Volume*2 System Options Short-Cut Selection Map Guide Mode*2 Day/Night Display*2 Close-up of Junction*2 Arrow in AV*2 P. 75 P. 75 P. 75 P. 76 P. 76 Set "Home" Map in Memory Set "Go To" P. 55, 76 P. 76, 138 P. 55, 76 Connection Status 3D Calibration Service Info Screen - Pioneer AVIC N4 | Owner's Manual - Page 174
NAVI/AV Shortcut menu ❒ The shortcuts displayed onscreen can be changed. Changing a shortcut ➞ Page 74 Shortcut menu : Destination*3 : Change Route*3 : Registration : Vicinity Search*1 :Volume Setting : Whole Route Overview : Overlay POI*1 : Address Book : Route Options : Edit Current Route : - Pioneer AVIC N4 | Owner's Manual - Page 175
NAVI/AV Menu in the AV Screen Sound menu Sound FAD/BAL (Balance) EQ Menu Staging Loudness Sub Woofer (Non Fading) HPF SLA Initial menu Initial Rear SP PIN Edit Mute Input/Guide 5.1CH P. 124 P. 124 P. 125 P. 125 P. 125 P. 126 P. 126 P. 129 P. 129 P. 130 Rear SP Preout P. 129 P. 129 Appendix - Pioneer AVIC N4 | Owner's Manual - Page 176
NAVI/AV System menu System AV1 Input AV2 Input Camera Antenna Control Wide Mode V.Adjust Screen Off Illumi Color Screen Color P. 131 P. 131 P. 132 P. 132 P. 133 P. 133 P. 132 P. 132 Camera Polarity P. 131 P. 131 Appendix 174 - Pioneer AVIC N4 | Owner's Manual - Page 177
DVD-Video Function Repeat L/R Select DVD/Divx Setup CD/ROM Function Repeat Random Scan DivX Function Repeat DVD/Divx Setup RADIO Function BSM Local M-DVD Function Repeat Random Scan USB Function Repeat P. 83 Random P. 83 Scan P. 126 XM Function P. 87 P. 87 P. 87 Memo SIRIUS NAVI/AV - Pioneer AVIC N4 | Owner's Manual - Page 178
NAVI/AV iPod Function Repeat Shuffle Wide Screen iPod Charge BT-AUDIO Function Connection Open Disconnect Device Info P. 117 P. 117 P. 117 P. 117 P. 119 P. 119 P. 119 Appendix 176 - Pioneer AVIC N4 | Owner's Manual - Page 179
NAVI/AV DVD/DivX Setup menu DVD/DivX Setup Language Assist Subtitle Multi Angle TV Aspect Parental DivX VOD Auto Play Subtitle File P. 126 P. 127 P. 127 P. 127 P. 127 P. 128 P. 128 P. 128 Subtitle Language Audio Language Menu Language P. 126 P. 126 P. 126 Appendix 177 - Pioneer AVIC N4 | Owner's Manual - Page 180
ELECTRONICS (USA) INC. P.O. Box 1540, Long Beach, California 90801-1540, U.S.A. TEL: (800) 421-1404 PIONEER EUROPE NV Haven 1087, Keetberglaan 1, B-9120 Melsele, Belgium TEL: (0) 3/570.05.11 PIONEER ELECTRONICS ASIACENTRE PTE. LTD. 253 Alexandra Road, #04-01, Singapore 159936 TEL: 65-6472-7555
-
 1
1 -
 2
2 -
 3
3 -
 4
4 -
 5
5 -
 6
6 -
 7
7 -
8
-
9
-
10
-
11
-
12
-
13
-
14
-
15
-
16
-
17
-
18
-
19
-
20
-
21
-
22
-
23
-
24
-
25
-
26
-
27
-
28
-
29
-
30
-
31
-
32
-
33
-
34
-
35
-
36
-
37
-
38
-
39
-
40
-
41
-
42
-
43
-
44
-
45
-
46
-
47
-
48
-
49
-
50
-
51
-
52
-
53
-
54
-
55
-
56
-
57
-
58
-
59
-
60
-
61
-
62
-
63
-
64
-
65
-
66
-
67
-
68
-
69
-
70
-
71
-
72
-
73
-
74
-
75
-
76
-
77
-
78
-
79
-
80
-
81
-
82
-
83
-
84
-
85
-
86
-
87
-
88
-
89
-
90
-
91
-
92
-
93
-
94
-
95
-
96
-
97
-
98
-
99
-
100
-
101
-
102
-
103
-
104
-
105
-
106
-
107
-
108
-
109
-
110
-
111
-
112
-
113
-
114
-
115
-
116
-
117
-
118
-
119
-
120
-
121
-
122
-
123
-
124
-
125
-
126
-
127
-
128
-
129
-
130
-
131
-
132
-
133
-
134
-
135
-
136
-
137
-
138
-
139
-
140
-
141
-
142
-
143
-
144
-
145
-
146
-
147
-
148
-
149
-
150
-
151
-
152
-
153
-
154
-
155
-
156
-
157
-
158
-
159
-
160
-
161
-
162
-
163
-
164
-
165
-
166
-
167
-
168
-
169
-
170
-
171
-
172
-
173
-
174
-
175
-
176
-
177
-
178
-
179
-
180
 |
 |

DVD MULTIMEDIA AV NAVIGATION SERVER
AVIC-N4
Operation Manual
Notice to all users:
This software requires that the navigation system be properly connected to your vehicle’s
parking brake. If not properly connected and depending on your vehicle, additional instal-
lation may be required. For more information, please contact your Authorized Pioneer
Electronics retailer or call us at (800) 421-1404.