Pioneer DV-AX10 Owner's Manual - Page 15
Home Theater Component Connections Example
 |
View all Pioneer DV-AX10 manuals
Add to My Manuals
Save this manual to your list of manuals |
Page 15 highlights
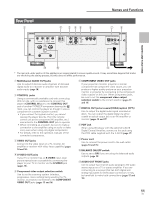
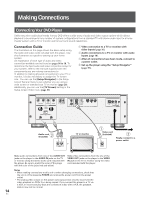
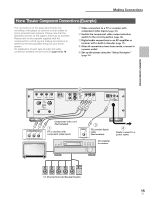
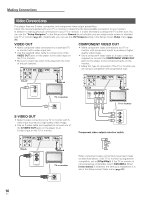
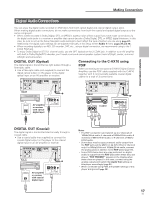
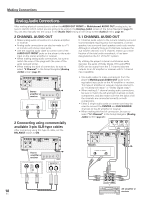
Making Connections Home Theater Component Connections (Example) The connections on this page demonstrate the versatility of this player to conform to any number of home entertainment systems. Please note that the illustration shown on this page is meant as an example. Please refer to the manuals supplied with the components to which you are making connections to determine the best possible setup for your home system. An explanation of each type of audio and video connection available can be found on pages 16 to 18. 1 Video connection to a TV or monitor with component video inputs (page 16). 2 Switch the component video output selection switch to the correct position (page 16). 3 Digital audio connections to an AV amplifier or receiver with a built-in decoder (page 17). 4 After all connections have been made, connect to a power outlet. 5 Set up the player using the "Setup Navigator" (page 19). MAKING CONNECTIONS R L SURROUND SUB WOOFER AUDIO OUT 1 - GND 2 - HOT (+) 3 - COLD (-) BALANCE OFF ON CENTER R FRONT L IN OUT CONTROL 2 1 1 2 VIDEO OUT 2 S-VIDEO OUT menu select 525i (480i) 525p (480p) PR PB Y COMPONENT VIDEO OUT OPT 2COAX 1COAX PCM PDIF DIGITAL OUT COMPONENT VIDO INPUT PR PB Y Component video cord (Not included) 1 TV or monitor with component video inputs DIGITAL IN 3 75Ω coaxial digital cable (Not included) AV amplifier or receiver 4 Finally, connect to a power outlet. 5.1 Channel Surround Speaker System 15 En
-
 1
1 -
2
-
3
-
4
-
5
-
6
-
7
-
8
-
9
-
 10
10 -
 11
11 -
 12
12 -
 13
13 -
 14
14 -
 15
15 -
 16
16 -
 17
17 -
 18
18 -
 19
19 -
 20
20 -
21
-
22
-
23
-
24
-
25
-
26
-
27
-
28
-
29
-
30
-
31
-
32
-
33
-
34
-
35
-
36
-
37
-
38
-
39
-
40
-
41
-
42
-
43
-
44
-
45
-
46
-
47
-
48
-
49
-
50
-
51
-
52
-
53
-
54
-
55
-
56
-
57
-
58
-
59
-
60
-
61
-
62
-
63
-
64
-
65
-
66
-
67
-
68
-
69
-
70
-
71
-
72
-
73
-
74
-
75
-
76
 |
 |
