Pioneer VSX-521-K Owner's Manual - Page 14
Control, HDMI Setup, TV/SAT - subwoofer
 |
UPC - 884938133043
View all Pioneer VSX-521-K manuals
Add to My Manuals
Save this manual to your list of manuals |
Page 14 highlights
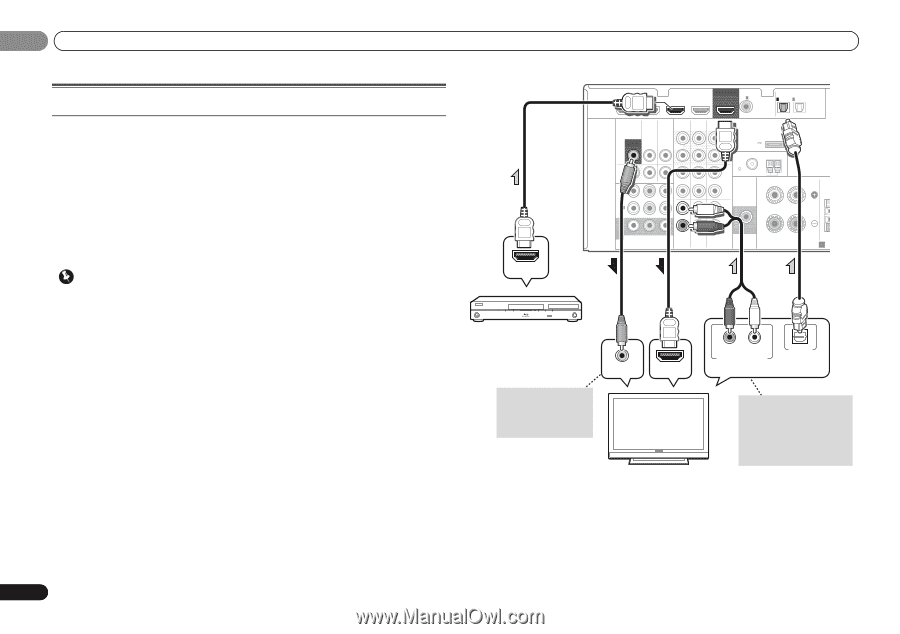
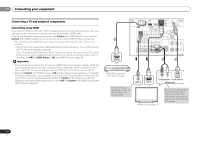
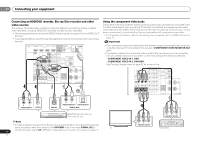
02 Connecting your equipment Connecting a TV and playback components Connecting using HDMI If you have an HDMI or DVI (with HDCP) equipped component (Blu-ray Disc player, etc.), you can connect it to this receiver using a commercially available HDMI cable. If the TV and playback components support the Control with HDMI feature, the convenient Control with HDMI functions can be used (see Control with HDMI function on page 34). • The following connection/setting is required to listen to the sound of the TV over this receiver. - If the TV does not support the HDMI Audio Return Channel function, connect the receiver and TV with audio cables (as shown). - If the TV supports the HDMI Audio Return Channel function, the sound of the TV is input to the receiver via the HDMI terminal, so there is no need to connect an audio cable. In this case, set ARC at HDMI Setup to ON (see HDMI Setup on page 34). Important • If the receiver is connected to a TV using an HDMI cable, the on-screen display (OSD) will not be displayed. Be sure to use a standard RCA analog video cable to connect. In this case, switch the TV input to analog to see the OSD screen (for setup, etc.) on the TV. • When the Control with HDMI function is ON and the receiver is connected to a compatible TV with an HDMI cable, and you switch the input of the TV to composite or component, the input of the receiver may automatically switch to TV/SAT. If this happens, switch the receiver's input back to the original input, or turn OFF the Control with HDMI function (see HDMI Setup on page 34). HDMI OUT HDMI DVR/BDR IN DVD IN BD IN VIDEO IN OUT COAXIAL IN 1 IN 1 ASSIGNABLE IN OPTICAL 2 ASSIGNABLE VIDEO (CD) AUDIO SURR BACK/ DVR/BDR CD-R/TAPE FRONT HEIGHT (TV/SAT) (CD-R/TAPE) MONITOR TV/SAT BD OUT IN IN OUT DVR/ BDR OUT IN 1 (DVD) ASSIGNABLE IN DVD IN IN L ADAPTER PORT (Single) (OUTPUT 5 V PRE OUT 0.1 A MAX) R ANTENNA FM CD UNBAL 75 L AM LOOP IN R FRONT L R CEN IN 2 (DVR/ BDR) L IN IN MONITOR OUT Y PB PR COMPONENT VIDEO TV/SAT BD R SUBWOOFER DVD PRE OUT Class 2 Wiring SPEAKERS A HDMI/DVI-compatible Blu-ray Disc player This connection is necessary in order to see the OSD of the unit on the TV. VIDEO IN HDMI IN R L OPTICAL ANALOG AUDIO OUT DIGITAL AUDIO OUT Select one HDMI/DVI-compatible TV If the TV does not support the HDMI Audio Return Channel function, this connection is required to listen to the TV sound over the receiver. 14 En
-
 1
1 -
2
-
3
-
4
-
5
-
6
-
7
-
8
-
 9
9 -
 10
10 -
 11
11 -
 12
12 -
 13
13 -
 14
14 -
 15
15 -
 16
16 -
 17
17 -
 18
18 -
 19
19 -
20
-
21
-
22
-
23
-
24
-
25
-
26
-
27
-
28
-
29
-
30
-
31
-
32
-
33
-
34
-
35
-
36
-
37
-
38
-
39
-
40
-
41
-
42
-
43
-
44
-
45
-
46
-
47
-
48
-
49
-
50
-
51
-
52
-
53
-
54
-
55
-
56
-
57
-
58
-
59
-
60
-
61
-
62
-
63
-
64
-
65
-
66
-
67
-
68
-
69
-
70
-
71
-
72
-
73
-
74
-
75
-
76
-
77
-
78
-
79
-
80
-
81
-
82
-
83
-
84
-
85
-
86
-
87
-
88
-
89
-
90
-
91
-
92
-
93
-
94
-
95
-
96
-
97
-
98
-
99
-
100
-
101
-
102
-
103
-
104
-
105
-
106
-
107
-
108
-
109
-
110
-
111
-
112
-
113
-
114
-
115
-
116
-
117
-
118
-
119
-
120
 |
 |