RCA CC6151 User Guide
RCA CC6151 - VHS-C Camcorder Manual
 |
UPC - 034909720455
View all RCA CC6151 manuals
Add to My Manuals
Save this manual to your list of manuals |
RCA CC6151 manual content summary:
- RCA CC6151 | User Guide - Page 1
nCJ/ camcorder user's guide CC6151/CC6251/CC6271 - RCA CC6151 | User Guide - Page 2
. Keep your sales receipt for proof of purchase to obtain warranty parts and service and attach it here. Record the serial number and model numbers located on the bottom of the camcorder. Model No: SerialNo:_,, Purchase Date-_ _ Purchased From: CC6151 or CC6251 or CC6271 -, •_ : ;._. ,!. ': : - RCA CC6151 | User Guide - Page 3
Warranty 800-283-6503 (pages 84-85) Customer Service 800-336-1900 (page 83) Accessories 800-338-0376 (pages 70-75) Safety Information i First Time Operation • Assistance 3 • Unpack the Camcorder and Accessories 3 • Attach the Adapter/Charger 4 • Adjust the Handstrap to Fit Your Hand - RCA CC6151 | User Guide - Page 4
70-75 • Accessory Order Form 73-75 Trouble Checks 76-79 Care and Maintenance • Clean the Camcorder 80 • Clean the Camcorder's Lens ......... 80 • Clean the Camcorder's Viewfinder 80 • Proper Care and Storage 81 • Things to Avoid 81 Specifications 82 Information to User 82 Customer Assistance - RCA CC6151 | User Guide - Page 5
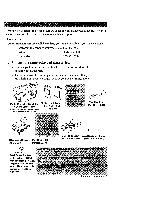
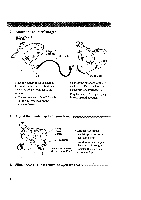
any are missing or appear damaged, contact your dealer immediately. Model CC6151 or CC6251 or CC6271 Camcorder* (*Your camcorder may appear slightly different than the one shown.) Rechargeable Battery Part No FB1260 or BB700 Shoulder Strap Part No. ACS091 4+ "{1 AC Adapter/Charger and DC Cable - RCA CC6151 | User Guide - Page 6
Hz Adapter/ Charger Cable PUT Jack Since the battery must be charged before it can be used the first time, attach the adapter/charger to the camcorder. Connect one end of the DC cable to the DC OUT jack on the adapter/charger. _DC In Jack • Connect the other end of the DC cable to the DC in jack - RCA CC6151 | User Guide - Page 7
until the cassette holder locks into place. 6. Set POWER (CAMERA/OFF/VCR) switch to CAMERA. _ _ ___ • Switch and Indicator • The power indicator lights and the camcorder enters record-pause. =- PAUSE--: appears in the viewfinder when the"camcorder is in record-pause. • The position of this switch - RCA CC6151 | User Guide - Page 8
i@ SP/SLP Button Electronic Viewfinder Eyepiece Focus Control 7. Adjust the viewfinder and eyepiece focus control. __ You can see what you record in the viewf'mder. • Adjust the viewf'mder for a comfortable viewing position. • Turn the eyepiece focus control to adjust the focus of the - RCA CC6151 | User Guide - Page 9
4ENU Dial 9. Select a tape length. Set the length of the tape you are using so the camcorder can correctly calculate the recording time remaining on the tape. , • Place the AE dial in MAN, and press the MENU dial to display the MENU - RCA CC6151 | User Guide - Page 10
Power Indicator POWER (VCR/ OFFICAMERA) Switch Tally Light AE Dial This places the camcorder in the AUTO mode. In the AUTO mode, the focus, exposure, and white balance are automatically controlled by the camcorder. 11. Start and stop recording. Press and release the thumb trigger to start - RCA CC6151 | User Guide - Page 11
finished playing back the tape. • Details on viewfinder playback are on pages 60-61. 13. Set the POWER switch to OFF to turn off the camcorder. The power indicator turns off. 14. Close the lens cover. (continued on next page) 9 - RCA CC6151 | User Guide - Page 12
15. Review camcorder's operating controls. VCR 4, Button QUICK REC (Record)" Button DATE/TIME Button (Also COUNTER R/M Button) SP/SLP Button Model CC6271 Only: Color Enhancement Light ii_/I I Button -- VCR ,, Button Button Lens Tall' Light Microphone Z FADE TITLE€ CKLI AE Dial 10 - RCA CC6151 | User Guide - Page 13
Ring BATT. (Battery) RELEASE Button Models CC6251 and CC6271 Only B (Bright) and C (Color) Controls (See Trouble Checks for Details) Focus Control Power Zoom Buttons LENS Control Clock Cell Battery Compartment Attach Rechargeable Battery Here Handstrap Attach Adapter/ Charger's DC Cord Here - RCA CC6151 | User Guide - Page 14
world to power the camcorder or recharge the battery. To AC 100-240, 50/60 Hz Adapter/ Charger Cable ,19(7OUT Jack DC In Jack Attach Adapter/Charger 1. Connect one end of the DC cable to the DC OUT jack on the adapter/ charger. 2. Connect the other end of the DC cable to the DC in jack on the - RCA CC6151 | User Guide - Page 15
. It has no other purpose. Marker Switch BATT. RELEASE Button Attach the Charged Battery If the DC cable is attached to the camcorder, remove it before attaching the battery. Also, install the lithium clock cell before attaching the battery. Details are on page 17. 1. Hook the top end of the - RCA CC6151 | User Guide - Page 16
Use the Battery to Power Your Camcorder Hold Battery Flush and Slide (continued) Marks I CHG (Charge) Im REFRESH • Indicator Adapter/Charger To AC Wall Outlet 100- 240 Volts, 50/60 Hz. Button Charge the Battery If the DC cable is attached to the DC OUT jack on the adapter/charger, remove it. - RCA CC6151 | User Guide - Page 17
level indicator appears in the viewf'mder and shows you the amount of power in the rechargeable battery. mmml • When the battery power is almost gone, ,_,\:_" flashes in the viewfinder. The camcorder turns off automatically after a few seconds. Set the POWER switch to OFF to turn off the cam - RCA CC6151 | User Guide - Page 18
operating instructions. Use the DCC08 Car Cord Adapter __,____!! Cigarette Lighter Socket POWER Indicator Power Connector Optional DCC08 Car Cord Adapter 1. Set the POWER switch to OFF to tum off the camcorder., The power .... indicator on the camcorder turns off. . If the battery or DC cable - RCA CC6151 | User Guide - Page 19
attached to the camcorder. 2. Press release tab of clock cell compartment cover and open the compartment. 3. Insert the clock cell with the "+" terminal facing out, and press it in. 4. Close the compartment cover. It clicks into place. To Remove Lithium Cell To remove battery, insert a pointed - RCA CC6151 | User Guide - Page 20
on the previous page before "you can set the date. MENU Dial (Rotate or Press In) 1. Set thePOWER switch to CAMERA, and make sure the AE dial is not set to AUTO. 2. Press the MENU dial in to display the main MENU in the viewfinder. MENU )'MENU END EXPOSURE DATErnME TELE MACRO - RCA CC6151 | User Guide - Page 21
the settings are flashing, rotate the MENU dial to highlight EX/T. FOCUS EXPOSURE DATE/TIME TELE MACRO TAPE LENGTH M.W.B. ZOOM SPEED 1_NEXT AUTO AUTO NOV 18.98 OFF 1"30 AUTO FAST 12. Press the MENU dial in again to remove the main MENU from the viewfinder. Notes: If you decide to return the - RCA CC6151 | User Guide - Page 22
You Created to Record On Your Tape 1. Attach a power supply and set POWER switch to CAMERA. The power indicator lights. 2. Make sure the AE dial is not set to AUTO to select any mode except AUTO DATE. Note: AUTO DATE is selected when the AE dial is set toAUTO. . Repeatedly press the DATE/TIME - RCA CC6151 | User Guide - Page 23
AM 10:25:00 To Record the Date, Time, Date and Time, AUTO DATE, or Title You Created 1. Make sure the camcorder is in record-pause. 2. Make sure the AE dial is not set to AUTO unless you want to record AUTO DATE. 3. Repeatedly press DATE/TIME to ._ display th_ date, time, date and - RCA CC6151 | User Guide - Page 24
the need for accessory cleaners or cleaning by a Service Center. This system over tape. Recording and Playback Speeds and Times The camcorder records and plays back in standard speed (SP) the maximum SP and SLP recording times for popular VHS-C cassettes. SP - Standard play provides the best - RCA CC6151 | User Guide - Page 25
motors anU other devices. Keep dust from entering the cassette compartment. All dust is abrasive and causes excessive wear on the tape and the camcorder's recording or playback heads. Do not use cassettes with damaged or spliced tape. Do not use acassette if it has been damaged or exposed - RCA CC6151 | User Guide - Page 26
length in the TAPE LENGTH feature of the main MENU before the camcorder can correctly calculate time remaining. / SPISLP Button .,S / MENU Dial Select a Tape Length 1. Set the POWER switch to CAMERA, and make sure the AE dial is not set to AUTO. 2. Press the SPISLP button to select a tape speed. - RCA CC6151 | User Guide - Page 27
Time-Remaining Display (continued) 30MIN 29MIN ! 3MIN l 2MIN (Flashing) 1MIN ,t (Flashing) OMIN (Flashing) I 30MIN SP _ TAPE END T30- -- Tape Length Indicator "--Tape Speed Indicator Time-Remaining Display in Viewfinder . Press the MENU dial to display the TAPE LENGTH menu. TAPE LENGTH "!"30 - RCA CC6151 | User Guide - Page 28
more professional. Learn to use the special production effects available with your camcorder to add variety to your recordings. Be aware of video and audio detract from the sound you want to record. Avoid long "still" shots of landmarks and scenic attractions. Recordings are more interesting if they - RCA CC6151 | User Guide - Page 29
..... The eyepiece focus control lets you set the focus of the viewfinder for your vision. If you wear eyeglasses, you probably can operate the camcorder without them. It is easiest to set the correct focus by focusing on one of the viewfinder's on- screen displays. Look through the viewfinder - RCA CC6151 | User Guide - Page 30
Viewfinder Displays [3 SEPIA Q PAUSE AT J MWB HAPPY BIRTHDAY AE Dial Special Effect Indicators • AUTO (Full Auto Mode) AUTO LOCK appears briefly when you select AUTO. • MAN (Manual Mode) AUTO RELEASE appears briefly when you select MAN. • .'_ SPORTS This indicator appears when you select ._ to - RCA CC6151 | User Guide - Page 31
battery. • This indicator flashes when the battery is almost empty. Cassette Warning • The _ indicator flashes when the POWER switch is set to CAMERA and there is no cassette in the camcorder on page 46. MWB (Manual White Balance Indicators) The indicator for the manual white balance selected in the - RCA CC6151 | User Guide - Page 32
operate when this indicator appears. Place the camcorder in a warm, dry area until this indicator disappears. Exposure Indicators (+03) This indicator appears when you are adjusting brightness manually using the EXPOSURE menu. Make sure the AE dial is not set to AUTO. • Details are on pages 40-41 - RCA CC6151 | User Guide - Page 33
MAN in the FOCUS menu. • ,l,l,4, and x,l_l ,. flash while you adjust manual focus and "A"and ".riflash when you cannot adjust the focus any farther. • ( d_ ) This indicator appears for a few seconds when you turn on the camcorder and the clock cell is missing or needs to be replaced. • Details are on - RCA CC6151 | User Guide - Page 34
Tally FADE TITLEc Microphone AE Dial Full Auto Mode The AE dial lets you select automatic or manual control of several features. To Turn on the Full Auto Mode lo Set the POWER switch to CAMERA. The power indicator lights and the camcorder enters record-pause. ----PAUSE---- appears in the - RCA CC6151 | User Guide - Page 35
might occur at the beginning or the end of recordings. Auto Head. Cleaner The camcorder has an automatic headcleaning system. Whenever you insert or remove a cassette, this system is activated. The head-cleaning system minimizes the need for accessory cleaners or cleaning by a Service Center. 33 - RCA CC6151 | User Guide - Page 36
and out for close ups or wide-angle shots just by pressing the zoom buttons on the camcorder. The camcorder automatically focuses when you zoom at most distances. menus. 1. Make sure the POWER switch is set to CAMERA and the AE dial is not set to AUTO. 2. Press the MENU dial in to display the main - RCA CC6151 | User Guide - Page 37
press the zoom button lightly. To Turn Tele Macro Zooming ON or OFF 1. Make sure the POWER switch is set to CAMERA and the AE dial is not set to AUTO. TELE MACRO OFF . Press the MENU dial in to display the main MENU in the viewfinder. MENU _,MENU END FOCUS EXPOSURE - RCA CC6151 | User Guide - Page 38
may zoom out to focus. The lens must be clean for the camcorder to focus accurately. Manual Focus You might need to focus manually under certain conditions. . Set the POWER switch to CAMERA, and make sure the AE dial is not set to AUTO. . Press zoom button T to zoom in on the subject and center - RCA CC6151 | User Guide - Page 39
any more. . Press the MENU dial twice to remove the menus. Notes: To return to auto focus, select AUTO in the FOCUS menu or set the AE dial to AUTO. Conditions Requiring Manual Focus :...... When recording a subject through a window. • When recording a subject having a close foreground and - RCA CC6151 | User Guide - Page 40
(Rotate or Press In) Auto White Balance During auto white balance, the camcorder adjusts the white balance. • Set the AE dial to AUTO to turn on the automatic white balance feature. No indicator appears in the viewfinder. Manual .White Balance 1. Set the POWER switch to CAMERA, and make sure the - RCA CC6151 | User Guide - Page 41
or tungsten lighting. • Select MWB when shooting subjects with different color temperatures and adjust the white balance as follows: M.W.B, AUTO ;0:-:RNE :._-:CLOUD LOGEN A. Point camcorder at a white, flat object such as a piece of white paper. B. While MWB is highlighted, press and hold the MENU - RCA CC6151 | User Guide - Page 42
subject. MENU Dial (Rotate or Press In) Auto Exposure The camcorder adjusts the iris for the best possible picture during auto exposure. • Set the AE dial to AUTO to turn on the auto exposure feature. No exposure indicator appears in the viewfinder. Manual Exposure You may need to adjust exposure - RCA CC6151 | User Guide - Page 43
again to remove the main MENU. Notes: To return to auto exposure, select AUTO in the EXPOSURE menu or set the AE dial to AUTO. EXIT 4. Rotate the MENU dial to highlight MANU (manual) and press the dial in. Conditions Requiring Manual Exposure • When recording with a bright back- ground or reverse - RCA CC6151 | User Guide - Page 44
and out of scenes. The picture gradually appears or disappears. The speed of the fade is controlled by the camcorder. FADE Button To Fade In or Out 1. Set POWER switch to CAMERA. You can activate fading during recordpause or recording. PEFFECT [j_]FADER Notes: Press and hold the thumb trigger to - RCA CC6151 | User Guide - Page 45
ff l S 1/1000 HZ:HAZE SD:SHADOW , [_ SEPIA Uses Places camcorder in full auto mode. Time and date displays, title, manual focus, manual exposure, and manual white balance will not operate. Use this mode for recording using some of the manual features. Use to capture fast-moving action with less - RCA CC6151 | User Guide - Page 46
Light and Back Light The camcorder adjusts the light automatically under BACK LIT appears briefly and then [] remains in the viewfinder. Set the AE dial to AUTO to turn off the front or back light feature. To Use the FRONTLIGHT or BA CKLIGHT Release the button to turn off manual front or backlight. - RCA CC6151 | User Guide - Page 47
lost or stolen, you will be able to identify it. Use extra care to avoid damage to your camcorder and accessories when operating them at a beach or pool. Spray, sand, and dust should be avoided. If your lens has been exposed to the elements, clean it - RCA CC6151 | User Guide - Page 48
own title -- up to 18 characters. You must install the clock cell battery as shown on page 17 before you can create or store your own Preset Title or Title You Create o Make sure the camcorder is in recordpause and the AE dial is not set to AUTO. . Repeatedly press TITLE to select one of the preset - RCA CC6151 | User Guide - Page 49
Title . Make sure the camcorder is in recordpause and the AE dial is not set to AUTO. . Press the MENU dial in to display the main MENU in the viewfinder. MENU b'MENU END FOCUS EXPOSURE DATE/TIME TELE MACRO TAPE LENGTH M.W.B. Z_M_ SPEED AUTO AUTO NOV 18.98 OFF T30 AUTO FAST . Rotate the MENU - RCA CC6151 | User Guide - Page 50
scene when recording begins. Tally Light MENU Dial (Rotate or Press In) To Set the Self Timer 1. Make sure the camcorder is in recordpause and the AE dial is not set to AUTO. 2. Press the MENU dial in to display the main MENU in the viewfinder. MENU )'MENU END FOCUS EXPOSURE DATE - RCA CC6151 | User Guide - Page 51
1M1N to delay the recording for one minute. • Select 5MIN to delay the recording for five minutes. • Select OFF if you donot want the camcorder to delay recording. 8. Press the thumb trigger to start recording. Note: The tally light flashes. About five seconds before recording begins, the tally - RCA CC6151 | User Guide - Page 52
as cartooning). SP/SLP Button Tally Light MENU Dial (Rotate or Press In) To Record Using Animation 1. Make sure the camcorder is in recordpause and the AE dial is not set to AUTO. 2. Press and hold SP/SLP to select SP. SP appears in the viewfinder. 3. Press the MENU dial in to - RCA CC6151 | User Guide - Page 53
S 1S REC TIME EXIT 6. Rotate the MENU dial to highlight the amount of time you want the camcorder to record. • Select 1/4S to record for 1/4 second. • Select 1/2S to record for 1/2 You might want to take two to five shots of the subject in the same position. 10. Move the subject and repeat step - RCA CC6151 | User Guide - Page 54
object. SP/SLP Button MENU Dial (Rotate or Press In) Tally Light To Record Using Time Lapse 1. Make sure the Camcorder is in recordpause and the AE dial is not set to AUTO. 2. Press and hold SP/SLP to select SP. SP appears in the viewfinder. 3. Press the MENU dial in to - RCA CC6151 | User Guide - Page 55
the selected amount of time. The tally light flashes with the flash speed increasing five seconds before recording begins. 12. To stop recording, place the camcorder in record-pause, and set the REC TIME and INT. TIME in the second MENU to OFF. Note: Fade does not operate during animation or - RCA CC6151 | User Guide - Page 56
or Press In) To Turn the Tally Light On or Off 1. Make sure the camcorder is in recordpause and the AE dial is not set to A UTO. 2. MENU • MENU END FOCUS EXPOSURE DATEtTIME TELE MACRO TAPE LENGTH M.W.B. AUTO AUTO NOV 18.98 OFF "130 AUTO PEED FAST . Rotate the MENU dial to highlight NEXT. The - RCA CC6151 | User Guide - Page 57
To Turn the Demo Mode On Io Make sure the camcorder is in recordpause and the AE dial is not set to AUTO. 2. If a cassette is inserted, remove the dial in to select ON or OFF. • Select ON if you want the camcorder to demonstrate some of the recording features. Note: Zoom is the only feature that - RCA CC6151 | User Guide - Page 58
Select a JLIP ID NO. 1. Make sure the camcorder is in recordpause and the AE dial is not set to AUTO. 2. Press the MENU dial in to display the in to select a JLIP number. Use the number you select to identify your camcorder if you connect it to a computer using the JLIP connector. 6. Rotate the - RCA CC6151 | User Guide - Page 59
your shoulder and - when you are ready to shoot - bring the camcorder to shooting position in one quick movement. To Attach the Shoulder Strap ° If the strap keeper is over a double section of the strap, slide the - RCA CC6151 | User Guide - Page 60
Enhancement Light Model CC6271 's built-in color enhancement light automatically adds more light when needed. The POWER switch must be set to CAMERA to menu when using the light. Set to AUTO to have the light come on automatically when the camcorder senses there is insufficient light for the best - RCA CC6151 | User Guide - Page 61
Color Carefully follow the instructions below. Enhancement Light (continued) To Replace the Bulb Assembly 1. Insert a flat nonmetallic object (such as a plastic screwdriver) in the hole. Plastic Screwdriver Bulb Assembly . Place the new bulb assembly into the camcorder by inserting the top - RCA CC6151 | User Guide - Page 62
playback. _TOP Button Eyepiece Focus Control V'_vfinder EJECT Switch PUSH Button To Play Back a Tape 1. Attach a power supply. Attach the adapter/charger, charged battery, or optional car cord. 2. Insert a tape. • Slide EJECT up to open the cassette compartment. • Turn the tape wheel on the - RCA CC6151 | User Guide - Page 63
up or down and out of the picture. • During stop-action playback, rotating the MENU dial while in manual tra.ckingmight reduce picture ,'jitter, (picture bouncing up and down). Some "jitter" is normal. Press the buttons might have no effect on tapes recorded on other camcorders or VCRs. 61 - RCA CC6151 | User Guide - Page 64
Playback Features PLAY/PAUSE Button I_111 VCR VCR • • Button STOP Button Position the Tape Set POWER switch to VCR and press STOP. • Press and quickly release the VCR • • button or VCR • • button to rewind or fast-forward the tape. • Press STOP to stop the tape. Visual Search During playback, - RCA CC6151 | User Guide - Page 65
Playback Features (continued) VCR < < Button COUNTER R/M Button Button I_1_ Button ;TOP Button Time Counter The time-counter display shows the actual time elapsed when playing back a segment of tape. The memory-stop feature helps locate a certain point on the tape. Turn memory stop on to stop the - RCA CC6151 | User Guide - Page 66
into the cassette adapter. Insert the cassette adapter into the VHS VCR like a normal VHS cassette. Install Cassette Adapter's Battery Battery Compartment 1. Remove battery compartment cover. 2. Install supplied "AA" battery so positive (+) and negative (-) ends align properly with (+) and - RCA CC6151 | User Guide - Page 67
Use the Cassette Adapter (continued) Load Detector __ . Gently close the cassette compartment lid until it locks into place. Make sure the c_sette reel area under the adapter is free to turn while the cassette is loading. Note: You should hear a whirring sound while the tape loads. The adapter's - RCA CC6151 | User Guide - Page 68
monitor (or VCR) with audio/video inputs, you need an optional audio/video cable, such as VH83 shown on page 72. If your TV is already connected to a VCR, attach the camcorder to the VCR and watch what the camcorder is recording or playing on the TV. Back of Mono VCR or TV - RCA CC6151 | User Guide - Page 69
TV and tune it to the video input channel. B. Camcorder connected to VCR that is already connected to TV: Turn on VCR and place it in the "line" or "camera mode". (If your VCR does not have a "line" or "camera mode", consult the VCR owner's manual.) Operate the TV as you normally do to see - RCA CC6151 | User Guide - Page 70
To connect your camcorder to a TV without audio/video inputs, you need an optional 1CVA 147C RF output adapter and an optional coaxial RF cable, such as -75 Ohm \ Transformer N OUT TO TV Connector VCRITV Switch AUDIO, RF DC OUT, VIDEO Jacks RF Output Adapter's Plug IN FROM ANT Connector CH3/CH4 - RCA CC6151 | User Guide - Page 71
to CAMERA. Power indicator lights. 5. Press the thumb trigger to begin recording. You can watch what the camcorder is the camcorde r and place the adapter's VCR/ TV switch in TE. Note to Cable TV Part I), that provides guidelines for proper grounding and, in particular, specifies that the cable - RCA CC6151 | User Guide - Page 72
VHS camcorder and most accessories. batteries, and tapes. This car cord adapter enables you to operate your camcorder from your car, truck, or RV by plugging the car cord directly into the vehicle's cigarette lighter socket. The DCC08 is designed specifically to convert power from a 12-volt battery - RCA CC6151 | User Guide - Page 73
head provides smooth camera pan and tilt. The quickrelease mount makes it easy to attach or remove the camcorder. The grooved, tubular 3-section leg design folds down to 26" when not in use. Rubber feet allow for sure footing. CPS91 AC Battery Charger The CPS91 battery chargerplugs directly into - RCA CC6151 | User Guide - Page 74
the 300 ohm screw terminals on a TV. VH83 Audio/Video Cable Coaxial RF Cables VH8920 (61-2f-tf)t) This six foot audio/video cable can be used to connect the camcorder to a TV monitor or VCR for tape playback or copying tapes. These RF cables are used with the RF output adapter to connect your - RCA CC6151 | User Guide - Page 75
Form for Camcorder Model CC6151/CC6251/CC6271 Description Part No. Price Qty. Super Lightweight Tripod Soft Camcorder Case Shoulder Strap Y-Adapter AC Battery Charger Car Cord Adapter Rechargeable Battery (Extended) Rechargeable Battery (Standard) 75-300 Cable Transformer Coaxial RF-Cable AC088 - RCA CC6151 | User Guide - Page 76
I I I II I I I II I I I I Expiration date: _ [-'W'-] AUTHORIZED SIGNATURE Prices are subject to change without notice. Print or type your name and address clearly. A complete and filled out completely. • Allow 4 weeks for delivery. • All accessories are subject to availability. €3 ,? 74 - RCA CC6151 | User Guide - Page 77
between 8 AM and 10 PM (EST) Monday through Friday or between 9AM and 5PM (EST) Saturday. Use this number only to place an order for accessory items listed on this order form. 1-800-338-0376 To place your order by mail, detach and mail the completed order form with credit card - RCA CC6151 | User Guide - Page 78
get service. No power Won't record or playback Won't playback Won't record No picture Camcorder turns itself off 76 • Set the POWER switch to CAMERA or VCR to turn on the camcorder. The power indicator lights. • If using battery, it might need to be recharged. • If using AC adapter/charger, make - RCA CC6151 | User Guide - Page 79
operating the camcorder. Poor auto-focus operation • Subject is dark or behind glass. Auto-focus may not work under these conditions. Rotate AE dial to MAN and focus manually. See AE dial to MAN and adjust exposure manually. See pages 40-41 ...... • Model CC6271 Only: Turn on built-in light. 77 - RCA CC6151 | User Guide - Page 80
DATE is selected (AE dial in AUTO), date display is automatically recorded when you begin recording or change the cassette. See pages 20-21. • Clock lithium cell battery might need replacing. See page 17. doesnot _disappear from viewf'mder, consult your Authorized RCA Camcorder Service Center. - RCA CC6151 | User Guide - Page 81
camcorder at a clock and recording the picture of the clock. When the recording stops, play the last recorded section and note the clock time. A one-hour battery should give you about 60 minutes of recording time. In practical use, you might not be able to record for the full time because the camera - RCA CC6151 | User Guide - Page 82
wipe the lens with cleaning tissue and commercially prepared cleaning solution designed for use on camera lens. Improper cleaning might scratch the lens. Clean the Camcorder's Viewfinder_ You can remove the viewfinder eyepiece for cleaning. Reference Marks 1. Turn the eyepiece counterclockwise - RCA CC6151 | User Guide - Page 83
the camcorder or adapter/charger to rain or moisture. If any component becomes wet, turn off the power and take the unit to an Authorized RCA Camcorder Service Center. Do not use an adapter/charger or batteries other than the ones specified for the camcorder. Use of the wrong accessories might - RCA CC6151 | User Guide - Page 84
and 6271 .55" Color viewfinder Model 6151 0.5" Black-and-white electronic viewfinder Camera Section Image sensor: 1/4" CCD imager Lens: FI.6, f=3.8 to 83.6mm 22:1 power zoom lens Filter diameter: 46 mm Tripod Mount One 1/4" x 20 threaded hole AC Adapter/Charger Power requirement: 50/60 Hz. 100 - RCA CC6151 | User Guide - Page 85
are unable to resolve your problem over the phone, we will gladly service your unit or exchange it for a new or refurbished camcorder. Refer to the limited the phone. They will also provide you with instructions on where and how to return your Camcorder. Write the number in large, clear characters on - RCA CC6151 | User Guide - Page 86
for the repair. How you get service: Call 1-800-283-6503 and have your unit's date of purchase and model/serial number ready. The model/serial number information is on the bottom of your camcorder. • A representative will troubleshoot your problem over the phone. If the representative determines - RCA CC6151 | User Guide - Page 87
all accessories, camcorder problem parts charges and you elect not to use your credit card. 5. Upon receipt of your product, a new or refurbished unit will be shipped to you next business day delivery in the continental U.S.A. To have your Camcorder repaired by an Authorized RCA Camcorder Service - RCA CC6151 | User Guide - Page 88
' using 13 Battery, installing in cassette adapter 64 86 Built-in light (model CC6271) 58 Bulb for light, replacing (model CC6271) 59 C C (color) control (models CC6251 and CC6271) Cable TV installer note 69 11, 77 Camcorder, cleaning 80 Camcorder's operating controls 10 Camera edit feature 33 - RCA CC6151 | User Guide - Page 89
, 13, 14, 16 DC in jack 4, 12 Demo AUTO RELEASE 43 BACK LIT 28, 43, 44 battery level 15 cassette warning 29 clock cell 17, 31 date display 29 exposure 30, 41, 44 focus 30, 37 FRONT LIT 28, 43, 44 HAZE 28 HZ:HAZE 43 interval time 49, 53 LENS COVER 31 MAN 28 manual Information to user 82 Inserting and - RCA CC6151 | User Guide - Page 90
COVER indicator 31 Light, color enhancement (model CC6271) 58, 59 LIGHT OFF.AUTO.ON switch (modelCC6271) 11, 58 Limited 63, 67, 69 Powering your camcorder using adapter/charger 12 using battery 13 using optional car cord adapter 16 Preset title, recording 46 Problem solving 76 .Product registration i - RCA CC6151 | User Guide - Page 91
Safety information i Time-counter display 31, 63 Safety precautions, battery 13 Safety tab 22 Time-lapse indicator 31, 53 Time- 6 SLP tape speed 6, 22 Solving problems 76 _p',fi_gyour own 20 ..-, . Trouble checks _6 U Sports feature 43 SPORTS indicator 28, 43 Unpack camcorder and accessories - RCA CC6151 | User Guide - Page 92
_ THOMSON CONSUMER ELECTRONICS 10330 N Meridian Street Indianapolis, IN 46290 © 1998 Thomson Consumer Trademark(s)@ Registered Marca(s) Registrada(s) Printed in Japan TOCOM 15331700 Electronics, Inc. LYT0079-001A(VP)
-
 1
1 -
 2
2 -
 3
3 -
 4
4 -
 5
5 -
 6
6 -
 7
7 -
8
-
9
-
10
-
11
-
12
-
13
-
14
-
15
-
16
-
17
-
18
-
19
-
20
-
21
-
22
-
23
-
24
-
25
-
26
-
27
-
28
-
29
-
30
-
31
-
32
-
33
-
34
-
35
-
36
-
37
-
38
-
39
-
40
-
41
-
42
-
43
-
44
-
45
-
46
-
47
-
48
-
49
-
50
-
51
-
52
-
53
-
54
-
55
-
56
-
57
-
58
-
59
-
60
-
61
-
62
-
63
-
64
-
65
-
66
-
67
-
68
-
69
-
70
-
71
-
72
-
73
-
74
-
75
-
76
-
77
-
78
-
79
-
80
-
81
-
82
-
83
-
84
-
85
-
86
-
87
-
88
-
89
-
90
-
91
-
92
 |
 |

nCJ/
camcorder
user's guide
CC6151/CC6251/CC6271