Samsung SCL907 User Manual (ENGLISH) - Page 43
Enregistrement de la date et de l'heure, Remarques, Recording the DATE/TIME, Notes
 |
View all Samsung SCL907 manuals
Add to My Manuals
Save this manual to your list of manuals |
Page 43 highlights
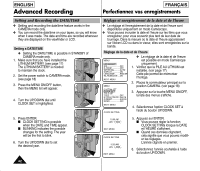
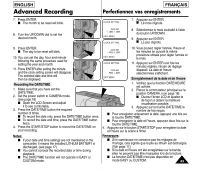
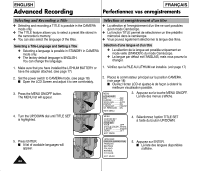
ENGLISH Advanced Recording FRANÇAIS Perfectionnez vos enregistrements 7. Press ENTER. I The month to be reset will blink. CLOCK SETTING 7. Appuyez sur ENTER. I Le mois clignote. 8. Turn the UP/DOWN dial to set the desired month. 12:00 AM JAN. 1, 2005 EXIT: MENU CLOCK SETTING 8. Sélectionnez le mois souhaité à l'aide du bouton UP/DOWN. 9. Appuyez sur ENTER. I Le jour clignote. 9. Press ENTER. I The day to be reset will blink. 10. You can set the day, hour and minute following the same procedure used for setting the year and month. 11. Press ENTER after setting the minute and the clock setting screen will disappear. The selected date and time will then be displayed. Recording the DATE/TIME 1. Make sure that you have set the DATE/TIME. 2. Set the power switch to CAMERA mode. (see page 18) I Open the LCD Screen and adjust it to see comfortably. 3. Press the DATE/TIME button the required number of times. I To record the date only, press the DATE/TIME button once. I To record the date and time, press the DATE/TIME button twice. 4. Press the START/STOP button to record the DATE/TIME on your recording. Notes: I If your date and time settings are not maintained in the camcorder, it means the installed LITHIUM BATTERY is discharged. (see page 17) I You cannot conceal the recorded date or time during playback. I The DATE/TIME function will not operate in EASY or CUSTOM mode. 12:00 AM FEB. 1, 2005 EXIT: MENU 10. Vous pouvez régler l'année, l'heure et les minutes en suivant la même procédure utilisée pour régler l'année et le mois. CLOCK SETTING 12:00 AM FEB. 1, 2005 11. Appuyez sur ENTER une fois les minutes réglées, l'écran de réglage disparaît. La date et l'heure sélectionnées s'affichent. EXIT: MENU Enregistrement de la date et de l'heure 1. Vérifiez que la fonction DATE/HEURE est activée. 2. Placez le commutateur principal sur la position CAMERA. (voir page 18) I Ouvrez l'écran LCD et ajustez-le de façon à obtenir la meilleure visualisation possible. 3. Appuyez sur la touche DATE/TIME le nombre de fois requis. I Pour enregistrer uniquement la date, appuyez une fois sur la touche DATE/TIME. I Pour enregistrer la date et l'heure, appuyez deux fois sur la touche DATE/TIME. 4. Appuyez sur le bouton START/STOP pour enregistrer la date et l'heure sur la scène à filmer. Remarques: I Si le caméscope ne conserve pas les réglages de l'horloge, cela signifie que la pile au lithium est déchargée. (Voir page 17.) I Si la date et l'heure ont été enregistrées sur la bande, elles ne peuvent pas être masquées lors de la lecture. I La fonction DATE/TIME n'est pas disponible en mode EASY ou CUSTOM. 43
-
 1
1 -
2
-
3
-
4
-
5
-
6
-
7
-
8
-
9
-
10
-
11
-
12
-
13
-
14
-
15
-
16
-
17
-
18
-
19
-
20
-
21
-
22
-
23
-
24
-
25
-
26
-
27
-
28
-
29
-
30
-
31
-
32
-
33
-
34
-
35
-
36
-
37
-
 38
38 -
 39
39 -
 40
40 -
 41
41 -
 42
42 -
 43
43 -
 44
44 -
 45
45 -
 46
46 -
 47
47 -
 48
48 -
49
-
50
-
51
-
52
-
53
-
54
-
55
-
56
-
57
-
58
-
59
-
60
-
61
-
62
-
63
-
64
-
65
-
66
-
67
-
68
-
69
-
70
-
71
-
72
 |
 |
