Samsung SRD-470D User Manual - Page 16
the main board.
 |
View all Samsung SRD-470D manuals
Add to My Manuals
Save this manual to your list of manuals |
Page 16 highlights
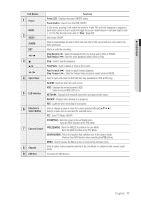
installation 4. Insert the bracket where the additional hard disk is inserted into the lower bracket and fix it using the provided screws. 5. When done, connect the power cable and connect the signal cable (SATA cable) to the connector for the main board. SATA2 SATA1 6. Check if the connectors are properly connected and there is no problem with wiring, and close the cover and fix it with screws. 16_ installation
-
 1
1 -
2
-
3
-
4
-
5
-
6
-
7
-
8
-
9
-
10
-
 11
11 -
 12
12 -
 13
13 -
 14
14 -
 15
15 -
 16
16 -
 17
17 -
 18
18 -
 19
19 -
 20
20 -
 21
21 -
22
-
23
-
24
-
25
-
26
-
27
-
28
-
29
-
30
-
31
-
32
-
33
-
34
-
35
-
36
-
37
-
38
-
39
-
40
-
41
-
42
-
43
-
44
-
45
-
46
-
47
-
48
-
49
-
50
-
51
-
52
-
53
-
54
-
55
-
56
-
57
-
58
-
59
-
60
-
61
-
62
-
63
-
64
-
65
-
66
-
67
-
68
-
69
-
70
-
71
-
72
-
73
-
74
-
75
-
76
-
77
-
78
-
79
-
80
-
81
-
82
-
83
-
84
-
85
-
86
-
87
-
88
-
89
-
90
-
91
-
92
-
93
-
94
-
95
-
96
-
97
-
98
-
99
-
100
-
101
-
102
-
103
-
104
-
105
-
106
-
107
-
108
-
109
-
110
-
111
-
112
-
113
-
114
-
115
-
116
-
117
-
118
-
119
-
120
-
121
-
122
-
123
 |
 |

16_
installation
installation
4.
Insert the bracket where the additional hard disk is
inserted into the lower bracket and fix it using the
provided screws.
5.
When done, connect the power cable and connect
the signal cable (SATA cable) to the connector for
the main board.
6.
Check if the connectors are properly connected
and there is no problem with wiring, and close the
cover and fix it with screws.
SATA2
SATA1