Sharp DX-B352P DX-B352P User Manual - Page 10
Product View
 |
View all Sharp DX-B352P manuals
Add to My Manuals
Save this manual to your list of manuals |
Page 10 highlights
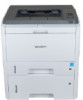
1.2. Product View Side view 1 Output Bin For storing the printed paper 2 Control Panel To indicate the printer status and adjust the print settings operation 3 Output Tray To prevent the printed paper from falling 4 Front Cover To open the front cover to access the laser toner cartridge 5 Multipurpose Input Tray To open the front cover of the multipurpose input tray, and put in the print media 6 Multipurpose Input Tray Guide To adjust the width of both sides of the paper 7 Main Power Switch To turn on or turn off the power supply 8 Standard Input Tray To hold the print paper 9 Paper-width Guide To adjust the width of the paper inside the standard input tray 2
-
 1
1 -
2
-
3
-
4
-
 5
5 -
 6
6 -
 7
7 -
 8
8 -
 9
9 -
 10
10 -
 11
11 -
 12
12 -
 13
13 -
 14
14 -
 15
15 -
16
-
17
-
18
-
19
-
20
-
21
-
22
-
23
-
24
-
25
-
26
-
27
-
28
-
29
-
30
-
31
-
32
-
33
-
34
-
35
-
36
-
37
-
38
-
39
-
40
-
41
-
42
-
43
-
44
-
45
-
46
-
47
-
48
-
49
-
50
-
51
-
52
-
53
-
54
-
55
-
56
-
57
-
58
-
59
-
60
-
61
-
62
-
63
-
64
-
65
-
66
-
67
-
68
-
69
-
70
-
71
-
72
-
73
-
74
-
75
-
76
-
77
-
78
-
79
-
80
-
81
-
82
-
83
-
84
-
85
-
86
-
87
-
88
-
89
-
90
 |
 |

2
1.2. Product View
Side view
1
Output Bin
For storing the printed paper
2
Control Panel
To indicate the printer status and adjust the print settings
operation
3
Output Tray
To prevent the printed paper from falling
4
Front Cover
To open the front cover to access the laser toner cartridge
5
Multipurpose Input
Tray
6
Multipurpose Input
Tray Guide
To open the front cover of the multipurpose input tray, and
put in the print media
To adjust the width of both sides of the paper
7
Main Power Switch
To turn on or turn off the power supply
8
Standard Input Tray
To hold the print paper
9
Paper-width Guide
To adjust the width of the paper inside the standard input
tray