Sharp DX-B352P DX-B352P User Manual - Page 29
Complete Interface.
 |
View all Sharp DX-B352P manuals
Add to My Manuals
Save this manual to your list of manuals |
Page 29 highlights
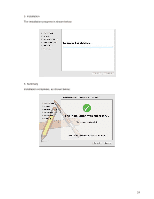
2) Select the name of the printer to be deleted and click "Remove One" or directly click "Remove All" to enter the uninstallation progress interface. 3) Uninstallation verification prompt will appear. If any task remains in the print queue, a warning will pop up, saying "The XXX Laser Printer is in use. Please uninstall the driver after the printing is completed." See the figure below: 4) Complete Interface. After the progress bar is finished loading, the complete window will appear. Once you click "Done", the following window will pop up prompting you to restart the computer. Click "OK" to exit the uninstaller and restart the computer. Click "Cancel" to exit the uninstaller. 21
-
 1
1 -
2
-
3
-
4
-
5
-
6
-
7
-
8
-
9
-
10
-
11
-
12
-
13
-
14
-
15
-
16
-
17
-
18
-
19
-
20
-
21
-
22
-
23
-
 24
24 -
 25
25 -
 26
26 -
 27
27 -
 28
28 -
 29
29 -
 30
30 -
 31
31 -
 32
32 -
 33
33 -
 34
34 -
35
-
36
-
37
-
38
-
39
-
40
-
41
-
42
-
43
-
44
-
45
-
46
-
47
-
48
-
49
-
50
-
51
-
52
-
53
-
54
-
55
-
56
-
57
-
58
-
59
-
60
-
61
-
62
-
63
-
64
-
65
-
66
-
67
-
68
-
69
-
70
-
71
-
72
-
73
-
74
-
75
-
76
-
77
-
78
-
79
-
80
-
81
-
82
-
83
-
84
-
85
-
86
-
87
-
88
-
89
-
90
 |
 |

21
2)
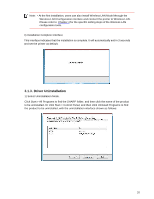
Select the name of the printer to be deleted and click "Remove One" or directly click
"Remove All" to enter the uninstallation progress interface.
3)
Uninstallation verification prompt will appear.
If any task remains in the print queue, a warning will pop up, saying "The XXX Laser
Printer is in use. Please uninstall the driver after the printing is completed." See the
figure below:
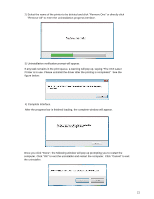
4)
Complete Interface.
After the progress bar is finished loading, the complete window will appear.
Once you click "Done", the following window will pop up prompting you to restart the
computer. Click "OK" to exit the uninstaller and restart the computer. Click "Cancel" to exit
the uninstaller.