Sharp XEA21S Instruction Manual - Page 73
Replacing the Batteries, 5 Replacing the Paper Roll, Make sure that the cash register is plugged in.
 |
UPC - 074000049260
View all Sharp XEA21S manuals
Add to My Manuals
Save this manual to your list of manuals |
Page 73 highlights
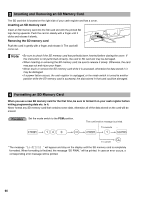
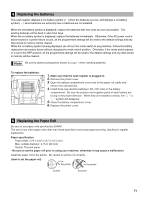
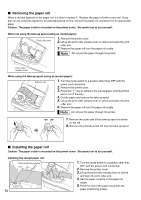
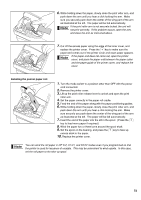
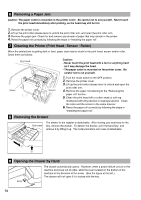
4 Replacing the Batteries This cash register displays a low battery symbol ( ) when the batteries are low, and displays a no battery symbol ( ) when batteries are extremely low or batteries are not installed. When the low battery symbol is displayed, replace the batteries with new ones as soon as possible. The existing batteries will be dead in about two days. When the no battery symbol is displayed, replace the batteries immediately. Otherwise, if the AC power cord is disconnected or a power failure occurs, all the programmed settings will be reset to the default settings and any data stored in memory will be cleared. While the no battery symbol is being displayed, do not turn the mode switch to any positions. Follow the battery replacement procedure below without changing the mode switch position. Otherwise, if the mode switch passes or is set to the OFF position, all the programmed settings will be reset to the default settings and any data stored in memory will be cleared. Be sure to observe precautions shown on page 1 when handling batteries. To replace the batteries: 1. Make sure that the cash register is plugged in. 2. Remove the printer cover. 3. Open the battery compartment cover next to the paper roll cradle and remove the old batteries. 4. Install three new alkaline batteries LR6 ("AA" size) in the battery compartment. Be sure the positive and negative poles of each battery are facing in the proper direction. When they are installed correctly, the " " or " " symbol will disappear. 5. Close the battery compartment cover. 6. Replace the printer cover. 5 Replacing the Paper Roll Be sure to use paper rolls specified by SHARP. The use of any other paper rolls other than those specified could cause paper jamming, resulting in register malfunction. Paper specification Paper width: 2.25 ± 0.02 in (57.5 ± 0.5 mm) Max. outside diameter: 3.15 in (80 mm) Quality: Thermal paper • Be sure to set the paper roll prior to using your machine, otherwise it may cause a malfunction. Install the paper roll in the printer. Be careful to set the roll correctly. (How to set the paper roll) To the printer To the printer Correct Incorrect 71
-
 1
1 -
2
-
3
-
4
-
5
-
6
-
7
-
8
-
9
-
10
-
11
-
12
-
13
-
14
-
15
-
16
-
17
-
18
-
19
-
20
-
21
-
22
-
23
-
24
-
25
-
26
-
27
-
28
-
29
-
30
-
31
-
32
-
33
-
34
-
35
-
36
-
37
-
38
-
39
-
40
-
41
-
42
-
43
-
44
-
45
-
46
-
47
-
48
-
49
-
50
-
51
-
52
-
53
-
54
-
55
-
56
-
57
-
58
-
59
-
60
-
61
-
62
-
63
-
64
-
65
-
66
-
67
-
 68
68 -
 69
69 -
 70
70 -
 71
71 -
 72
72 -
 73
73 -
 74
74 -
 75
75 -
 76
76 -
 77
77 -
 78
78 -
79
-
80
-
81
-
82
-
83
-
84
-
85
-
86
-
87
-
88
-
89
-
90
-
91
-
92
-
93
-
94
-
95
-
96
-
97
-
98
-
99
-
100
-
101
-
102
-
103
-
104
-
105
-
106
-
107
-
108
-
109
-
110
-
111
-
112
-
113
-
114
-
115
-
116
-
117
-
118
-
119
 |
 |
