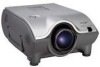
Sharp XG-P25X XG-P25X Operation Manual
Sharp XG-P25X - Conference Series XGA LCD Projector Manual
 |
View all Sharp XG-P25X manuals
Add to My Manuals
Save this manual to your list of manuals |
Sharp XG-P25X manual content summary:
- Sharp XG-P25X | XG-P25X Operation Manual - Page 1
Important Information Setup & Connections Operation Buttons Basic Operation Multiple Function Maintenance & Troubleshooting OPERATION MANUAL MODEL XG-P25X LCD PROJECTOR Appendix XG-P25X/CD/H(E) 1 02.3.19, 7:18 PM - Sharp XG-P25X | XG-P25X Operation Manual - Page 2
LCD Projector, please record the Serial Number located on the bottom of the projector and retain this information. Before recycling the packaging, please be sure that you have checked the contents of the carton thoroughly against the list of "Supplied Accessories" on page 15 . Model No.: XG-P25X - Sharp XG-P25X | XG-P25X Operation Manual - Page 3
Korean and Arabic. Carefully read through the operation instructions before operating the LCD projector. Die mitgelieferte CD-ROM enthält Bedienungsanleitungen in Coreano e Árabe. Leia cuidadosamente todas as instruções de operação antes de operar o projetor LCD. XG-P25X/CD/SUP 1 02.3.19, 7:20 PM - Sharp XG-P25X | XG-P25X Operation Manual - Page 4
on the projector or on the remote control. Ensure the cooling fan has stopped before disconnecting the power cord. DURING NORMAL OPERATION, NEVER TURN THE PROJECTOR OFF BY DISCONNECTING THE POWER CORD. FAILURE TO OBSERVE THIS WILL RESULT IN PREMATURE LAMP FAILURE. E-1 XG-P25X/CD (E)-a 1 02 - Sharp XG-P25X | XG-P25X Operation Manual - Page 5
REPLACING THE LAMP. REPLACE WITH SAME SHARP LAMP UNIT TYPE BQC-XGP25X//1 ONLY. UV RADIATION : CAN CAUSE EYE DAMAGE. TURN OFF LAMP BEFORE SERVICING. MEDIUM PRESSURE LAMP : RISK OF EXPLOSION. POTENTIAL HAZARD OF GLASS PARTICLES IF LAMP HAS RUPTURED. HANDLE WITH CARE. SEE OPERATION MANUAL. XG-P25X - Sharp XG-P25X | XG-P25X Operation Manual - Page 6
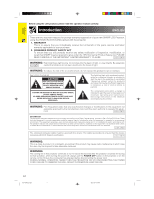
SHOCK OR FIRE HAZARD. In order not to defeat the safeguards incorporated into this LCD Projector, observe the following basic rules for its installation, use and servicing. 1. Read Instructions All the safety and operating instructions should be read before the product is operated. 2. Retain - Sharp XG-P25X | XG-P25X Operation Manual - Page 7
service or repairs to this product, ask the service technician to perform safety checks to determine that the product is in proper operating condition. 21. Wall or Ceiling Mounting This product should be mounted to a wall or ceiling Independent JPEG Group. XG-P25X/CD (E)-a 4 02.3.19, 7:15 PM E-4 - Sharp XG-P25X | XG-P25X Operation Manual - Page 8
Potential hazard of glass particles if lamp ruptures. In case of lamp rupture, contact your nearest Sharp Authorized LCD Projector Dealer or Service Center for a replacement. See "Replacing the Lamp" on pages 62 and 63 . CAUTION PRECAUCIÓN PRÉCAUTION BQC-XGP25X//1 Cautions Concerning the Setup of - Sharp XG-P25X | XG-P25X Operation Manual - Page 9
connector Using the Kensington Lock This projector has a Kensington Security Standard connector for use with a Kensington MicroSaver Security System. Refer to the information that came with the system for instructions on how to use it to secure the projector. XG-P25X/CD (E)-a 6 02.3.19, 7:15 PM - Sharp XG-P25X | XG-P25X Operation Manual - Page 10
brightness even for pictures at any brightness level from white to dark. And, with Digital Convergence, a slight distortion of convergence can be adjusted on the service menu screen without having to touch the LCD panel. E-7 XG-P25X/CD (E)-a 7 02.3.19, 7:16 PM - Sharp XG-P25X | XG-P25X Operation Manual - Page 11
10. Useful Features • Picture-in-Picture, Digital Enlargement, Freeze • Customizable Startup Screen & Background Screen 11. Application Software • "Sharp Advanced Presentation Software Professional Edition" (Network and Remote Control) LAN LAN LAN XG-P25X/CD (E)-a 8 02.3.19, 7:16 PM E-8 - Sharp XG-P25X | XG-P25X Operation Manual - Page 12
Speed (RS-232C 53 Controling Multiple Projectors with ID Numbers 54 Protecting Important Settings with a Password 55 Selecting the On-screen Display Language 56 Displaying the Adjustment Settings ....... 56 Maintenance & Troubleshooting Appendix XG-P25X/CD (E)-a 9 02.3.19, 7:16 PM - Sharp XG-P25X | XG-P25X Operation Manual - Page 13
57 Maintenance & Troubleshooting Lamp/Maintenance Indicators 61 Replacing the Lamp 62 Replacing the Air Filter 64 Troubleshooting 65 For SHARP Assistance 66 Appendix Connecting Pin Assignments 67 (RS-232C) Specifications and Command Settings 68 Wired Remote Control Terminal Specifications - Sharp XG-P25X | XG-P25X Operation Manual - Page 14
program and follow the instructions on the screen. and follow the instructions on the screen. For Double click on the "p25x" pdf file to access the projector manual. 6 Double click on the pdf file. • If the desired pdf file cannot be opened manual. E-11 XG-P25X/CD (E)-a 11 02.3.19, 7:16 PM - Sharp XG-P25X | XG-P25X Operation Manual - Page 15
Numbers next to the part names refer to the main pages in this manual where the topic is explained. Projector Front View LAMP REPLACEMENT indicator 61 POWER indicator 61 POWER buttons (ON/OFF) 22 MUTE button 31 LENS button 24 INPUT 1, 2, 3, 4, 5 buttons 31 FREEZE button 32 BLACK SCREEN button 32 - Sharp XG-P25X | XG-P25X Operation Manual - Page 16
the part names refer to the main pages in this manual where the topic is explained. Remote Control Front View 22 POWER buttons (ON/OFF) LENS button 24 ENTER button 38 UNDO button 38 ENLARGE buttons 34 BREAK TIMER button Bottom View 14 Wired RC jack E-13 XG-P25X/CD (E)-a 13 02.3.19, 7:16 PM - Sharp XG-P25X | XG-P25X Operation Manual - Page 17
, etc.), connect a ø3.5 mm minijack cable (commercially available) from the wired RC jack on the bottom of the remote control to the WIRED REMOTE control input terminal on the rear of the projector. ø3.5 mm minijack cable (commercially available) XG-P25X/CD (E)-a 14 02.3.19, 7:17 PM E-14 - Sharp XG-P25X | XG-P25X Operation Manual - Page 18
-C10RS DVI to 15-pin D-sub adaptor (7.9Љ (20 cm)) AN-A1DV • All cables may not be available in all regions. Please check with your nearest Sharp Authorized LCD Projector Dealer or Service Center. E-15 XG-P25X/CD (E)-a 15 02.3.19, 7:17 PM - Sharp XG-P25X | XG-P25X Operation Manual - Page 19
connections before proceeding. Connect the power cord to a wall outlet. The POWER indicator lights up red and the projector enters standby mode. POWER indicator • If the bottom filter cover is not securely installed, the POWER indicator flashes. XG-P25X/CD (E)-b 16 02.3.19, 7:03 PM E-16 - Sharp XG-P25X | XG-P25X Operation Manual - Page 20
manual carefully before making connections. • Refer to page 72 "Compatibility Chart" for a list of computer signals compatible with the projector nearest Sharp Authorized LCD Projector Dealer or Service Center. • AUDIO INPUT 1 can be used to input audio corresponding to the INPUT 1. E-17 XG-P25X/CD - Sharp XG-P25X | XG-P25X Operation Manual - Page 21
sync (Y), B (PB), HD/C sync and VD output projector to a compatible computer other than a PC (VGA/SVGA/XGA projector first and the connected computer last. • The DDC "Plug and Play" function of this projector operates only when used in conjunction with a VESA DDC compatible computer. XG-P25X - Sharp XG-P25X | XG-P25X Operation Manual - Page 22
manual of the computer for details on setting up/installing the correct mouse driver. • A Macintosh adaptor may be required for use with some Macintosh computers. Contact your nearest Sharp Authorized LCD Projector Dealer or Service with separate sync. E-19 XG-P25X/CD (E)-b 19 02.3.19, 7:04 PM - Sharp XG-P25X | XG-P25X Operation Manual - Page 23
is sold separately. • If your video equipment does not have an S-video output terminal, use a composite video cable. CAUTION • Always turn off the projector before connecting to video equipment, in order to protect both the projector and the equipment being connected. XG-P25X/CD (E)-b 20 02.3.19 - Sharp XG-P25X | XG-P25X Operation Manual - Page 24
ø3.5 mm stereo minijack to stereo RCA audio cable adaptor may be necessary. When connecting this projector to a DVD video player or DTV decoder, select "Component" for "Signal Type" on the GUI menu. ( to stereo RCA audio cable adaptor may be necessary. E-21 XG-P25X/CD (E)-b 21 02.3.19, 7:04 PM - Sharp XG-P25X | XG-P25X Operation Manual - Page 25
button on the projector or on the remote control. Ensure the cooling fan has stopped before disconnecting the power cord. DURING NORMAL OPERATION, NEVER TURN THE PROJECTOR OFF BY DISCONNECTING THE POWER CORD. FAILURE TO OBSERVE THIS WILL RESULT IN PREMATURE LAMP FAILURE. XG-P25X/CD (E)-b 22 02 - Sharp XG-P25X | XG-P25X Operation Manual - Page 26
The picture can be adjusted within the shift range of the lens by rotating the dial on the top of the projector. Projector Projected Image Lens shift dial UP UP DOWN DOWN • The lens shift dial is set to the upper most position at the factory. Remember to adjust lower by turning the dial when - Sharp XG-P25X | XG-P25X Operation Manual - Page 27
ratios. • Digital shift function only works with BORDER, STRETCH or SMART STRETCH of VIDEO and DTV inputs. (See page 35 for details.) The DIGITAL SHIFT screen is not displayed when projecting images other than WIDE. Digital Shift or Press ∂. Press ƒ. XG-P25X/CD (E)-b 24 02.3.19, 7:04 PM E-24 - Sharp XG-P25X | XG-P25X Operation Manual - Page 28
also available for specialized application. Please see your local Sharp Authorized LCD Projector Dealer to details on all the lenses. (Refer to the lens operation manual when attaching a lens.) Also, be sure to have service personnel install the AN-P9MX and AN-P48EZ optional lenses. Throw Distance - Sharp XG-P25X | XG-P25X Operation Manual - Page 29
of screen (White portion) = Standard (0) point -H Lower lens shift position H: מ8.2؆ (מ20.8 cm) Upper lens shift position (High mount setup) Lower lens shift position (Desktop setup) Upper and Lower Lens Shift Position (Ceiling Mount) When the projector is in the inverted position, use the - Sharp XG-P25X | XG-P25X Operation Manual - Page 30
(inches) l: Projection distance (L) (feet) h: Lens center to the lower edge of the screen (H) (inches) • There is an error of ע3% in the formula above. • Values with a minus ( )מsign indicate the distance of the lens center below the bottom of the screen. E-27 XG-P25X/CD (E)-b 27 02.3.19 - Sharp XG-P25X | XG-P25X Operation Manual - Page 31
2451x l: Projection distance (L) (feet) h: Lens center to the lower edge of the screen (H) (inches) • There is an error of ע3% in the formula above. • Values with a minus ( )מsign indicate the distance of the lens center below the bottom of the screen. XG-P25X/CD (E)-b 28 02.3.19, 7:05 PM - Sharp XG-P25X | XG-P25X Operation Manual - Page 32
(inches) l: Projection distance (L) (feet) h: Lens center to the lower edge of the screen (H) (inches) • There is an error of ע3% in the formula above. • Values with a minus ( )מsign indicate the distance of the lens center below the bottom of the screen. E-29 XG-P25X/CD (E)-b 29 02.3.19 - Sharp XG-P25X | XG-P25X Operation Manual - Page 33
that you use the optional Sharp ceiling-mount bracket for this installation. • Before mounting the projector, contact your nearest Sharp Authorized LCD Projector Dealer or Service Center to obtain the recommended ceiling-mount bracket (sold separately). (AN-XGCM61 ceiling-mount bracket and its AN - Sharp XG-P25X | XG-P25X Operation Manual - Page 34
Adjusting the Volume Projector Remote control Press VOLUME to adjust the volume. VOLUME On-screen Display Muting the Sound Projector Remote control Press MUTE to temporarily turn off the sound. Press MUTE again to turn the sound back on. MUTE On-screen Display E-31 XG-P25X/CD (E)-c 31 - Sharp XG-P25X | XG-P25X Operation Manual - Page 35
Image sg Displaying a Still Image Projector Remote control FREEZE This function allows you to instantly freeze a moving image. This is useful when you want to display a still image from a computer or video XG-P25X/CD (E)-c 32 02.3.19, 7:06 PM E-32 - Sharp XG-P25X | XG-P25X Operation Manual - Page 36
Magnifying a Specific Portion of an Image Remote control UNDO ENLARGE On-screen Display This function allows you to magnify a specific portion of an image. the image is magnified, press to pan and scan around the image. Press Operation Buttons E-33 XG-P25X/CD (E)-c 33 02.3.19, 7:06 PM - Sharp XG-P25X | XG-P25X Operation Manual - Page 37
TIMER Operation Buttons On-screen Display Computer Image Adjustments using AUTO SYNC Projector Remote control This function can be used to automatically adjust a computer image. of the computer connected to the projector. On-screen Display g f s XG-P25X/CD (E)-c 34 02.3.19, 7:06 PM E-34 - Sharp XG-P25X | XG-P25X Operation Manual - Page 38
Operation Buttons Adjusting the Picture Aspect Ratio Projector Remote control UNDO RESIZE This function allows you ratio. Resolution lower than XGA 4:3 aspect ratio XGA 4:3 aspect ratio Resolution higher than XGA 4:3 aspect ratio SXGA (1280 ן1024) E-35 XG-P25X/CD (E)-c 35 02.3.19 - Sharp XG-P25X | XG-P25X Operation Manual - Page 39
Operation Buttons Adjusting the Picture Aspect Ratio VIDEO 480I, 480P, 580I, 580P, 4:3 aspect ratio NTSC, PAL, SECAM Letter box, squeeze 720P, 1035I, 1080I 16:9 580I, 580P, NTSC, PAL, SECAM Letter box Squeeze 720P, 1035I, 1080I 16:9 aspect ratio XG-P25X/CD (E)-c 36 02.3.19, 7:06 PM E-36 - Sharp XG-P25X | XG-P25X Operation Manual - Page 40
Gamma Correction Function Projector Remote Control UNDO GAMMA exciting theater experience. CUSTOM Allows you to adjust gamma value using Sharp Advanced Presentation Software. PRESENTATION s 1 Press GAMMA. Each time GAMMA RGB and VIDEO modes. E-37 XG-P25X/CD (E)-c 37 02.3.19, 7:06 PM - Sharp XG-P25X | XG-P25X Operation Manual - Page 41
projector or the remote control with the following procedure. Projector Remote control MENU UNDO ENTER (GUI) On-screen Display INPUT 1, 2 (RGB) or 3 (DIGITAL) mode (Example) 1 2 3 5 4 2 5 INPUT 4, 5 (VIDEO tree charts on pages 39 and 40 . 5 XG-P25X/CD (E)-d 38 02.3.19, 7:07 PM E-38 - Sharp XG-P25X | XG-P25X Operation Manual - Page 42
Reset Sharp Custom None Main menu Options (2) Sub menu Lamp Timer PRJ Mode Stack Setting Keylock Level Set Inputs Language RS-232C Set ID No. Password English Deutsch Español Nederlands Français Italiano Svenska Português Front CeilingםFront Rear Ceiling XG-P25X/CD (E)-d 39 02.3.19, 7:07 PM - Sharp XG-P25X | XG-P25X Operation Manual - Page 43
PAL-N Sharp Custom Blue None Sharp Custom None Main menu Options (2) Sub menu Lamp Timer PRJ Mode Stack Setting Keylock Level Set Inputs Language RS-232C Set ID No. Password English Deutsch Español Nederlands Français Italiano Svenska Português Status Front CeilingםFront Rear CeilingםRear - Sharp XG-P25X | XG-P25X Operation Manual - Page 44
blue For stronger blue All image adjustment items are returned to the factory preset settings. • "Color", "Tint" and "Sharp" do not appear for RGB input in INPUT 1 or 2 mode. • To reset all adjustment items, select "Reset" on the "Picture" menu screen and press ENTER. • The adjustments can be - Sharp XG-P25X | XG-P25X Operation Manual - Page 45
* The film source is a digital video recording with the original encoded as is at 24 frames/second. The projector can convert this film source to progressive video at 60 frames/ second with NTSC and the film source has been entered. Basic Operation XG-P25X/CD (E)-d 42 02.3.19, 7:08 PM E-42 - Sharp XG-P25X | XG-P25X Operation Manual - Page 46
stripes, etc.), interference may occur between the LCD pixels, causing flickering, vertical stripes, or contrast reset all adjustment items, select "Reset" on the "Fine Sync" menu screen and press ENTER. Saving and Selecting Adjustment Settings This projector XG-P25X/CD (E)-d 43 02.3.19, 7:08 PM - Sharp XG-P25X | XG-P25X Operation Manual - Page 47
1080I signals, select the corresponding type of signal. Checking the Input Signal This function allows you to check the current input signal information. Basic Operation XG-P25X/CD (E)-d 44 02.3.19, 7:08 PM E-44 - Sharp XG-P25X | XG-P25X Operation Manual - Page 48
made each time the projector is turned on while manual adjustments. (See page 43 .) Auto Sync Display Function Normally, an image is not superimposed during Auto Sync adjustment. You can, however, choose to superimpose a background image during Auto Sync adjustment. Basic Operation E-45 XG-P25X - Sharp XG-P25X | XG-P25X Operation Manual - Page 49
to the factory preset settings. • To reset all adjustment items, select "Reset" on projector. VAO (Variable audio output): Audio output that varies in strength with the volume level of the source projector. Speaker Switching the built-in speakers on the projector ON/OFF. Basic Operation XG-P25X - Sharp XG-P25X | XG-P25X Operation Manual - Page 50
inset picture (Factory preset to projector VIDEO menu only) Digital Noise Reduction (DNR) provides high quality images with minimal dot crawl and cross color noise. See page 38 for the procedure details. Basic Operation • If the image is clear, select " " to prevent any blurring. E-47 XG-P25X - Sharp XG-P25X | XG-P25X Operation Manual - Page 51
screen functions are not displayed. All On-screen Display are not displayed (except Menu/ Lens functions and warning display (Power off/Temp./ Lamp function etc.)). Setting the Video Signal (VIDEO menu only) The video input system mode is preset to "Auto"; however, it can be changed to a specific - Sharp XG-P25X | XG-P25X Operation Manual - Page 52
the projector via an RS-232C cable. See page 19 in this operation manual, and also the supplied Sharp Advanced Presentation Software operation manual on the CD-ROM for detailed instructions. See page 38 for the procedure details. Selected item Sharp Custom None Description SHARP default image User - Sharp XG-P25X | XG-P25X Operation Manual - Page 53
using the Sharp Advanced Presentation Software (supplied). Automatic Power Shutoff Function When no input signal is detected for more than 15 minutes, the projector will Out/RS232C" is factory preset to " ", and "Auto Power Off" is factory preset to " ". XG-P25X/CD (E)-d 50 02.3.19, - Sharp XG-P25X | XG-P25X Operation Manual - Page 54
. Selected item Front CeilingםFront Rear CeilingםRear Description Normal image Inverted image Reversed image Reversed and inverted image • This function is used for the reversed image and ceiling-mount setups. See page 30 for these setups. Basic Operation E-51 XG-P25X/CD (E)-e 51 02 - Sharp XG-P25X | XG-P25X Operation Manual - Page 55
/Volume/Mute functions on the projector are available. All operation buttons on the projector are unavailable. • To cancel the Keylock Level, perform the above procedure using the remote control. • See page 55 for details using the password function. Basic Operation XG-P25X/CD (E)-e 52 02.3.19 - Sharp XG-P25X | XG-P25X Operation Manual - Page 56
by selecting the baud rate. See page 38 for the procedure details. • Make sure that both the projector and computer are set for the same baud rate. Refer to the computer's operation manual for instructions for setting the baud rate. Basic Operation E-53 XG-P25X/CD (E)-e 53 02.3.19, 7:11 PM - Sharp XG-P25X | XG-P25X Operation Manual - Page 57
of up to 250 projectors. To identify separately and control specified projector, you need to set ID No.. The ID No. is factory preset to "001". to the projector. • The ID No. can be set from 001 to 250. • For details on intended purpose, see pages 57 to 60 . Basic Operation XG-P25X/CD (E)-e 54 - Sharp XG-P25X | XG-P25X Operation Manual - Page 58
in case you can not remember it. Changing the Password 1 Enter the old password using and then press ENTER. 2 Enter the new password using and then press ENTER. 3 Enter the password again ("Reconfirm") using and then press ENTER. Basic Operation E-55 XG-P25X/CD (E)-e 55 02.3.19, 7:11 PM - Sharp XG-P25X | XG-P25X Operation Manual - Page 59
be used to display all the adjusted settings on the screen simultaneously. See page 38 for the procedure details. INPUT 1, 2 (RGB) or 3 (DIGITAL) mode INPUT 4, 5 (VIDEO) mode Basic Operation XG-P25X/CD (E)-e 56 02.3.19, 7:11 PM E-56 - Sharp XG-P25X | XG-P25X Operation Manual - Page 60
information (lamp usage time, etc.) to a Sharp Service Center or outside contractor for quick and efficient customer service. • For more information on these features, see the operation manuals accompanying the Sharp Advanced Presentation Software Professional Edition. E-57 XG-P25X/CD (E)-f 57 - Sharp XG-P25X | XG-P25X Operation Manual - Page 61
Video Source 1 Video Source 2 This projector can be used in a network of projectors managed from a single PC with the accompanied Sharp Advanced Presentation Software Professional Edition. Projectors not longer than 49Ј 3Љ (15 m). Multiple Function XG-P25X/CD (E)-f 58 02.3.19, 7:11 PM E-58 - Sharp XG-P25X | XG-P25X Operation Manual - Page 62
input on the Slave projector. Projectors can be stacked using an RS-232C cable (cross type, sold separately). See page 67 for recommended connection of an RS-232C serial control cable. • See page 52 , "Setting the Stacking Mode", and page 53 , "Deselecting Inputs". E-59 XG-P25X/CD (E)-f 59 02 - Sharp XG-P25X | XG-P25X Operation Manual - Page 63
information on this feature, see the operation manuals accompanying the Sharp Advanced Presentation Software Professional Edition. • When UXGA signal is displayed, the videowall can not be set by Sharp Advanced Presentation Software Professional Edition. XG-P25X/CD (E)-f 60 02.3.19, 7:11 PM E-60 - Sharp XG-P25X | XG-P25X Operation Manual - Page 64
of the current type BQC-XGP25X//1 from your nearest Sharp Authorised LCD Projector Dealer or Service Center. • Replace the lamp. (See pages 62 and 63 .) If you wish, you may have the lamp replaced at your nearest Sharp Authorised LCD Projector Dealer or Service Center. XG-P25X/CD (E)-g 61 02.3.19 - Sharp XG-P25X | XG-P25X Operation Manual - Page 65
a replacement lamp unit (lamp/cage module) of the current type BQC-XGP25X//1 from your nearest Sharp Authorized LCD Projector Dealer or Service Center. Then carefully change the lamp by following the instructions below. If you wish, you may have the lamp replaced at your nearest Sharp Authorized LCD - Sharp XG-P25X | XG-P25X Operation Manual - Page 66
of the projector. 2 Reset the lamp timer. While pressing ƒ, © and ENTER on the projector, press POWER ON on the projector. "LAMP 0000H" is displayed, indicating that the lamp timer is reset. Ł • Reset the lamp timer only after replacing the lamp. Maintenance & Troubleshooting E-63 XG-P25X/CD - Sharp XG-P25X | XG-P25X Operation Manual - Page 67
Sharp Authorized LCD Projector Dealer or Service Center exchange the filter (PFILD0080CEZZ) when it is no longer possible to clean it. Bottom View Side and Rear View Air filter Air filter (not removable) Cleaning and replacing cannot be removed. XG-P25X/CD (E)-g 64 02.3.19, 7:12 PM E-64 - Sharp XG-P25X | XG-P25X Operation Manual - Page 68
Troubleshooting Problem Power cannot be turned on or off using the POWER buttons (ON/OFF) on the projector. Check • Keylock level is set to "Level A" or "Level B", preventing operation of some or all buttons. (See page 52 .) Cannot be operated by remote control. • Check to see if the batteries - Sharp XG-P25X | XG-P25X Operation Manual - Page 69
Assistance If you encounter any problems during setup or operation of this projector, first refer to the "Troubleshooting" section on page 65 . If this operation manual does not answer your question, please contact the SHARP Service Department listed below. U.S.A. Canada Mexico Germany U.K. Italy - Sharp XG-P25X | XG-P25X Operation Manual - Page 70
T.M.D.S. Data 5*ם3 T.M.D.S. Clock Shield T.M.D.S. Clockם T.M.D.S. Clock Analog Red Analog Green Analog Blue Analog Horizontal sync Analog Ground*2 • *1 Return for ם5 V, Hsync. and Vsync. • *2 Analog R, G and B return • *3 These pins are not used on this equipment. E-67 Appendix XG-P25X - Sharp XG-P25X | XG-P25X Operation Manual - Page 71
Projector OK BUTTONS & REMOTE CONTROL KEY BUTTONS & REMOTE CONTROL KEY CONTROL CONTENTS POWER ON POWER OFF VOLUME (0 - 60) MUTE ON MUTE OFF LENS FOCUS (מ30 - ם30) LENS (VIDEO 1) INPUT 5 (VIDEO _ _ _ 0 OK OR ERR A D J S _ _ _ 1 OK OR ERR Appendix XG-P25X/CD (E)-h 68 02.3.19, 7:13 PM E-68 - Sharp XG-P25X | XG-P25X Operation Manual - Page 72
REMOTE VIDEO 1) SHARP (מ30 - ם30) V A S H _ * * * OK OR ERR INPUT 4 (VIDEO 1) CLR TEMP (מ3 - ם3) V A C T _ _ * * OK OR ERR INPUT 4 (VIDEO 1) DISPLAY V A R E _ _ _ 0 OK OR ERR INPUT 4 (VIDEO 1) ADJUSTMENT RESET _ 0 OK OR ERR PICTURE Appendix E-69 XG-P25X/CD (E)-h 69 02.3.19, 7:13 PM - Sharp XG-P25X | XG-P25X Operation Manual - Page 73
RESET VIDEO DNR OFF VIDEO DNR ON W _ _ _ 1 OK OR ERR LANGUAGE OPTIONS (2) CONTROL CONTENTS LAMP USAGE TIME LAMP STATUS PRJ MODE : REVERSE OFF PRJ MODE : REVERSE ON PRJ MODE PROJECTOR NAME, up to 12-character memory. The PROJECTOR NAME in memory can then be output (confirmed). XG-P25X/CD (E)-h - Sharp XG-P25X | XG-P25X Operation Manual - Page 74
REMOTE control input terminal on the projector to the remote control. The codes for these functions are complex and are, therefore, not listed here. Wired remote control function code LSB C1 System Code C5 C6 Data Data Bit Reverse in D Appendix E-71 XG-P25X/CD (E)-h 71 02.3.19, 7:13 PM - Sharp XG-P25X | XG-P25X Operation Manual - Page 75
75 XGA 1,024 ן768 68.7 85 73.5 90 77.2 96 80.6 100 98.8 120 113.2 140 DVI Support LCD display on the notebook computer and output the display data in "CRT only" mode. Details on how to change display modes can be found in your notebook computer's operation manual. • This projector - Sharp XG-P25X | XG-P25X Operation Manual - Page 76
(79) 11 3/25 (282.5) 16 21/32 (423) 17 17/32 (445) 4 37/64 (116.5) 2 9/16 (65) 9/32 (7) 3/16 (4.5) Front View Bottom View Appendix E-73 XG-P25X/CD (E)-h 73 12 9/16 (319) 29/32 (23) 9/64 (3.5) 6 3/32 (155) 1 3/64 (26.5) 1 11/32 (34) 9 3/4 (248) 3 31/64 (88.5) 2 15/16 (74.5) 4 5/64 (103 - Sharp XG-P25X | XG-P25X Operation Manual - Page 77
cable (9Ј 10Љ, 3 m), Three BNC-RCA adaptors, Extra air filter, Lens cap, CD-ROM, LCD projector operation manual, Quick reference guides, ID number seal Replacement parts Lamp unit (Lamp/cage module) (BQC-XGP25X//1), Remote control (RRMCGA048WJSA), Two R-6 batteries ("AA" size, UM/SUM-3, HP-7 or - Sharp XG-P25X | XG-P25X Operation Manual - Page 78
DVI Digital Visual Interface that supports both digital and analog displays. trouble with adjustment and operation when stack projecting. When setting two projectors Video signal mode of a computer which overlaps horizontal and vertical sync signal to green color signal pin. Appendix E-75 XG-P25X - Sharp XG-P25X | XG-P25X Operation Manual - Page 79
52 Keystone correction 24 L LAMP REPLACEMENT indicator 61 LENS button 24 Lens shift 23 M MENU button 38 Monitor Out/RS-232C Off Function 50 MUTE button 31 N Network Function 57 O On-screen display 48 On-screen display Language 56 OUTPUT port 50 P Password 55 PDF 11 Phase 43 Picture in - Sharp XG-P25X | XG-P25X Operation Manual - Page 80
SHARP CORPORATION XG-P25X/CD (E)-h 77 02.3.19, 7:15 PM
-
 1
1 -
 2
2 -
 3
3 -
 4
4 -
 5
5 -
 6
6 -
 7
7 -
8
-
9
-
10
-
11
-
12
-
13
-
14
-
15
-
16
-
17
-
18
-
19
-
20
-
21
-
22
-
23
-
24
-
25
-
26
-
27
-
28
-
29
-
30
-
31
-
32
-
33
-
34
-
35
-
36
-
37
-
38
-
39
-
40
-
41
-
42
-
43
-
44
-
45
-
46
-
47
-
48
-
49
-
50
-
51
-
52
-
53
-
54
-
55
-
56
-
57
-
58
-
59
-
60
-
61
-
62
-
63
-
64
-
65
-
66
-
67
-
68
-
69
-
70
-
71
-
72
-
73
-
74
-
75
-
76
-
77
-
78
-
79
-
80
 |
 |
OPERATION MANUAL
MODEL
XG-P25X
LCD PROJECTOR
Important
Information
Setup & Connections
Operation Buttons
Basic Operation
Maintenance &
Troubleshooting
Appendix
Multiple Function
XG-P25X/CD/H(E)
02.3.19, 7:18 PM
1