Sony DCR-TRV480E User Manual - Page 102
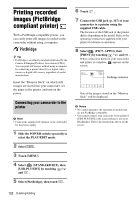
Printing recorded images (PictBridge compliant printer
 |
View all Sony DCR-TRV480E manuals
Add to My Manuals
Save this manual to your list of manuals |
Page 102 highlights
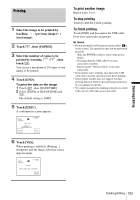
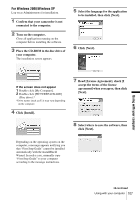
Printing recorded images (PictBridge compliant printer) With a PictBridge compatible printer, you can easily print still images recorded on the camcorder without using a computer. z Tip • PictBridge is an industry standard established by the Camera & Imaging Products Association (CIPA). You can print still images without using a computer by connecting a printer directly to a digital video camera or digital still camera, regardless of model manufacturer. Insert the "Memory Stick" on which still images are stored into your camcorder, set the paper in the printer, and turn on the power. Connecting your camcorder to the printer b Note • Connect the supplied AC Adaptor to the wall outlet for the power supply. 1 Slide the POWER switch repeatedly to select the PLAY/EDIT mode. 2 Select . 3 Touch [MENU]. 4 Select (STANDARD SET), then [USB-PLY/EDT] by touching / and . 5 Select [PictBridge], then touch . 6 Touch . 7 Connect the USB jack (p. 147) of your camcorder to a printer using the supplied USB cable. The location of the USB jack of the printer differs depending on the model. Refer to the operating instructions supplied with your printer for details on operation. 8 Select (PICT. APPLI), then [PRINT] by touching / and . When connection between your camcorder and printer is complete, appears on the screen. PRINT 101-0001 1 / 10 101 END PictBridge indication SET EXEC One of the images stored on the "Memory Stick" will be displayed. b Notes • We cannot guarantee the operation of models that are not PictBridge compatible. • You cannot connect your camcorder to the printer if [USB-PLY/EDT] in the menu settings is not set to [PictBridge]. Follow the instructions shown on the screen. 102 Dubbing/Editing
-
 1
1 -
2
-
3
-
4
-
5
-
6
-
7
-
8
-
9
-
10
-
11
-
12
-
13
-
14
-
15
-
16
-
17
-
18
-
19
-
20
-
21
-
22
-
23
-
24
-
25
-
26
-
27
-
28
-
29
-
30
-
31
-
32
-
33
-
34
-
35
-
36
-
37
-
38
-
39
-
40
-
41
-
42
-
43
-
44
-
45
-
46
-
47
-
48
-
49
-
50
-
51
-
52
-
53
-
54
-
55
-
56
-
57
-
58
-
59
-
60
-
61
-
62
-
63
-
64
-
65
-
66
-
67
-
68
-
69
-
70
-
71
-
72
-
73
-
74
-
75
-
76
-
77
-
78
-
79
-
80
-
81
-
82
-
83
-
84
-
85
-
86
-
87
-
88
-
89
-
90
-
91
-
92
-
93
-
94
-
95
-
96
-
 97
97 -
 98
98 -
 99
99 -
 100
100 -
 101
101 -
 102
102 -
 103
103 -
 104
104 -
 105
105 -
 106
106 -
 107
107 -
108
-
109
-
110
-
111
-
112
-
113
-
114
-
115
-
116
-
117
-
118
-
119
-
120
-
121
-
122
-
123
-
124
-
125
-
126
-
127
-
128
-
129
-
130
-
131
-
132
-
133
-
134
-
135
-
136
-
137
-
138
-
139
-
140
-
141
-
142
-
143
-
144
-
145
-
146
-
147
-
148
-
149
-
150
-
151
-
152
-
153
-
154
-
155
-
156
 |
 |
