Sony DCR-TRV480E User Manual - Page 113
Using with your computer, To cancel the operation, Touch [NO] to finish creating a DVD.
 |
View all Sony DCR-TRV480E manuals
Add to My Manuals
Save this manual to your list of manuals |
Page 113 highlights
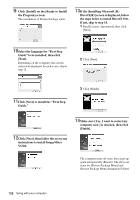
z Tip • If you use a DVD-RW/+RW which has other data stored on it, the message [This is a recorded disc. Delete and overwrite?] appears on the LCD screen of your camcorder. When you touch [EXEC], the existing data is erased and new data is written. 9 Touch [NO] to finish creating a DVD. The disc tray comes out automatically. 60min 0:00:00:00 BURN DVD COMPLETED Create another copy? Disctray opens. YES NO - When [A/V t DV OUT] in the menu settings of your camcorder is set to on. • You may not be able to create a DVD from an 8mm tape if it contains pictures recorded in a format other than Digital8 format. To create another DVD with the same content, touch [YES]. The disc tray comes out. Place a new writable DVD in the disc drive. Then, repeat steps 8 and 9. Using with your computer To cancel the operation Touch [CANCEL]. b Notes • You cannot cancel the operation after [Finalizing DVD.] is displayed on the LCD screen of your camcorder. • Do not disconnect the i.LINK cable or set the POWER switch to another mode on your camcorder until the picture is completely copied to the computer. • The DVD is created even if you disconnect the i.LINK cable (optional) or turn off the power of your camcorder while [WRITING] or [CONVERTING] is displayed. • When any of the following occurs, copying of the picture is canceled. A DVD containing the data up to the point the operation was canceled is created. Refer to the help files of "Click to DVD Automatic Mode Launcher" for details. - When there is a blank portion of 10 seconds or longer on the tape. - When the data of the tape contains a date before the recording date of the later images. - When normal and wide size pictures are recorded on the same tape. • You cannot operate your camcorder in the following situations: - While playing back a tape - While recording images onto a "Memory Stick" - When "Click to DVD" is started up from the computer Using with your computer 113
-
 1
1 -
2
-
3
-
4
-
5
-
6
-
7
-
8
-
9
-
10
-
11
-
12
-
13
-
14
-
15
-
16
-
17
-
18
-
19
-
20
-
21
-
22
-
23
-
24
-
25
-
26
-
27
-
28
-
29
-
30
-
31
-
32
-
33
-
34
-
35
-
36
-
37
-
38
-
39
-
40
-
41
-
42
-
43
-
44
-
45
-
46
-
47
-
48
-
49
-
50
-
51
-
52
-
53
-
54
-
55
-
56
-
57
-
58
-
59
-
60
-
61
-
62
-
63
-
64
-
65
-
66
-
67
-
68
-
69
-
70
-
71
-
72
-
73
-
74
-
75
-
76
-
77
-
78
-
79
-
80
-
81
-
82
-
83
-
84
-
85
-
86
-
87
-
88
-
89
-
90
-
91
-
92
-
93
-
94
-
95
-
96
-
97
-
98
-
99
-
100
-
101
-
102
-
103
-
104
-
105
-
106
-
107
-
 108
108 -
 109
109 -
 110
110 -
 111
111 -
 112
112 -
 113
113 -
 114
114 -
 115
115 -
 116
116 -
 117
117 -
 118
118 -
119
-
120
-
121
-
122
-
123
-
124
-
125
-
126
-
127
-
128
-
129
-
130
-
131
-
132
-
133
-
134
-
135
-
136
-
137
-
138
-
139
-
140
-
141
-
142
-
143
-
144
-
145
-
146
-
147
-
148
-
149
-
150
-
151
-
152
-
153
-
154
-
155
-
156
 |
 |
