Sony DCR-TRV480E User Manual - Page 94
To set the [IR SETUP] code, IR SETUP] code list, then [IR SETUP]., EXEC]
 |
View all Sony DCR-TRV480E manuals
Add to My Manuals
Save this manual to your list of manuals |
Page 94 highlights
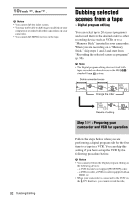
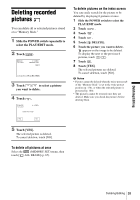
To set the [IR SETUP] code When you connect with an A/V connecting cable, you need to check the [IR SETUP] code signal to see if your VCR can be operated by your camcorder (infrared ray emitter). Remote sensor Infrared ray emitter VCR A/V connecting cable (supplied) 1 Touch , then [IR SETUP]. 2 Select the [IR SETUP] code of your VCR with / , then touch . For the [IR SETUP] code of your VCR, refer to "[IR SETUP] code list" (p. 94). When there is more than one code listed for the manufacturer of your VCR, try each code and find the most appropriate one. 3 Touch [PAUSEMODE]. 4 Select the mode to cancel recording pause on your VCR, then touch . Refer to the operating instructions supplied with your VCR for details on operation. 5 Point the infrared ray emitter of your camcorder towards the remote sensor on your VCR, from about 30 cm (12 in.) away, with no obstructions. 6 Insert a cassette into your VCR, and set the VCR to recording pause. 7 Touch [IR TEST]. 8 Touch [EXEC]. The recording starts on your VCR when the setting is correct. [Completed.] appears when the [IR SETUP] code test is finished. Go on to "Step 2 : Adjusting the synchronization of the VCR" (p. 95). When recording fails to start, select another [IR SETUP] code and try again. [IR SETUP] code list The following [IR SETUP] codes are recorded on your camcorder by default. (It is set at "3" as the default setting.) Manufacturing company [IR SETUP] code Sony Aiwa Akai Alba Amstrad Baird Blaupunkt Bush CGM Clatronic Daewoo Ferguson Fisher Funai Goldstar Goodmans Grundig Hitachi ITT/Nokia Instant JVC Kendo Loewe Luxor Mark Matsui Mitsubishi Nokia Nokia Oceanic Nordmende Okano Orion Panasonic Philips Phonola 1, 2, 3, 4, 5, 6 47, 53, 54 50, 62, 74 73 73 30, 36 11, 83 74 36, 47, 83 73 26 76, 83 73 80 47 26, 84 9, 83 42, 56 36 11, 12, 15, 21 47 16, 47, 84 89 26* 47, 58*, 60 28, 29 36, 89 89 76 60, 62, 63 58*, 70 16, 78 83, 84, 86 83, 84 94 Dubbing/Editing
-
 1
1 -
2
-
3
-
4
-
5
-
6
-
7
-
8
-
9
-
10
-
11
-
12
-
13
-
14
-
15
-
16
-
17
-
18
-
19
-
20
-
21
-
22
-
23
-
24
-
25
-
26
-
27
-
28
-
29
-
30
-
31
-
32
-
33
-
34
-
35
-
36
-
37
-
38
-
39
-
40
-
41
-
42
-
43
-
44
-
45
-
46
-
47
-
48
-
49
-
50
-
51
-
52
-
53
-
54
-
55
-
56
-
57
-
58
-
59
-
60
-
61
-
62
-
63
-
64
-
65
-
66
-
67
-
68
-
69
-
70
-
71
-
72
-
73
-
74
-
75
-
76
-
77
-
78
-
79
-
80
-
81
-
82
-
83
-
84
-
85
-
86
-
87
-
88
-
 89
89 -
 90
90 -
 91
91 -
 92
92 -
 93
93 -
 94
94 -
 95
95 -
 96
96 -
 97
97 -
 98
98 -
 99
99 -
100
-
101
-
102
-
103
-
104
-
105
-
106
-
107
-
108
-
109
-
110
-
111
-
112
-
113
-
114
-
115
-
116
-
117
-
118
-
119
-
120
-
121
-
122
-
123
-
124
-
125
-
126
-
127
-
128
-
129
-
130
-
131
-
132
-
133
-
134
-
135
-
136
-
137
-
138
-
139
-
140
-
141
-
142
-
143
-
144
-
145
-
146
-
147
-
148
-
149
-
150
-
151
-
152
-
153
-
154
-
155
-
156
 |
 |
