Sony DCR-TRV480E User Manual - Page 87
Dubbing/Editing, Connecting to a VCR or TV
 |
View all Sony DCR-TRV480E manuals
Add to My Manuals
Save this manual to your list of manuals |
Page 87 highlights
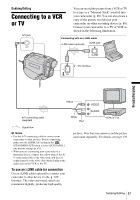
Dubbing/Editing Connecting to a VCR or TV You can record the picture from a VCR or TV to a tape or a "Memory Stick" inserted into your camcorder (p. 89). You can also create a copy of the picture recorded on your camcorder on other recording device (p. 88). Connect your camcorder to a TV or VCR as shown in the following illustration. A/V jack Connecting with an i.LINK cable i.LINK cable (optional) i.LINK jack DV Interface Dubbing/Editing Yellow A/V connecting cable (supplied) Signal flow b Notes • Use the A/V connecting cable to connect your camcorder to other devices. Before connecting, make sure the [DISPLAY] setting in the (STANDARD SET) menu is set to [LCD PANEL] (the default setting) (p. 82). • When you are connecting your camcorder to a monaural device, connect the yellow plug of the A/ V connecting cable to the video jack, and the red (right channel) or the white (left channel) plug to the audio jack on the VCR or the TV. To use an i.LINK cable for connection Use an i.LINK cable (optional) to connect your camcorder to other device via the DV Interface. The video and sound signals are transmitted digitally, producing high quality White Red VCRs or TVs pictures. Note that you cannot record the picture and sound separately. For details, see page 139. Dubbing/Editing 87
-
 1
1 -
2
-
3
-
4
-
5
-
6
-
7
-
8
-
9
-
10
-
11
-
12
-
13
-
14
-
15
-
16
-
17
-
18
-
19
-
20
-
21
-
22
-
23
-
24
-
25
-
26
-
27
-
28
-
29
-
30
-
31
-
32
-
33
-
34
-
35
-
36
-
37
-
38
-
39
-
40
-
41
-
42
-
43
-
44
-
45
-
46
-
47
-
48
-
49
-
50
-
51
-
52
-
53
-
54
-
55
-
56
-
57
-
58
-
59
-
60
-
61
-
62
-
63
-
64
-
65
-
66
-
67
-
68
-
69
-
70
-
71
-
72
-
73
-
74
-
75
-
76
-
77
-
78
-
79
-
80
-
81
-
 82
82 -
 83
83 -
 84
84 -
 85
85 -
 86
86 -
 87
87 -
 88
88 -
 89
89 -
 90
90 -
 91
91 -
 92
92 -
93
-
94
-
95
-
96
-
97
-
98
-
99
-
100
-
101
-
102
-
103
-
104
-
105
-
106
-
107
-
108
-
109
-
110
-
111
-
112
-
113
-
114
-
115
-
116
-
117
-
118
-
119
-
120
-
121
-
122
-
123
-
124
-
125
-
126
-
127
-
128
-
129
-
130
-
131
-
132
-
133
-
134
-
135
-
136
-
137
-
138
-
139
-
140
-
141
-
142
-
143
-
144
-
145
-
146
-
147
-
148
-
149
-
150
-
151
-
152
-
153
-
154
-
155
-
156
 |
 |
