Sony DCR-TRV480E User Manual - Page 30
Recording still images – Memory photo recording
 |
View all Sony DCR-TRV480E manuals
Add to My Manuals
Save this manual to your list of manuals |
Page 30 highlights
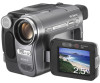
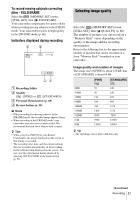
Recording still images - Memory photo recording You can record still images on a "Memory Stick." Before recording, follow steps 1 to 7 in "Getting started" (p. 13 - p. 22). OPEN PHOTO POWER switch z Tip • Performing Easy Handycam operation, even first time users can record easily. For details, see page 33. 1 Remove the lens cap. Pull the lens cap string down and attach it to the grip belt. 3 Slide the POWER switch repeatedly until the CAMERA-MEMORY lamp lights up. The selected recording folder is displayed. Slide the POWER switch while pressing the green button. 4 Press and hold PHOTO lightly. You will hear a light beeping sound when the focus and brightness settings are adjusted. Recording does not start at this point. The indicator stops flashing. The number of images that can be recorded.* 60min 101 FINE 20 P-MENU * The number of images that can be recorded varies depending on the image quality setting and the recording environment. 5 Press PHOTO fully. A shutter sound is heard. When bars of disappears, the image is recorded on the "Memory Stick." 2 Press OPEN and open the LCD panel. 30 Recording To check the most recently recorded image - Review Touch . Touch to return to standby. To delete the image, touch , then [YES]. To cancel deleting, touch [NO]. To turn the power off Slide the POWER switch up to (CHG) OFF.
-
 1
1 -
2
-
3
-
4
-
5
-
6
-
7
-
8
-
9
-
10
-
11
-
12
-
13
-
14
-
15
-
16
-
17
-
18
-
19
-
20
-
21
-
22
-
23
-
24
-
 25
25 -
 26
26 -
 27
27 -
 28
28 -
 29
29 -
 30
30 -
 31
31 -
 32
32 -
 33
33 -
 34
34 -
 35
35 -
36
-
37
-
38
-
39
-
40
-
41
-
42
-
43
-
44
-
45
-
46
-
47
-
48
-
49
-
50
-
51
-
52
-
53
-
54
-
55
-
56
-
57
-
58
-
59
-
60
-
61
-
62
-
63
-
64
-
65
-
66
-
67
-
68
-
69
-
70
-
71
-
72
-
73
-
74
-
75
-
76
-
77
-
78
-
79
-
80
-
81
-
82
-
83
-
84
-
85
-
86
-
87
-
88
-
89
-
90
-
91
-
92
-
93
-
94
-
95
-
96
-
97
-
98
-
99
-
100
-
101
-
102
-
103
-
104
-
105
-
106
-
107
-
108
-
109
-
110
-
111
-
112
-
113
-
114
-
115
-
116
-
117
-
118
-
119
-
120
-
121
-
122
-
123
-
124
-
125
-
126
-
127
-
128
-
129
-
130
-
131
-
132
-
133
-
134
-
135
-
136
-
137
-
138
-
139
-
140
-
141
-
142
-
143
-
144
-
145
-
146
-
147
-
148
-
149
-
150
-
151
-
152
-
153
-
154
-
155
-
156
 |
 |
