TEAC TN-550 Owner s Manual English Francais Espanol Deutsch Italiano Nederland - Page 6
Preparing the record player continued, Adjusting the tone arm height
 |
View all TEAC TN-550 manuals
Add to My Manuals
Save this manual to your list of manuals |
Page 6 highlights
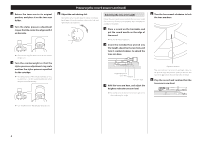
3 0 0 4 5 Return the tone arm to its original position, and place it on the tone arm holder. 6 Turn the stylus pressure adjustment ring so that the center line aligns with 0 on the scale. 1 2 oo Only turn the ring. Be careful not to let the counterweight turn. 7 Turn the counterweight so that the stylus pressure adjustment ring scale matches the stylus pressure specified for the cartridge. oo The stylus pressure of the included cartridge is 1.4 g. So, turn it to 1.4 on the counterweight scale when using the included cartridge. 1 2 Preparing the record player (continued) 3 4 0 8 Adjust the anti-skating dial. Start with it set at 1.4 and adjust it during record playback (page 9) to the position where the left and right volumes are balanced. 1 2 Adjusting the tone arm height Follow the procedures below to adjust the tone arm height if it is not level during record playback after changing the cartridge or headshell. 1 Place a record on the turntable, and put the record needle on the edge of the record. oo Do not let the turntable turn. 2 Insert the included hex wrench into the height adjustment screw hole and turn it counterclockwise to unlock the tone arm base. Height adjustment screw hole Pedestal Tone arm base 3 Hold the tone arm base, and adjust the height to make the tone arm level. oo Be careful not to let the tone arm move right or left when adjusting the height. 4 Turn the hex wrench clockwise to lock the tone arm base. Alignment position That tone arm base can move left and right relative to the pedestal. Align the guideline (white) on the tone arm base to the 5 mark on the pedestal before locking it. 5 Play the record and confirm that the tone arm is now level. 4 3 oo Turn it right from 0 in the direction of 0.5 and 1.0. 6
-
 1
1 -
 2
2 -
 3
3 -
 4
4 -
 5
5 -
 6
6 -
 7
7 -
 8
8 -
 9
9 -
 10
10 -
 11
11 -
 12
12 -
13
-
14
-
15
-
16
-
17
-
18
-
19
-
20
-
21
-
22
-
23
-
24
-
25
-
26
-
27
-
28
-
29
-
30
-
31
-
32
-
33
-
34
-
35
-
36
-
37
-
38
-
39
-
40
-
41
-
42
-
43
-
44
-
45
-
46
-
47
-
48
-
49
-
50
-
51
-
52
-
53
-
54
-
55
-
56
-
57
-
58
-
59
-
60
-
61
-
62
-
63
-
64
-
65
-
66
-
67
-
68
-
69
-
70
-
71
-
72
-
73
-
74
-
75
-
76
 |
 |
