TEAC TN-550 Owner s Manual English Francais Espanol Deutsch Italiano Nederland - Page 8
Connections, STANDBY/ON button
 |
View all TEAC TN-550 manuals
Add to My Manuals
Save this manual to your list of manuals |
Page 8 highlights
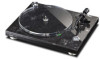
A B |R L Amplifier A Grounding connector (|) Use the grounding wire of the included RCA audio cable to connect this connector to the grounding connector of the amplifier, for example. oo This is NOT an electrical safety ground. oo If connecting the grounding wire of the audio cable to the grounding connector of this unit does not reduce noise, disconnect the grounding wire and check the sound again. Use the method (connected/disconnected) that has the least noise. Connections D C Included AC adapter VV Precautions when making connections oo Do not plug the unit in until after making all connections. oo Carefully read the manuals of the devices that you are connecting and follow their instructions when making connections. B Analog audio output connectors (L/R) The cartridge signal is output directly through the analog audio output connectors (L/R). Use the included RCA audio cable to connect other equipment to the output connectors of this unit. Use these when connecting to an amplifier or other equipment that has PHONO input connectors. When using the included cartridge (equivalent to MM), connect them to PHONO input connectors compatible with MM type input. When using an MC cartridge, connect them to PHONO input connectors compatible with MC type input. The PHONO input connectors of some equipment might be settable for use with either MM or MC type input. For details, refer to the operation manual of that equipment. oo The TN-550CA/B does not include a cartridge. C DC input connector After completing all other connections, connect the included AC adapter to this connector. Confirm that the power plug of the AC adapter is plugged into a power outlet. oo Unplug the power cord from the outlet when you are not planning to use the unit for an extended period of time. oo Do not use any AC adapter other than the one included. VV Be sure to connect the power cord to an AC outlet that supplies the correct voltage. Connection to an outlet that supplies incorrect voltage could cause fire or electric shock. Hold the power plug when plugging it into an outlet or unplugging it. Never pull or yank on the power cord. Unplug the power cord from the outlet when you are not planning to use the unit for an extended period of time. D STANDBY/ON button Press the STANDBY/ON button to turn the unit on or put it in standby. 8
-
 1
1 -
2
-
 3
3 -
 4
4 -
 5
5 -
 6
6 -
 7
7 -
 8
8 -
 9
9 -
 10
10 -
 11
11 -
 12
12 -
 13
13 -
14
-
15
-
16
-
17
-
18
-
19
-
20
-
21
-
22
-
23
-
24
-
25
-
26
-
27
-
28
-
29
-
30
-
31
-
32
-
33
-
34
-
35
-
36
-
37
-
38
-
39
-
40
-
41
-
42
-
43
-
44
-
45
-
46
-
47
-
48
-
49
-
50
-
51
-
52
-
53
-
54
-
55
-
56
-
57
-
58
-
59
-
60
-
61
-
62
-
63
-
64
-
65
-
66
-
67
-
68
-
69
-
70
-
71
-
72
-
73
-
74
-
75
-
76
 |
 |
