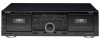
TEAC w-865r Owners Manual - Page 4

Table of Contents, Before Use - specifications

Page 4 highlights

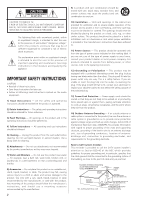
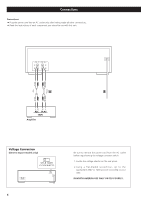
Table of Contents Before Use Thank you for choosing TEAC. Read this manual carefully to get the best performance from this unit. Before Use 4 Handling Cassette Tapes 5 Connections 6 Using the Remote Control Unit 7 Identifying the Parts 8 Display 10 Playback (either TAPE I or TAPE II 11 Continuous Playback 13 Blank Scan 13 Song Search 14 Intro Check 15 Recording (either TAPE I or TAPE II 16 Mic Mixing Recording 18 Continuous Recording 19 Dubbing (from TAPE I to TAPE II 20 Parallel Recording 20 Editing during Dubbing (only at normal speed 21 Synchro Reverse Dubbing (from TAPE I to TAPE II 22 Timer-Controlled Playback and Recording 24 Read this before operation < As the unit may become warm during operation, always leave sufficient space around the unit for ventilation. < The voltage supplied to the unit should match the voltage as printed on the rear panel. If you are in any doubt regarding this matter, consult an electrician. < Choose the installation location of your unit carefully. Avoid placing it in direct sunlight or close to a source of heat. Avoid locations subject to vibrations and excessive dust, heat, cold or moisture. < Do not place the unit on any other electronic components. < Do not open the cabinet as this might result in damage to the circuitry or electrical shock. If a foreign object should fall into the unit, contact your dealer or service company as soon as possible. < When removing the power plug from a wall outlet, always pull directly on the plug. Do not pull on the line cord. < Do not attempt to clean the unit with chemical solvents as this might damage the finish. Use a clean, dry, lint-free cloth. < Keep this manual in a safe place for future reference. Troubleshooting 25 Maintenance 26 Specifications 27 4

  • 1
  • 2
  • 3
  • 4
  • 5
  • 6
  • 7
  • 8
  • 9
  • 10
  • 11
  • 12
  • 13
  • 14
  • 15
  • 16
  • 17
  • 18
  • 19
  • 20
  • 21
  • 22
  • 23
  • 24
  • 25
  • 26
  • 27
  • 28
  • 29
  • 30
  • 31
  • 32
  • 33
  • 34
  • 35
  • 36
  • 37
  • 38
  • 39
  • 40
  • 41
  • 42
  • 43
  • 44
  • 45
  • 46
  • 47
  • 48
  • 49
  • 50
  • 51
  • 52
  • 53
  • 54
  • 55
  • 56
  • 57
  • 58
  • 59
  • 60
  • 61
  • 62
  • 63
  • 64
  • 65
  • 66
  • 67
  • 68
  • 69
  • 70
  • 71
  • 72
  • 73
  • 74
  • 75
  • 76
  • 77
  • 78
  • 79
  • 80
  • 81
  • 82
  • 83
  • 84
  • 85
  • 86
  • 87
  • 88
  • 89
  • 90
  • 91
  • 92
  • 93
  • 94
  • 95
  • 96
  • 97
  • 98
  • 99
  • 100
  • 101
  • 102
  • 103
  • 104
  • 105
  • 106
  • 107
  • 108
  • 109
  • 110
  • 111
  • 112
  • 113
  • 114
  • 115
  • 116
  • 117
  • 118
  • 119
  • 120
  • 121
  • 122
  • 123
  • 124
  • 125
  • 126
  • 127
  • 128
  • 129
  • 130
  • 131
  • 132
  • 133
  • 134
  • 135
  • 136
  • 137
  • 138
  • 139
  • 140
  • 141
  • 142
  • 143
  • 144
  • 145
  • 146
  • 147
  • 148

4
Table of Contents
Thank you for choosing TEAC. Read this manual carefully
to get the best performance from this unit.
Before Use
Read this before operation
<
As the unit may become warm during operation, always leave
sufficient space around the unit for ventilation.
<
The voltage supplied to the unit should match the voltage as
printed on the rear panel. If you are in any doubt regarding
this matter, consult an electrician.
<
Choose the installation location of your unit carefully. Avoid
placing it in direct sunlight or close to a source of heat. Avoid
locations subject to vibrations and excessive dust, heat, cold
or moisture.
<
Do not place the unit on any other electronic components.
<
Do not open the cabinet as this might result in damage to the
circuitry or electrical shock. If a foreign object should fall into
the unit, contact your dealer or service company as soon as
possible.
<
When removing the power plug from a wall outlet, always
pull directly on the plug. Do not pull on the line cord.
<
Do not attempt to clean the unit with chemical solvents as
this might damage the finish. Use a clean, dry, lint-free cloth.
<
Keep this manual in a safe place for future reference.
Before Use
. . . . . . . . . . . . . . . . . . . . . . . . . . . . . . . . . . . . . . . . 4
Handling Cassette Tapes . . . . . . . . . . . . . . . . . . . . . . . . . . . . . . 5
Connections . . . . . . . . . . . . . . . . . . . . . . . . . . . . . . . . . . . . . . . 6
Using the Remote Control Unit . . . . . . . . . . . . . . . . . . . . . . . . . 7
Identifying the Parts
. . . . . . . . . . . . . . . . . . . . . . . . . . . . . . . . . 8
Display . . . . . . . . . . . . . . . . . . . . . . . . . . . . . . . . . . . . . . . . . . 10
Playback (either TAPE I or TAPE II) . . . . . . . . . . . . . . . . . . . . . . 11
Continuous Playback. . . . . . . . . . . . . . . . . . . . . . . . . . . . . . . . 13
Blank Scan
. . . . . . . . . . . . . . . . . . . . . . . . . . . . . . . . . . . . . . . 13
Song Search . . . . . . . . . . . . . . . . . . . . . . . . . . . . . . . . . . . . . . 14
Intro Check. . . . . . . . . . . . . . . . . . . . . . . . . . . . . . . . . . . . . . . 15
Recording (either TAPE I or TAPE II) . . . . . . . . . . . . . . . . . . . . . 16
Mic Mixing Recording . . . . . . . . . . . . . . . . . . . . . . . . . . . . . . . 18
Continuous Recording
. . . . . . . . . . . . . . . . . . . . . . . . . . . . . . 19
Dubbing (from TAPE I to TAPE II). . . . . . . . . . . . . . . . . . . . . . . 20
Parallel Recording . . . . . . . . . . . . . . . . . . . . . . . . . . . . . . . . . . 20
Editing during Dubbing (only at normal speed) . . . . . . . . . . . . 21
Synchro Reverse Dubbing (from TAPE I to TAPE II) . . . . . . . . . . 22
Timer-Controlled Playback and Recording . . . . . . . . . . . . . . . . 24
Troubleshooting . . . . . . . . . . . . . . . . . . . . . . . . . . . . . . . . . . . 25
Maintenance. . . . . . . . . . . . . . . . . . . . . . . . . . . . . . . . . . . . . . 26
Specifications . . . . . . . . . . . . . . . . . . . . . . . . . . . . . . . . . . . . . 27