TP-Link TL-R460 User Guide - Page 39
Forwarding, 4.5.1 Virtual Servers
 |
UPC - 845973040031
View all TP-Link TL-R460 manuals
Add to My Manuals
Save this manual to your list of manuals |
Page 39 highlights
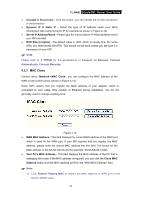
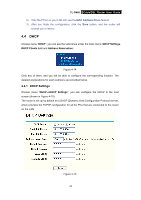
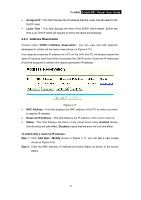
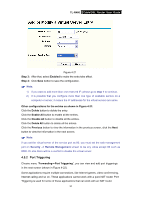
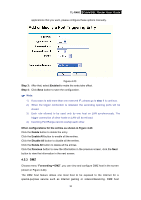
TL-R460 Cable/DSL Router User Guide Figure 4-18 Step 3: Click the Save button when finished. ) Note: 1) If you want to add more than one reserved IP, please go to step 1 to continue. 2) The function won't take effect until the router reboots. Other configurations for the entries as shown in Figure 4-17: Click the Delete button to delete the entry. Click the Enable All button to enable all the entries. Click the Disable All button to disable all the entries. Click the Delete All button to delete all the entries. Click the Previous button to view the information in the previous screen, click the Next button to view the information in the next screen. 4.5 Forwarding Choose menu "Forwarding", you can see the submenus under the main menu: Virtual Servers, Port Triggering, DMZ and UPnP. Figure 4-19 Click any of them, and you will be able to configure the corresponding function. The detailed explanations for each submenu are provided below. 4.5.1 Virtual Servers Choose menu "Forwarding→Virtual Servers", you can view and add virtual servers in the next screen (shown in Figure 4-20). 32
-
 1
1 -
2
-
3
-
4
-
5
-
6
-
7
-
8
-
9
-
10
-
11
-
12
-
13
-
14
-
15
-
16
-
17
-
18
-
19
-
20
-
21
-
22
-
23
-
24
-
25
-
26
-
27
-
28
-
29
-
30
-
31
-
32
-
33
-
 34
34 -
 35
35 -
 36
36 -
 37
37 -
 38
38 -
 39
39 -
 40
40 -
 41
41 -
 42
42 -
 43
43 -
 44
44 -
45
-
46
-
47
-
48
-
49
-
50
-
51
-
52
-
53
-
54
-
55
-
56
-
57
-
58
-
59
-
60
-
61
-
62
-
63
-
64
-
65
-
66
-
67
-
68
-
69
-
70
-
71
-
72
-
73
-
74
-
75
-
76
 |
 |
