Toshiba 42HL196 Operation Guide - Page 68
Setting up SMTP authentication - relay
 |
UPC - 022265240755
View all Toshiba 42HL196 manuals
Add to My Manuals
Save this manual to your list of manuals |
Page 68 highlights
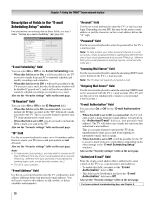
Chapter 7: Using the THINC™ home network feature Setting up SMTP authentication If your e-mail provider does not allow unknown e-mail clients to send e-mail through them (requires authentication), or uses port numbers different from the default, you will need to fill out the fields in the advanced section of the e-mail scheduler setup. To set up the SMTP authentication: 1 Repeat steps 1-4 of "Setting up E-mail Scheduling." 2 Press the B, b, C and c buttons on your remote to get to the Advanced button on the screen and press T. Another E-mail Scheduling Setup window will appear. E-mail Scheduling Setup Please enter your E-mail Setup Information. SMTP Authentication SMTP Username SMTP Password POP port number SMTP port number Check for new emails every Off 110 25 5 min Check for e-mails every: This field controls the frequency of checking e-mail. Options are 5 min, 15 min, 30 min and 1 hour. 4 When you are finished, highlight Basic and press T to return to the E-mail Scheduling Setup window. Your entries will not be saved until you highlight Done and press T. To exit the window without saving any entries, highlight Cancel and press T. Note: There are several techniques used for SMTP authentication by e-mail providers. Only the most commonly used (Network address based, "POP before SMTP" and "AUTH LOGIN") techniques are provided for your TV e-mail scheduler. SSL / TLS are currently not supported. Basic 3 Enter the data in the fields as you did in step 5 of "Setting up E-mail Scheduling." The fields and their descriptions are as follows: SMTP Authentication: This field controls the SMTP authentication feature. This is turned OFF by default. Setting this to "Same as POP" fills the SMTP Username and SMTP Password fields with the data filled in the "Account" and "Password" fields. Select "Different" if the username and password for your outgoing (SMTP) mail server are different from your incoming (POP3) mail server. SMTP Username: This field holds the user name required by the SMTP (outgoing email) server. This is typically the same as the "Account" field, but may be different depending on the ISP / SMTP server used. This field is enabled only if SMTP authentication field above is set to "Different". SMTP Password: This field holds the password required by the SMTP server. This is typically the same as the "Password" field used to receive e-mails, but may be different depending on the ISP / SMTP server used. This field is enabled only if SMTP authentication field above is set to "Different". POP Port number: Denotes the port number used by the user's POP3 (incoming mail) server. This is set to 110 by default. SMTP Port number: Denotes the port number used by the user's SMTP (outgoing mail) server. This is set to 25 by default. Some ISPs block this port to prevent mail relay attacks and specify an alternative port. 68
-
 1
1 -
2
-
3
-
4
-
5
-
6
-
7
-
8
-
9
-
10
-
11
-
12
-
13
-
14
-
15
-
16
-
17
-
18
-
19
-
20
-
21
-
22
-
23
-
24
-
25
-
26
-
27
-
28
-
29
-
30
-
31
-
32
-
33
-
34
-
35
-
36
-
37
-
38
-
39
-
40
-
41
-
42
-
43
-
44
-
45
-
46
-
47
-
48
-
49
-
50
-
51
-
52
-
53
-
54
-
55
-
56
-
57
-
58
-
59
-
60
-
61
-
62
-
 63
63 -
 64
64 -
 65
65 -
 66
66 -
 67
67 -
 68
68 -
 69
69 -
 70
70 -
 71
71 -
 72
72 -
 73
73 -
74
-
75
-
76
-
77
-
78
-
79
-
80
-
81
-
82
-
83
-
84
-
85
-
86
 |
 |
