Toshiba Air10 User Guide - Page 52
Using CAMILEO® AIR10 Connect via Wi-Fi® (Infrastructure mode)
 |
View all Toshiba Air10 manuals
Add to My Manuals
Save this manual to your list of manuals |
Page 52 highlights
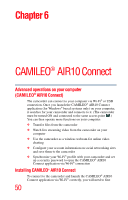
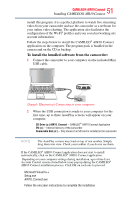
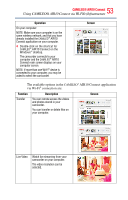
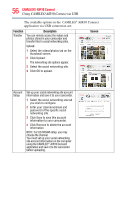
52 CAMILEO® AIR10 Connect Using CAMILEO® AIR10 Connect via Wi-Fi® (Infrastructure mode) To Install the bundled software from the included CD: 1 Insert the CD into your computer's optical disk drive. The AutoPlay screen appears. 2 Click Install CAMILEO® AIR10 Connect to install the application. NOTE ❖ If ArcSoft MediaImpression® is not installed, the CAMILEO® AIR10 Connect program will install the H.264 Codec (ffdshow-a free software under GPL license) to view videos correctly. ❖ In order for video chatting to function properly, you need to log out/quit the Instant Message (IM) application before the installation. ❖ During the installation, a warning message may appear. Click Continue Anyway/Yes to go on the installation. ❖ CAMILEO® AIR10 Connect is for Windows® based systems only. Using CAMILEO® AIR10 Connect via Wi-Fi® (Infrastructure mode) Follow the steps below to successfully connect to an available AP. Operation On you camcorder: 1 In Record mode, press the MENU/OK button. The Menu screen appears. 2 Use the Directional buttons to select the Wi-Fi ( ) icon, and then press the OK button to display the available AP list. 3 Select the available access point (Network), see "Wi-Fi® Functions" on page 58. Screen
-
 1
1 -
2
-
3
-
4
-
5
-
6
-
7
-
8
-
9
-
10
-
11
-
12
-
13
-
14
-
15
-
16
-
17
-
18
-
19
-
20
-
21
-
22
-
23
-
24
-
25
-
26
-
27
-
28
-
29
-
30
-
31
-
32
-
33
-
34
-
35
-
36
-
37
-
38
-
39
-
40
-
41
-
42
-
43
-
44
-
45
-
46
-
 47
47 -
 48
48 -
 49
49 -
 50
50 -
 51
51 -
 52
52 -
 53
53 -
 54
54 -
 55
55 -
 56
56 -
 57
57 -
58
-
59
-
60
-
61
-
62
-
63
-
64
-
65
-
66
-
67
-
68
-
69
-
70
-
71
-
72
-
73
-
74
 |
 |