Toshiba P47LSB User Manual - Page 20
Main Menu, MENU], Information, Display, PIP Control, OSD control, Others
 |
View all Toshiba P47LSB manuals
Add to My Manuals
Save this manual to your list of manuals |
Page 20 highlights
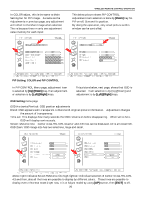
All the functions below are remote control white area/side key possible operations. As for the Pro-Adjust buttons (black colored area), refer to the RS232C section, from P.27, the OSD becomes different from Normal adjustment mode. Main Menu: Contains 5 different page icons to make adjustments Press the [MENU] then OSD picture appears, this icon indicates "information" page. No adjustment function, just to see the signal received. This icon indicates "Main input" related place. Input selection or main picture adjustment is possible. As for the adjustment, Brightness, Contrast, Hue, Saturation, Flesh-Tone and Black Level can be adjusted. There are a total of 5 menus, Information Menu, Display Menu, PIP Control Menu, OSD control Menu and Others Menu. Each these menus has branch adjustments for picture quality. The 3rd from top, this icon has PIP selection, adjustments and controls. The 4th icon indicates OSD adjust mode, On-Screen-Display Menu, size and position control. The bottom most icon is for factory reset or some other items. In this page, a language selection in which English, Japanese and Chinese can be set, and some more items be found. These items are explained in the reference chart on the next page. Wireless remote control, operation keys with enlarged (above picture) silver colored background, Normal adjustments area is shown. These buttons have partially similar operation with old wireless remote control, shown at right. For the adjustments explained from this page up to upper part of page 26, only enlarged, silver colored area, these keys are used. Actually, [MENU], [UP], [DOWN], [LEFT], [RIGHT], [ENTER] and [EXIT] are used. This is normal adjustment area. These keys in black colored area, they are Pro-Adjust area and different OSD will appear which is the same to RS-232C control operation. During the adjustment operation in this normal area, do not use colored area keys, this Pro-adjust operation method is different from normal mode, thus, once [MENU] has pressed, then black area keys are disabled. 20
-
 1
1 -
2
-
3
-
4
-
5
-
6
-
7
-
8
-
9
-
10
-
11
-
12
-
13
-
14
-
 15
15 -
 16
16 -
 17
17 -
 18
18 -
 19
19 -
 20
20 -
 21
21 -
 22
22 -
 23
23 -
 24
24 -
 25
25 -
26
-
27
-
28
-
29
-
30
-
31
-
32
-
33
-
34
-
35
-
36
-
37
-
38
-
39
-
40
-
41
-
42
-
43
-
44
-
45
-
46
 |
 |
