Toshiba P47LSB User Manual - Page 25
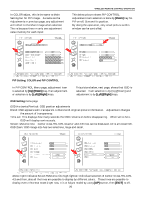
OSD Setting, PiP Setting, COLOR and PiP CONTROL
 |
View all Toshiba P47LSB manuals
Add to My Manuals
Save this manual to your list of manuals |
Page 25 highlights
In COLOR adjust, this is the same to Main Setting but for PiP image. As same as the Adjustments in previous page, any adjustment will reflect to the Main Image when selected. This is because there in only one adjustment value memory for each input. WIRELESS REMOTE CONTROL OPERATION This below picture shows PiP CONTROL. Adjustment item selection is done by [Down] key for. PiP on-off, Size and its position. By doing this operation, only small picture within window can be controlled. PiP Setting, COLOR and PiP CONTROL In PiP CONTROL Menu page, adjustment item is selected by [Up]/[Down] key, then adjustment or selection is by [Left]/[Right] keys. This picture below, next page, shows that OSD is selected. Item selection is by [Up]/[Down] and adjustment is by [Left]/[Right] keys. OSD Setting menu page OSD Horizontal/Vertical: OSD position adjustments Blend: OSD appears semi-transparent to blend with original picture information. Adjustment changes the amount of transparency. Time out: This displays how many seconds the OSD remains on before disappearing. When set to Zero, OSD will display continuously. Screen reference line: Center cross, 5%, 10%, Quarter and 4:3 lines can be displayed. All is all except Qtr. OSD Zoom: OSD image size has two selections, large and small. Above right indicates Screen Reference line high-lighted. Individual selection of Center Cross, 5%, 10%, 4:3 and then, also all the lines are possible to display by different colors. These lines are possible to display even in Normal mode (right now, it is in Adjust mode) by using [UP] button, then [EXIT] to off. 25
-
 1
1 -
2
-
3
-
4
-
5
-
6
-
7
-
8
-
9
-
10
-
11
-
12
-
13
-
14
-
15
-
16
-
17
-
18
-
19
-
 20
20 -
 21
21 -
 22
22 -
 23
23 -
 24
24 -
 25
25 -
 26
26 -
 27
27 -
 28
28 -
 29
29 -
 30
30 -
31
-
32
-
33
-
34
-
35
-
36
-
37
-
38
-
39
-
40
-
41
-
42
-
43
-
44
-
45
-
46
 |
 |
