Toshiba P47LSB User Manual - Page 23
When in Main Setting
 |
View all Toshiba P47LSB manuals
Add to My Manuals
Save this manual to your list of manuals |
Page 23 highlights
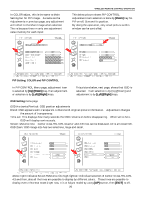
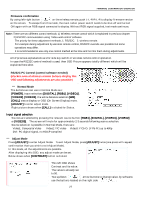
WIRELESS REMOTE CONTROL OPERATION The below left shows when Contrast is selected and high-lighted, then [LFFT]/[RIGHT] are to adjust values. Use [EXIT] when done. When exit from this DISPLAY mode, then the size of frame becomes smaller, refer to the previous page, lower right picture where DISPLAY frame is smaller. By using [RIGHT] key, selection moves to the IMAGE area. Refer to above right. In this page, the picture size can be set to have different scaling effect. Auto Adjust is to set Phase and Clock automatically but also manual setting is possible to shut-off this function. Staying in IMAGE page and pressing [DOWN] key enters to Scaling selection mode. There are selections of different image size/shape and they are: 1:1 This will display dot to dot image. The models P42 and P47 have 1920x1080 pixels and supplied signal was 1280x1024, the image will be displayed by little small 1280x1024 area only, surrounding black area. Fill Whatever the signal resolution, the image is expanded to 1920x1080 possibly scaling up so that vertical/horizontal ratio may be different. Aspect This mode will display as not as 16:9 picture ratio that screen has but keeping an original Aspect ratio such as 4:3 picture will appear as expanded but keeping 4:3 image ratio. When confirming picture/image size based on above selection, it is possible to confirm by pressing [ENTER] button, the new picture size appears. POSITION menu page When in Main Setting, [POSITION] selection displays below left (in next page), for picture sizing by Zoom function is possible. When Zoom is operated, with this menu, horizontal and vertical sizes move together at the same rate. Smaller than the original picture size is not possible. When enlarged by Zoom function, then, where to see the zoomed picture, is controlled by Zoom Vertical/Horizontal Pan. The Horizontal and Vertical position adjustment is also placed in this page. Use [EXIT] twice escaping from any adjustment mode. In some pictures, at bottom area, there is an operation guide area where which button is to be used. Before pushing [ENTER] button and after, this operation guide changes its indication, there are mostly two different indications as indicated by (1) or (2). 23
-
 1
1 -
2
-
3
-
4
-
5
-
6
-
7
-
8
-
9
-
10
-
11
-
12
-
13
-
14
-
15
-
16
-
17
-
 18
18 -
 19
19 -
 20
20 -
 21
21 -
 22
22 -
 23
23 -
 24
24 -
 25
25 -
 26
26 -
 27
27 -
 28
28 -
29
-
30
-
31
-
32
-
33
-
34
-
35
-
36
-
37
-
38
-
39
-
40
-
41
-
42
-
43
-
44
-
45
-
46
 |
 |
