Toshiba P47LSB User Manual - Page 22
Entering to the adjustment MENU
 |
View all Toshiba P47LSB manuals
Add to My Manuals
Save this manual to your list of manuals |
Page 22 highlights
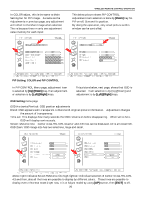
WIRELESS REMOTE CONTROL OPERATION Entering to the adjustment MENU Arrow mark (red) indicates "Selected and Highlighted" When [MENU] button is pushed, Display enters Display Information page as below left, no adjustment functions placed in here. By using [DOWN] key, below right picture appears, this is input selection page. Above right shows that [ENTER] or [MENU] button is pressed, Main Setting page appears, a resolution of the signal is indicated and Input terminal icons. By using [LEFT], [RIGHT] keys, input can be set to the others, in here below left, Composite is selected and high-lighted. Now, go back by selecting RGB and [EXIT] from this Input selection. When [RIGHT] is pressed, the picture below right appears where this DISPLY menu page includes Brightness/Contrast/Hue/Saturation/Flesh-Tone/Black Level adjustments. Use [ENTER] or [MENU] to do adjustments. Item selection from these 6 items is done by [UP]/[DOWN] key. To escape from any adjustment such as Brightness, [EXIT] key is to be pushed. With this new remote control, some actions to use [ENTER] key, [MENU] also takes place. When Input selection menu is selected When DISPLAY menu is selected Once the adjustment item is selected by [UP] or [DOWN] key, press the [LEFT] or [RIGHT] key to make the value change. Note that these [UP]/[DOWN]/[LEFT]/[RIGHT] keys are center located adjustment key surrounding [MENU] key inside, refer to the above right picture of the remote control, to make easy to notice, the keys which are used in this operation are indicated by red color. (actual remote control is not colored red) Press the [EXIT] key to leave from this mode. In these adjustments, only red colored keys are used to perform adjustments. Other keys in black colored area, they are different adjustment OSD, Pro-Adjust area. When using the wireless remote control, the adjusted value will be automatically saved into memory. 22
-
 1
1 -
2
-
3
-
4
-
5
-
6
-
7
-
8
-
9
-
10
-
11
-
12
-
13
-
14
-
15
-
16
-
 17
17 -
 18
18 -
 19
19 -
 20
20 -
 21
21 -
 22
22 -
 23
23 -
 24
24 -
 25
25 -
 26
26 -
 27
27 -
28
-
29
-
30
-
31
-
32
-
33
-
34
-
35
-
36
-
37
-
38
-
39
-
40
-
41
-
42
-
43
-
44
-
45
-
46
 |
 |
