Toshiba P47LSB User Manual - Page 43
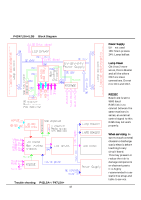
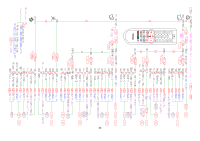
power supply for P42LSA+, P47LSA+, LSB models.
 |
View all Toshiba P47LSB manuals
Add to My Manuals
Save this manual to your list of manuals |
Page 43 highlights
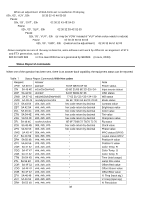
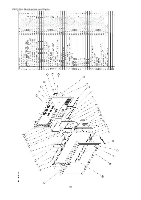
Before locating the trouble, the 1st thing will be to reset the panel and check if the condition is the same or not. Should the same failure persist, a rewrite of the firmware may be required to confirm the function. 1. Resetting 1. Turn OFF and then ON again, re-confirm the function. Use wireless remote to reset. Also side key too. 2. Rewrite firmware or replace E-PROM chip. 2. DC voltage check 1. Check the 24V and 18V DC outputs from switching power supply for P42LSA+, P47LSA+, LSB models. Power supply output for 18V to supply main/LVDS circuits and 24V for Lamp need to check at first. 2. Check the 24V and 18V voltages at the other side of the wires. There may be a bad connection or connector has become loose by vibration. Try again to re-insert all the connectors so that any bad contact may be found during the process. If there is no voltage, check the fuse in the power supply. If fuse is brown, replace it. If fuse brown again, The power supply unit has problem inside. Replace the power unit with the same type. OR If the fuse is OK but there is no output voltage or much lower than the rated value, then switching regulator may not be switching correctly, replace the power supply unit. 3. Signal check 1. Using an oscilloscope, check the RGB or Video signal waveform. The check points are at each input pins, be sure to supply input signals before the test. Also, check the output at CN2 (LCD Drive Signal). 2. Check if internal test signal appears or not, by pressing I/R wireless remote control, ENTER and EXIT Key with the sequence of ENTER, ENTER, EXIT, EXIT, ENTER and EXIT. The monitor will enter its Test mode and display internal test signal, these are mostly flat field, white, red, green and also some mixed colors. This is to check if the LCD drive area is OK or not. To escape from this operation, Shut-off panel main rocker switch and turn it on again with the RGB signal supplied. Try to replace the related circuit board or boards to check. The repair method is board replacement, since the chip parts are so small and very difficult to replace. 4. Ballast failure When lamps do not turn on, lamp ballast may be problematic. There are two boards located at right/left and one of the side, the power supply connector has little more wires, this is connected to the master. To check, replace one by one for ballast boards, one board might be broken. 5. LCD panel failure When the picture appeared as solid vertical or horizontal lines, the LCD drive circuit or LCD might be damaged. In this case, LCD panel assembly replacement is necessary. Please contact the Toshiba dealer for repair action. Discard of the product Please refer to the page 5, this product has fluorescent lamps inside that contain a small amount of mercury in liquid or vapor form. Discard this product in accordance with government regulations or return to Toshiba. 43
-
 1
1 -
2
-
3
-
4
-
5
-
6
-
7
-
8
-
9
-
10
-
11
-
12
-
13
-
14
-
15
-
16
-
17
-
18
-
19
-
20
-
21
-
22
-
23
-
24
-
25
-
26
-
27
-
28
-
29
-
30
-
31
-
32
-
33
-
34
-
35
-
36
-
37
-
 38
38 -
 39
39 -
 40
40 -
 41
41 -
 42
42 -
 43
43 -
 44
44 -
 45
45 -
 46
46
 |
 |
