Toshiba P47LSB User Manual - Page 27
Firmware confirmation, RS232C PC Control control software needed, Normal Mode, Adjust Mode
 |
View all Toshiba P47LSB manuals
Add to My Manuals
Save this manual to your list of manuals |
Page 27 highlights
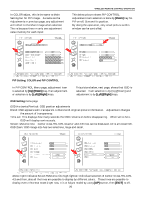
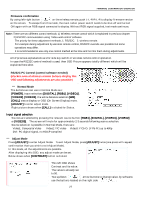
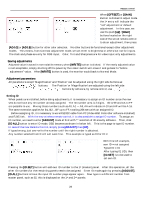
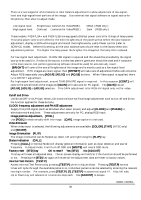
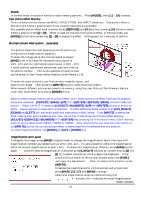
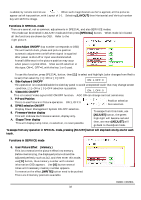
FIRMWARE CONFIRMATION OPERATION Firmware confirmation By using left-right button on the wireless remote, push L-L-R-R-L-R to display firmware version on the screen. To escape from this mode, the main rocker power switch needs to be shut-off and turned ON again with an RGB signal connected to display. Without RGB signal supplied, test mode continues. Note: There are two different control methods; 1) Wireless remote control which is explained in previous chapter 2) RS232C communication using 'Video-wall control' software. The priority for these adjustment methods, 1. RS232C 2. wireless remote. For example during adjustment by wireless remote control, RS232C override use possible but some operations may differ. It is recommended to use only one control method at the time and not mix them during adjustments. All of previous explanations are for side key switch or wireless remote control operation. In case the RS232C control method is used, then OSD Picture appears totally different which will be explained here after. RS232C PC Control (control software needed) (blacken area of wireless remote buttons display this OSD and following adjustments are also possible) *** Normal Mode The buttons we can use in Normal Mode are: [POWER], Input selections [DIGITAL], [RGB1], [VIDEO1], [VIDEO2], [VIDEO3], the white balance selection [WB], [CALL] status display or OSD (On Screen Display) mute, [ADJUST] to enter adjust mode. Right picture shows when [CALL] is clicked for Status. Input signal selection Sources are selected by pressing the relevant source button: [RGB1], [DIGITAL], [VIDEO1], [VIDEO2] or [VIDEO3]. The screen will mute for approximately 2-3 seconds following source selection. Source selection is possible in Normal Mode, there are: Video1: Composite Video Video2: Y/C video Video3: Y-Cb-Cr (Y-Pb-Pr) up to 480p DVI: PC digital signal, no HDCP complied *** Adjust Mode Press [ADJUST] to enter Adjust Mode. To exit Adjust Mode, press [ADJUST] twice (one press will request confirmation that you wish to exit Adjust Mode). In this mode, all the adjustments are possible. After displaying this OSD, any adjust mode can be set. Below shows when [CONTRAST] button is clicked. This left OSD shows Contrast and its value. The value is already set to 50. Two up/down arrow buttons to change value, by software, use the buttons located on the right side . 27
-
 1
1 -
2
-
3
-
4
-
5
-
6
-
7
-
8
-
9
-
10
-
11
-
12
-
13
-
14
-
15
-
16
-
17
-
18
-
19
-
20
-
21
-
 22
22 -
 23
23 -
 24
24 -
 25
25 -
 26
26 -
 27
27 -
 28
28 -
 29
29 -
 30
30 -
 31
31 -
 32
32 -
33
-
34
-
35
-
36
-
37
-
38
-
39
-
40
-
41
-
42
-
43
-
44
-
45
-
46
 |
 |
