Western Digital WDBACA0010BBK Instruction Manual - Page 110
Photos Options, See Rotate Left & Right
 |
UPC - 718037772370
View all Western Digital WDBACA0010BBK manuals
Add to My Manuals
Save this manual to your list of manuals |
Page 110 highlights
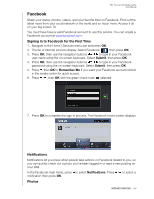
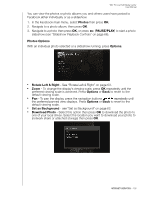
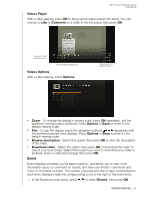
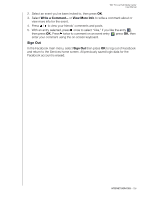
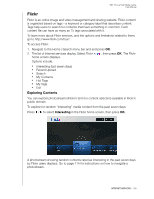
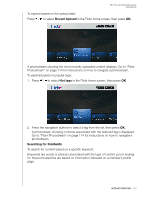
WD TV Live Hub Media Center User Manual You can view the photos or photo albums you and others users have posted to Facebook either individually or as a slideshow. 1. In the Facebook main menu, select Photos then press OK. 2. Navigate to a photo album, then press OK. 3. Navigate to a photo then press OK, or press (PAUSE/PLAY) to start a photo slideshow (see "Slideshow Playback Controls" on page 66). Photos Options With an individual photo selected or a slideshow running, press Options. „ Rotate Left & Right - See "Rotate Left & Right" on page 63. „ Zoom - To change the display's viewing scale, press OK repeatedly until the preferred viewing scale is achieved. Press Options or Back to revert to the default viewing scale. „ Pan - To pan the display, press the navigation buttons repeatedly until the preferred panned view displays. Press Options or Back to revert to the default viewing scale. „ Set as Background - see "Set as Background" on page 62. „ Download Photo - Select this option then press OK to download the photo to one of your local drives. Select the location you want to download your photo to (network share or attached storage) then press OK. INTERNET SERVICES - 105
-
 1
1 -
2
-
3
-
4
-
5
-
6
-
7
-
8
-
9
-
10
-
11
-
12
-
13
-
14
-
15
-
16
-
17
-
18
-
19
-
20
-
21
-
22
-
23
-
24
-
25
-
26
-
27
-
28
-
29
-
30
-
31
-
32
-
33
-
34
-
35
-
36
-
37
-
38
-
39
-
40
-
41
-
42
-
43
-
44
-
45
-
46
-
47
-
48
-
49
-
50
-
51
-
52
-
53
-
54
-
55
-
56
-
57
-
58
-
59
-
60
-
61
-
62
-
63
-
64
-
65
-
66
-
67
-
68
-
69
-
70
-
71
-
72
-
73
-
74
-
75
-
76
-
77
-
78
-
79
-
80
-
81
-
82
-
83
-
84
-
85
-
86
-
87
-
88
-
89
-
90
-
91
-
92
-
93
-
94
-
95
-
96
-
97
-
98
-
99
-
100
-
101
-
102
-
103
-
104
-
 105
105 -
 106
106 -
 107
107 -
 108
108 -
 109
109 -
 110
110 -
 111
111 -
 112
112 -
 113
113 -
 114
114 -
 115
115 -
116
-
117
-
118
-
119
-
120
-
121
-
122
-
123
-
124
-
125
-
126
-
127
-
128
-
129
-
130
-
131
-
132
-
133
-
134
-
135
-
136
-
137
-
138
-
139
-
140
-
141
-
142
-
143
-
144
-
145
-
146
-
147
-
148
-
149
-
150
-
151
-
152
-
153
-
154
-
155
-
156
-
157
-
158
-
159
-
160
-
161
-
162
-
163
-
164
-
165
-
166
-
167
-
168
-
169
-
170
-
171
-
172
-
173
-
174
-
175
-
176
-
177
-
178
-
179
-
180
-
181
-
182
-
183
-
184
-
185
-
186
-
187
-
188
-
189
-
190
-
191
-
192
-
193
-
194
-
195
-
196
-
197
-
198
-
199
-
200
-
201
-
202
-
203
-
204
-
205
-
206
-
207
-
208
-
209
-
210
-
211
-
212
-
213
-
214
-
215
-
216
-
217
-
218
-
219
-
220
-
221
-
222
-
223
-
224
-
225
-
226
-
227
-
228
-
229
-
230
-
231
-
232
-
233
-
234
-
235
-
236
-
237
-
238
-
239
-
240
-
241
 |
 |