Western Digital WDBACA0010BBK Instruction Manual - Page 23
Step 3 - Loading Content On Your Media Center, Windows, Start, Programs > WD Link > WD Link
 |
UPC - 718037772370
View all Western Digital WDBACA0010BBK manuals
Add to My Manuals
Save this manual to your list of manuals |
Page 23 highlights
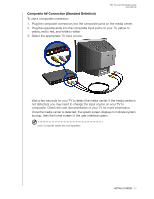
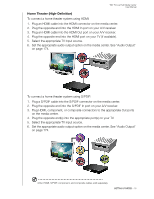
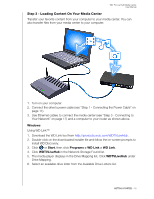
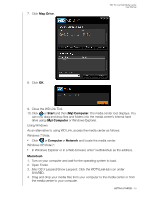
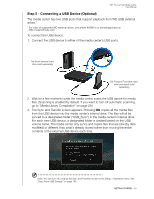
WD TV Live Hub Media Center User Manual Step 3 - Loading Content On Your Media Center Transfer your favorite content from your computer to your media center. You can also transfer files from your media center to your computer. 1. Turn on your computer. 2. Connect the drive's power cable (see "Step 1 - Connecting the Power Cable" on page 11). 3. Use Ethernet cables to connect the media center (see "Step 3 - Connecting to Your Network" on page 17) and a computer to your router as shown above. Windows Using WD Link™ 1. Download the WD Link tool from http://products.wdc.com/WDTVLiveHub. 2. Double-click on the downloaded installer file and follow the on-screen prompts to install WD Discovery. 3. Click or Start, then click Programs > WD Link > WD Link. 4. Click WDTVLiveHub in the Network Storage Found list. 5. The media player displays in the Drive Mapping list. Click WDTVLiveHub under Drive Mapping. 6. Select an available drive letter from the Available Drive Letters list. GETTING STARTED - 18
-
 1
1 -
2
-
3
-
4
-
5
-
6
-
7
-
8
-
9
-
10
-
11
-
12
-
13
-
14
-
15
-
16
-
17
-
 18
18 -
 19
19 -
 20
20 -
 21
21 -
 22
22 -
 23
23 -
 24
24 -
 25
25 -
 26
26 -
 27
27 -
 28
28 -
29
-
30
-
31
-
32
-
33
-
34
-
35
-
36
-
37
-
38
-
39
-
40
-
41
-
42
-
43
-
44
-
45
-
46
-
47
-
48
-
49
-
50
-
51
-
52
-
53
-
54
-
55
-
56
-
57
-
58
-
59
-
60
-
61
-
62
-
63
-
64
-
65
-
66
-
67
-
68
-
69
-
70
-
71
-
72
-
73
-
74
-
75
-
76
-
77
-
78
-
79
-
80
-
81
-
82
-
83
-
84
-
85
-
86
-
87
-
88
-
89
-
90
-
91
-
92
-
93
-
94
-
95
-
96
-
97
-
98
-
99
-
100
-
101
-
102
-
103
-
104
-
105
-
106
-
107
-
108
-
109
-
110
-
111
-
112
-
113
-
114
-
115
-
116
-
117
-
118
-
119
-
120
-
121
-
122
-
123
-
124
-
125
-
126
-
127
-
128
-
129
-
130
-
131
-
132
-
133
-
134
-
135
-
136
-
137
-
138
-
139
-
140
-
141
-
142
-
143
-
144
-
145
-
146
-
147
-
148
-
149
-
150
-
151
-
152
-
153
-
154
-
155
-
156
-
157
-
158
-
159
-
160
-
161
-
162
-
163
-
164
-
165
-
166
-
167
-
168
-
169
-
170
-
171
-
172
-
173
-
174
-
175
-
176
-
177
-
178
-
179
-
180
-
181
-
182
-
183
-
184
-
185
-
186
-
187
-
188
-
189
-
190
-
191
-
192
-
193
-
194
-
195
-
196
-
197
-
198
-
199
-
200
-
201
-
202
-
203
-
204
-
205
-
206
-
207
-
208
-
209
-
210
-
211
-
212
-
213
-
214
-
215
-
216
-
217
-
218
-
219
-
220
-
221
-
222
-
223
-
224
-
225
-
226
-
227
-
228
-
229
-
230
-
231
-
232
-
233
-
234
-
235
-
236
-
237
-
238
-
239
-
240
-
241
 |
 |
