Xerox 8560MFP User Guide - Page 158
Adding a Group
 |
UPC - 095205428841
View all Xerox 8560MFP manuals
Add to My Manuals
Save this manual to your list of manuals |
Page 158 highlights
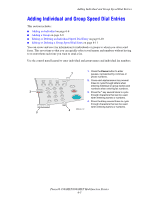
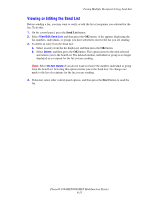
Adding Individual and Group Speed Dial Entries Adding a Group Set up and save group names to easily access them when you want to send a fax to a group. Groups can include both individual and group entries once they have been set up. Note: Individual entries must be set up before groups can be defined. Using the Control Panel Use the control panel to add or remove individuals or groups from the speed dial group. Setting Up a Group To set up a group: 1. On the control panel, press the Speed Dial button. 2. Select Group, and then press the OK button. 3. Select a blank number in the list displayed, and then press the OK button. 4. Using the alphanumeric keypad, enter a group name, and then press the OK button. 5. To add individuals to this group: a. Select Add Individual, and then press the OK button. This option appears when one or more individuals can be added to this group. b. Select an individual from the list displayed, and then press the OK button. c. Repeat the above steps to continue adding individuals to the group. 6. To add a group to this group: a. Select Add Group, and then press the OK button. This option appears when one or more groups can be added to this group. b. Select a group from the list displayed, and then press the OK button. c. Repeat the above steps to continue adding groups to the group. 7. When you have finished adding individuals and other groups, select Done, and then press the OK button. Phaser® 8560MFP/8860MFP Multifunction Printer 6-8
-
 1
1 -
2
-
3
-
4
-
5
-
6
-
7
-
8
-
9
-
10
-
11
-
12
-
13
-
14
-
15
-
16
-
17
-
18
-
19
-
20
-
21
-
22
-
23
-
24
-
25
-
26
-
27
-
28
-
29
-
30
-
31
-
32
-
33
-
34
-
35
-
36
-
37
-
38
-
39
-
40
-
41
-
42
-
43
-
44
-
45
-
46
-
47
-
48
-
49
-
50
-
51
-
52
-
53
-
54
-
55
-
56
-
57
-
58
-
59
-
60
-
61
-
62
-
63
-
64
-
65
-
66
-
67
-
68
-
69
-
70
-
71
-
72
-
73
-
74
-
75
-
76
-
77
-
78
-
79
-
80
-
81
-
82
-
83
-
84
-
85
-
86
-
87
-
88
-
89
-
90
-
91
-
92
-
93
-
94
-
95
-
96
-
97
-
98
-
99
-
100
-
101
-
102
-
103
-
104
-
105
-
106
-
107
-
108
-
109
-
110
-
111
-
112
-
113
-
114
-
115
-
116
-
117
-
118
-
119
-
120
-
121
-
122
-
123
-
124
-
125
-
126
-
127
-
128
-
129
-
130
-
131
-
132
-
133
-
134
-
135
-
136
-
137
-
138
-
139
-
140
-
141
-
142
-
143
-
144
-
145
-
146
-
147
-
148
-
149
-
150
-
151
-
152
-
 153
153 -
 154
154 -
 155
155 -
 156
156 -
 157
157 -
 158
158 -
 159
159 -
 160
160 -
 161
161 -
 162
162 -
 163
163 -
164
-
165
-
166
-
167
-
168
-
169
-
170
-
171
-
172
-
173
-
174
-
175
-
176
-
177
-
178
-
179
-
180
-
181
-
182
-
183
-
184
-
185
-
186
-
187
-
188
-
189
-
190
-
191
-
192
-
193
-
194
-
195
-
196
-
197
-
198
-
199
-
200
-
201
-
202
-
203
-
204
-
205
-
206
-
207
-
208
-
209
-
210
-
211
-
212
-
213
-
214
-
215
-
216
-
217
-
218
-
219
-
220
-
221
-
222
-
223
-
224
-
225
-
226
-
227
-
228
-
229
-
230
-
231
-
232
-
233
-
234
-
235
-
236
-
237
-
238
-
239
-
240
-
241
-
242
-
243
-
244
-
245
-
246
-
247
-
248
-
249
-
250
-
251
-
252
-
253
-
254
-
255
-
256
-
257
-
258
-
259
-
260
-
261
-
262
-
263
-
264
-
265
-
266
-
267
-
268
-
269
-
270
-
271
-
272
-
273
-
274
-
275
-
276
-
277
-
278
-
279
-
280
-
281
 |
 |